There’s something about banana pudding that feels like a warm hug in dessert form. Creamy layers, sweet banana slices, and cookie crumbles come together in every bite pure comfort. But if you’ve ever loved the classic and wished it could fit into your healthy lifestyle, this Healthy Banana Pudding is your dream come true.
Made for cozy nights, Sunday meal prep, or when cravings strike midweek, this recipe delivers the same rich, nostalgic flavour without the sugar crash. It’s high in protein, naturally sweetened, and thick enough to scoop like the indulgent pudding you remember from childhood.
You’ll love how the creamy pudding base comes from simple ingredients like almond milk, ripe bananas, and vanilla protein powder, all thickened to perfection. Topped with a fluffy Greek yogurt mousse and a sprinkle of better for you wafers, it’s proof that healthy can look and taste luxurious.
Whether you’re meal-prepping dessert or serving it to impress, this pudding checks every box: creamy, wholesome, crave-worthy, and shockingly good for you.
Why You’ll Love This Recipe
- It captures the nostalgia without the guilt: This pudding has the same comforting layers you remember from childhood creamy vanilla custard, sweet banana slices, and soft crumbles of wafers yet it’s made with nourishing ingredients you can feel proud of. Every spoonful tastes like a throwback dessert, but it’s built for your healthy, intentional lifestyle.
- Rich and creamy with a protein boost: You won’t believe how thick and luscious the texture is, thanks to the blend of almond milk, vanilla protein powder, and Greek yogurt. Each serving offers a satisfying dose of protein that keeps you full longer, turning a simple treat into a smart snack or post-dinner reward.
- Naturally sweetened and balanced: Instead of refined sugar, this pudding uses ripe bananas and monk fruit or allulose for just the right sweetness no sugar spikes, no energy crashes. It’s dessert that supports your goals, not one that derails them.
- Meal prep friendly and beautiful to serve: Whether you layer it into jars for the week or scoop it into a pretty bowl for guests, it keeps well and holds its gorgeous texture. It’s perfect for busy weeks, family gatherings, or when you want a dessert that looks as good as it tastes.
- Simple ingredients, stunning results: No complicated steps or fancy tools just wholesome pantry staples turned into a creamy, dreamy banana pudding that looks straight out of a bakery display. You’ll be amazed at how easy it is to create something this indulgent yet balanced.
Key Ingredients Breakdown
- Ripe Bananas
The heart of this pudding. Ripe bananas bring natural sweetness and that iconic banana flavor without the need for added sugar. They also add a silky texture that blends beautifully into the custard base. Look for bananas with plenty of brown freckles they’re softer, sweeter, and perfect for creating that melt in your mouth consistency you see in the inspo photo.
- Vanilla Protein Powder
This is where the magic happens. It transforms a simple dessert into a satisfying, high-protein treat that keeps you full and energized. The protein also helps thicken the pudding, giving it that creamy, scoopable body that looks as rich as the original. Choose a high quality whey casein blend or plant based powder that mixes smoothly and tastes great.
- Unsweetened Almond Milk
A light yet creamy base that keeps the pudding lower in calories and carbs. Almond milk allows the banana and vanilla flavours to shine while providing just enough liquid for the custard to set beautifully. You can also use Fairlife milk if you want extra protein and a thicker consistency.
- Greek Yogurt
Whipped into the topping, it adds a velvety, tangy creaminess that mimics whipped cream but with more nutrition. Greek yogurt is rich in protein and probiotics, giving your dessert a wholesome boost while maintaining that luscious, bakery style finish.
- Cornstarch or Arrowroot Starch
The secret to the pudding’s thick, glossy texture. Just a tablespoon or two turns the almond milk mixture into a smooth, custard like base that holds its shape when scooped. It’s what makes this healthy version look and feel like a classic pudding, not a smoothie.
- Better for You Wafers
To capture the signature banana pudding crunch, swap traditional vanilla wafers for options like Simple Mills or HighKey Vanilla Wafers. They add texture and nostalgic flavour with cleaner ingredients and lower sugar the perfect finishing touch to each creamy layer.
Step-by-Step Instructions
1. Make your creamy custard base
In a medium saucepan, whisk together 1 ½ cups unsweetened almond milk (or Fairlife milk), 1 mashed ripe banana, 1 ½ scoops vanilla protein powder, 1 tablespoon cornstarch or arrowroot starch, 1–2 tablespoons monk fruit or allulose, 1 teaspoon vanilla extract, and a pinch of sea salt.Place over medium heat and whisk constantly until the mixture thickens into a glossy, pudding-like texture (about 6–8 minutes).Once it coats the back of your spoon, remove from heat and pour into a bowl. Press plastic wrap directly onto the surface (to prevent a skin from forming) and chill for at least 2 hours or until fully set.
2. Whip your creamy topping
In a separate bowl, gently fold together ½ cup Greek yogurt (2% or 5%), ¼ cup light whipped topping or coconut whip, ½ teaspoon vanilla, and 1 tablespoon monk fruit.Whisk or fold until light and airy this creates the mousse like topping that mimics the rich whipped layer in the inspo pic.
3. Slice your bananas
Thinly slice 2 ripe bananas. To prevent browning, lightly toss them in a teaspoon of lemon juice mixed with a drop of stevia. Set aside.
4. Prep your “wafers”
Crush a handful of HighKey Vanilla Wafers, Simple Mills Vanilla Cookies, or your favorite protein cookies into small crumbles. You’ll use them to layer and for garnish.
5. Assemble the layers
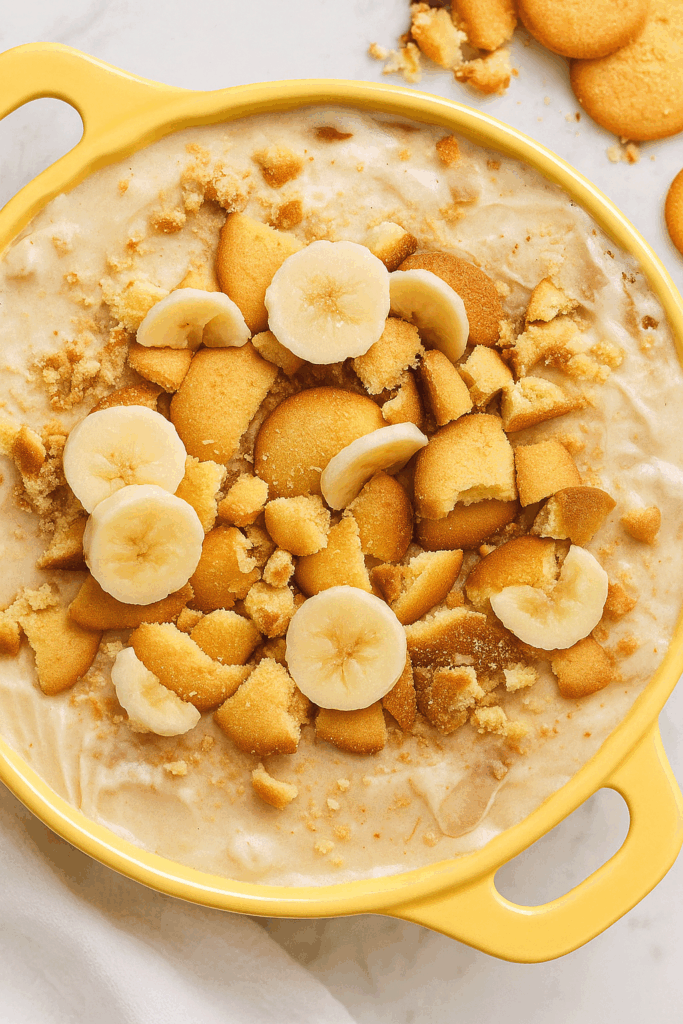
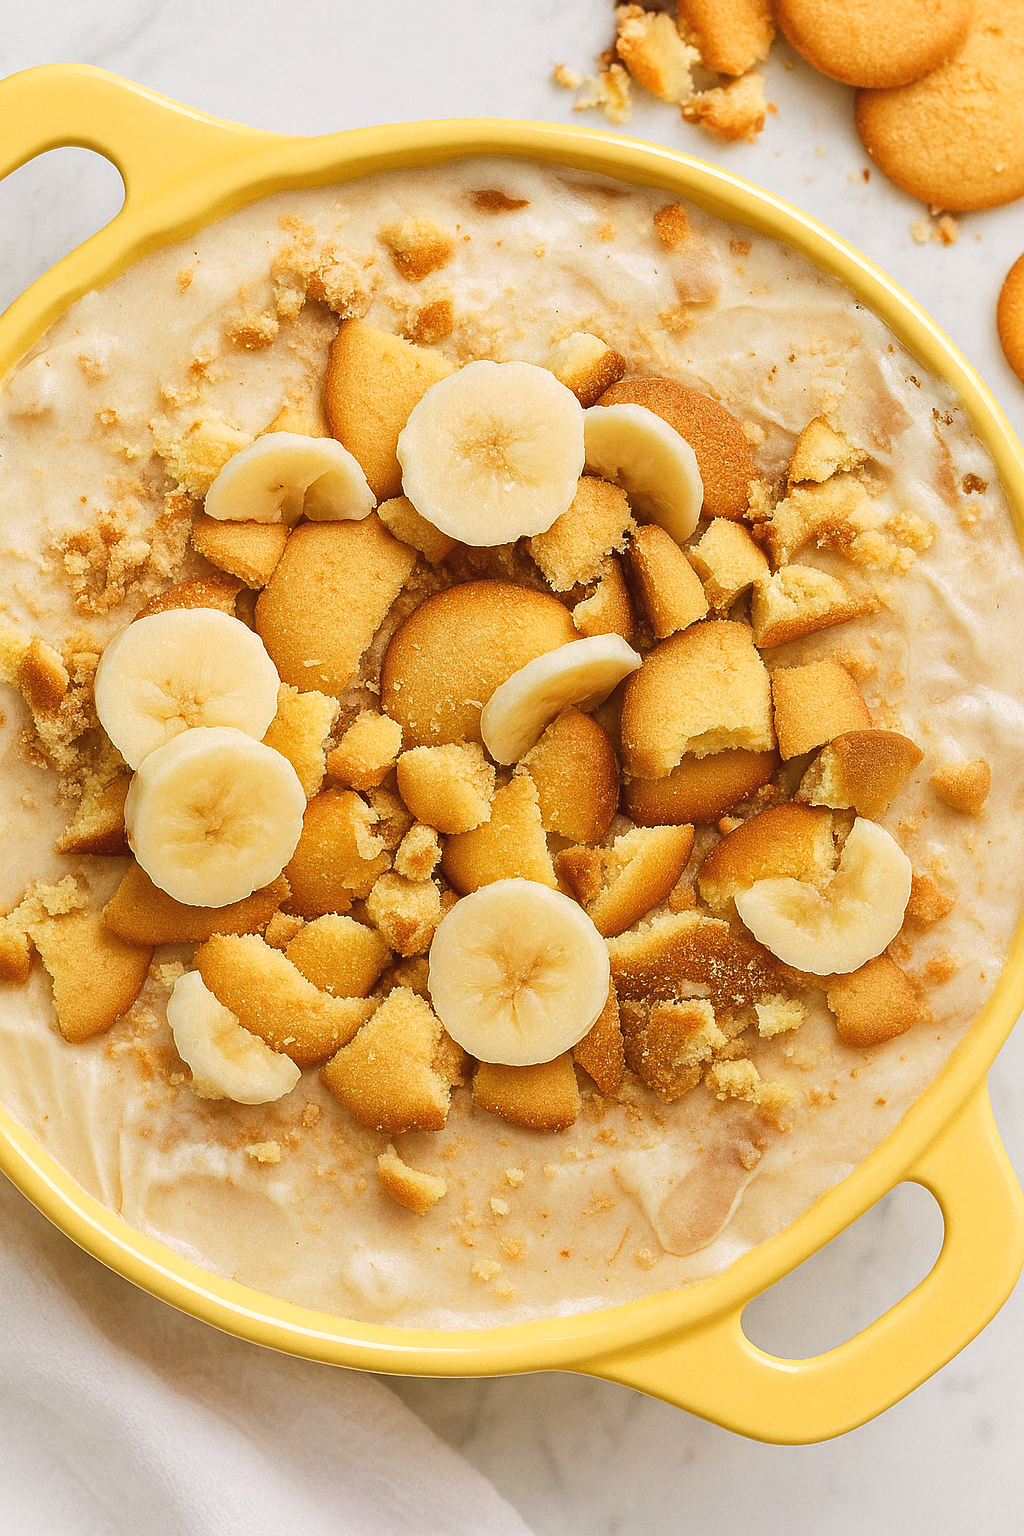
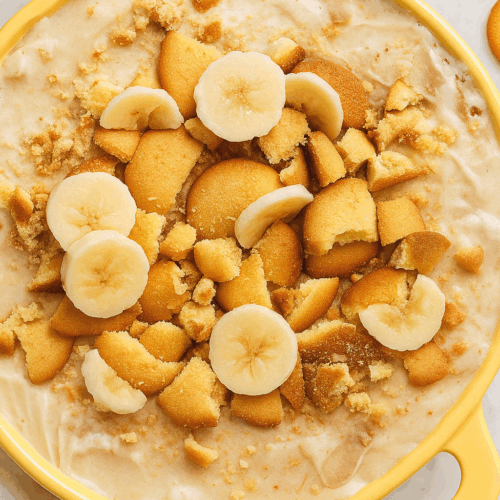
Grab a pretty dessert bowl or scalloped ramekin Layer in this order:
- A scoop of the banana pudding base
- A few banana slices,
- A sprinkle of cookie crumbles,
Repeat once more, then finish with a generous spoonful of the whipped topping.Top with extra crumbles and a single banana slice for that clean, elevated look.
6. Chill for presentation
Refrigerate your assembled pudding for 30-60 minutes so the layers firm up and the pudding holds its beautiful shape.
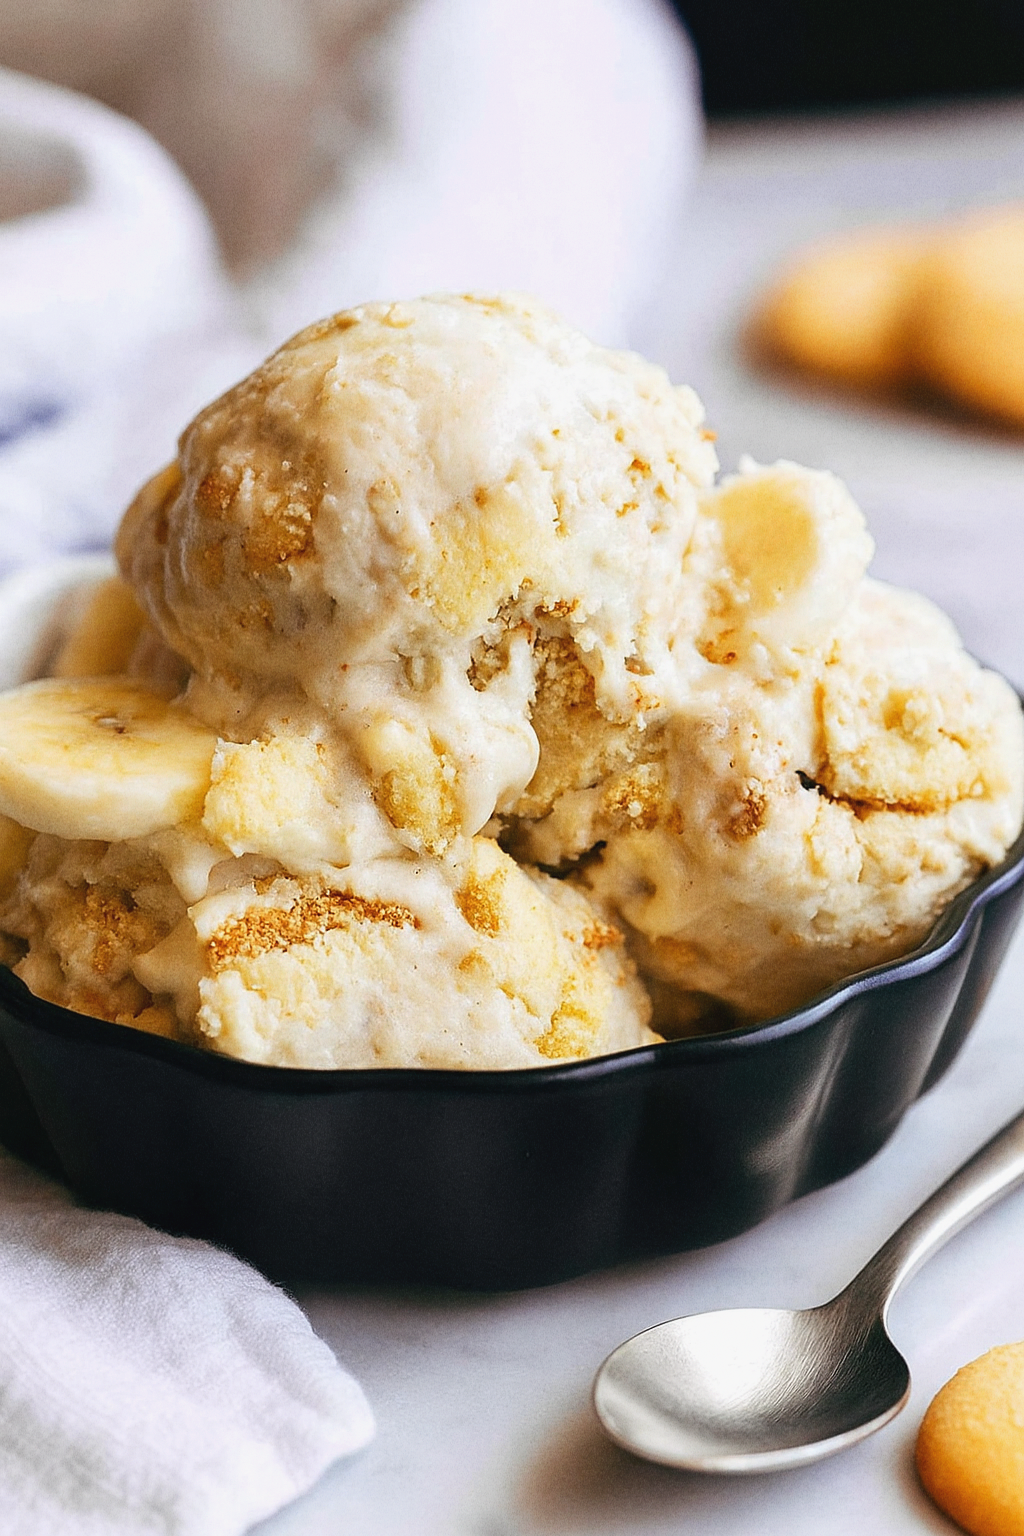
7. Serve it
Use an ice cream scoop to serve domes of pudding into bowls or cups it’ll look thick, glossy, but way lighter and higher in protein.
8. Optional twist
For a frozen “scoopable” version, freeze the pudding base for 2 hours (stir every 30 minutes). Scoop and layer like a banana pudding ice cream parfait!
Abby’s Real Talk
I have to be honest banana pudding used to be one of those desserts I’d only eat on special occasions, because it always felt like a treat that belonged at a family gathering or a Southern style buffet. But every time I’d see those creamy scoops layered with bananas and cookies, I’d crave that cozy, nostalgic flavor again even on an ordinary Tuesday.
When I started my health journey, I missed that old school banana pudding magic the thick custard, the sweet banana aroma, the comfort in every bite. So I challenged myself: could I make one that’s still rich and indulgent but fits the way I eat now?
This version is my answer a pudding that’s high in protein, low in sugar, and tastes like the real deal. Every spoonful brings back childhood memories, but with ingredients I can feel proud of. It’s proof that you don’t have to give up the classics to eat well. You just have to reimagine them and trust me, this one’s worth it.
Storage & Meal Prep Tips
This healthy banana pudding is a meal prep dream because it stays creamy and delicious for days!
Refrigerator:
Spoon your pudding into airtight glass jars or meal prep containers. It keeps fresh for up to 4 days in the fridge. The texture actually gets thicker and more luscious as it chills just like the classic banana pudding you love.
Banana Layer Tip:
To keep your banana slices from turning brown, toss them lightly with a few drops of lemon juice before layering. This adds a touch of brightness and helps them stay picture perfect.
Meal Prep Style:
You can layer your pudding in individual jars pudding, banana, cookie crumbs, repeat and store them for grab and go snacks or desserts. It’s perfect for busy weekdays or a healthy after dinner treat.
Freezer Option:
If you’d like a frozen banana pudding ice cream vibe, freeze in a loaf pan, cover tightly, and let it soften for 10 minutes before scooping.
Serving Tip:
When ready to serve, top with extra wafers and a fresh banana slice for that irresistible just-made look.
Shop This Recipe
I’m all about making healthy desserts feel just as cozy and indulgent as the classics and that starts with using the right tools and ingredients. Every product below is something I personally trust and use to recreate that creamy, nostalgic banana pudding magic, without the sugar crash.
Let’s talk through what you’ll need to bring this high-protein pudding to life:
- Vanilla Protein Powder– This is the secret behind that rich, custard like base. I love using a whey casein blend because it thickens beautifully and keeps you full for hours. My go to is Clean Simple Eats Vanilla Protein it blends smooth, tastes amazing, and makes the pudding scoopable like the inspo photo.
- High-Protein Milk– For creaminess without the heavy cream, I recommend Fairlife Milk. It’s rich in protein and low in sugar, helping your pudding set perfectly while keeping your macros in check.
- Natural Sweetener– Forget refined sugar. Monk Fruit Sweetener gives you that classic sweetness with zero guilt and no weird aftertaste a staple in all my healthy dessert recipes.
- Healthy Vanilla Wafers-You can’t have banana pudding without those nostalgic wafers. I use HighKey Vanilla Wafers because they’re grain free, low-carb, and give that perfect crunch without added sugar.
- Glass Meal Prep Jars– For layering and storing, airtight glass jars make it feel like a café dessert. They’re also great for portion control and make your pudding look Pinterest worthy.
- Nonstick Saucepan– Since this pudding cooks on the stovetop, a nonstick saucepan keeps the texture velvety smooth and helps prevent sticking or clumps. It’s one of those kitchen tools that makes healthy cooking so much easier.
With these kitchen staples, you’ll have everything you need to create a dessert that’s creamy, protein packed, and just as dreamy as the original banana pudding only better for you.
Disclaimer: As an Amazon Associate, I earn from qualifying purchases. This comes at no extra cost to you it simply supports my blog so I can keep sharing healthy, delicious recipes you’ll love.
FAQ
1. Can I make this healthy banana pudding dairy-free?
Absolutely! Swap the Fairlife milk for unsweetened almond milk or oat milk, and use a plant based vanilla protein powder (pea or soy blend). For the whipped layer, try coconut yogurt or coconut whipped cream it still comes out creamy and luscious, just like the classic version.
2. What’s the best protein powder for pudding?
A vanilla whey casein blend works best because it thickens beautifully and gives that custard like texture. If you’re dairy free, go for a vanilla pea protein. Avoid pure whey isolate alone it tends to make the pudding runnier.
3. Can I make it ahead of time?
Yes! This pudding is meal prep perfection. It tastes even better after chilling for a few hours. Make it up to 4 days ahead, store it in airtight jars, and just add the banana slices before serving for the best texture and color.
4. Can I freeze banana pudding?
You can especially if you want that banana pudding ice cream vibe! Freeze in a loaf pan, cover well, and thaw for 10 minutes before scooping. It’s rich, thick, and scoopable just like the inspo photo.
5. How can I keep my bananas from turning brown?
Toss your banana slices with a few drops of lemon juice before layering. This keeps them fresh and picture perfect for days.
6. What if I don’t have monk fruit sweetener?
No problem! You can use allulose, stevia, or a small amount of maple syrup or honey if you don’t mind a few extra carbs. Just adjust to taste the goal is a light, natural sweetness that lets the banana flavor shine.
7. Can I make it without cornstarch?
Yes try arrowroot starch or tapioca flour for the same thickening power. Both give you that glossy, scoopable pudding consistency.
8. How much protein does each serving have?
Depending on your protein powder, each serving packs around 20-25 grams of protein, which makes it perfect as a dessert or post-meal snack that actually keeps you full.
Nutrition Information (Per Serving)
- Calories: 240
- Protein: 22g
- Total Fat: 6g
- Saturated Fat: 2g
- Carbohydrates: 24g
- Fiber: 3g
- Sugars: 10g (from banana + natural sweetener)
- Net Carbs: 21g
- Cholesterol: 20mg
- Sodium: 130mg
Notes:
- Exact values may vary based on the brand of protein powder and milk you use.
- Using Fairlife milk and a whey-casein blend gives the best creamy texture and protein boost.
- Want it even leaner? Use nonfat Greek yogurt and reduce whipped topping slightly.
Thank you so much for stopping by my kitchen today! I hope this Healthy Banana Pudding brings you as much comfort and joy as it does me. It’s proof that eating well doesn’t mean giving up the sweet, creamy desserts we love it just means getting a little creative.
If you make this pudding, I’d love to hear how it turned out for you! Did you use chia seeds or the yogurt base? Did you layer it in jars or a big trifle bowl? Drop a comment below and let’s chat your feedback always makes my day.
And if you loved this recipe, don’t forget to share it with a friend or save it to your Pinterest board for your next meal prep day. Every share helps more people discover that healthy eating can be delicious, too.
See you next time with more sweet, protein-packed goodness!
Healthy Banana Pudding (Protein-Packed, Low Sugar)
Equipment
- Medium nonstick saucepan
- Whisk and rubber spatula
- Measuring cups and spoons
- Large bowl for chilling custard
- Plastic wrap to press onto pudding surface
- Ice cream scoop (for domes)
- 4 glass jars or dessert bowls for serving
Ingredients
Custard base
- 3 cups Fairlife milk or unsweetened almond milk (use Fairlife for extra protein and creaminess)
- 2 scoop vanilla protein powder (about 60 g total; use a whey-casein blend for best texture)
- 2 tbsp cornstarch or arrowroot starch
- 1 medium very ripe banana mashed smooth
- 2 tbsp monk fruit sweetener or allulose (adjust to taste)
- 2 tsp vanilla extract
- pinch of fine sea salt
Whipped topping (mousse)
- ½ cup plain Greek yogurt (2% or 5%)
- ¼ cup light whipped topping or canned coconut whipped cream (stabilizes texture)
- ½ tsp vanilla extract
- 1 tbsp monk fruit sweetener
Layers and garnish
- 2 ripe bananas, thinly sliced (for layering and garnish)
- 1 tbsp lemon juice (to toss banana slices)
- 1 to 1¼ cups crushed healthy vanilla wafers (HighKey, Simple Mills, or homemade almond flour cookies)
- extra cookie crumbles and 1 banana slice per serving for garnish
Instructions
- Measure out the milk, protein powder, and cornstarch so the cooking stage is smooth. Peel one very ripe banana and mash it with a fork until smooth. Thinly slice the two extra bananas and put them in a small bowl with 1 tablespoon lemon juice to keep them from browning while you cook.
- In a medium mixing bowl, whisk together 2 scoops vanilla protein powder and 2 tablespoons cornstarch until evenly blended. This helps prevent lumps when the liquid hits the powders.
- Pour 3 cups milk into a medium nonstick saucepan and warm over medium-low heat until it is warm but not simmering, about 2 minutes. Warming first prevents shock-curdling of the protein and makes whisking smoother.
- Add approximately one ladle of the warmed milk into the protein-cornstarch mix and whisk briskly to form a smooth slurry. This step tempers the powder so it dissolves without clumps. Once smooth, pour the slurry back into the saucepan with the warm milk while whisking continuously.
- Stir in the mashed ripe banana, 2 tablespoons monk fruit sweetener, 2 teaspoons vanilla extract, and a pinch of fine sea salt into the saucepan. Keep whisking to combine.
- Place the saucepan over medium heat and whisk constantly. After about 4 to 6 minutes the mixture will begin to thicken. You are looking for a glossy custard that coats the back of a spoon and holds a line when you run your finger across the spoon. This usually takes 6 to 8 minutes total depending on stovetop heat. Do not let the mixture boil vigorously. If it starts to bubble, lower the heat and keep whisking.
- Spoon a bit of custard onto a plate and cool for 30 seconds. It should be thick and scoopable. If it is still loose, cook another minute and test again. Remember the pudding continues to firm as it chills.
- Turn off the heat and transfer the hot custard to a shallow bowl. Press plastic wrap directly on the surface to prevent a skin forming. Refrigerate at least 2 hours until completely chilled and set. This step is essential to achieve that scoopable, glossy texture like the inspo photo.
- While the custard chills or 20 to 30 minutes before serving, combine 1/2 cup Greek yogurt, 1/4 cup light whipped topping, 1/2 teaspoon vanilla, and 1 tablespoon monk fruit in a bowl. Whisk gently until light and airy. Taste and adjust sweetness. Keep chilled.
- Place 1 to 1 1/4 cups vanilla wafers into a freezer bag and crush with a rolling pin until you have a mix of fine crumbs and small pieces. Reserve a few larger pieces for garnish.
- Use 4 clear jars or small dessert bowls for photo-ready layers. For each jar, follow this layering order:1. Spoon 3 to 4 tablespoons of the chilled pudding into the bottom.2. Add an even layer of banana slices.3. Sprinkle about 2 tablespoons of cookie crumbles.Repeat the layers once more, ending with a top layer of pudding.
- Pipe or spoon a generous dollop of the Greek yogurt mousse on each jar. Finish with a sprinkle of cookie crumbles, one thin banana slice on the side, and a few larger cookie pieces for texture. For the classic scoop look, you can instead chill the pudding, use an ice cream scoop to make domes in bowls, then spoon mousse over the domes and garnish.
- After assembly, refrigerate the jars for 30 to 60 minutes so the layers firm and the flavors meld. Chilling right after assembly makes the dessert look polished and bakery-style.
- Use an ice cream scoop warmed under hot water for perfectly rounded domes, or serve straight from the jar with a spoon. If you made the frozen version, let it soften for 8 to 10 minutes at room temperature before scooping.
- Keep assembled jars in the fridge for up to 4 days. Add fresh banana slices right before serving if you want the best presentation. The custard base alone will keep for up to 5 days refrigerated. If you freeze the assembled pudding, expect some texture change to the banana slices; freezing works best for the custard base only.
Notes
- If lumps form while cooking, whisk vigorously or use an immersion blender briefly to smooth.
- Use Fairlife milk for the creamiest texture and added protein. If you prefer dairy-free, use unsweetened almond milk and a plant-based protein powder. Results will be slightly lighter.
- Arrowroot can replace cornstarch at a 1:1 ratio. Arrowroot gives a very clear glossy finish.
- Adjust sweetness after chilling because flavors concentrate as the mixture cools.
- For a frozen, scoopable ice cream style: after step 6, freeze the custard in a shallow pan, stirring every 30 minutes until firm, then layer as above.
- If your protein powder is grainy, sift it first into the cornstarch or blend it with a small amount of milk in a blender to dissolve fully.