Let’s be real: College is exhausting. Between 8 a.m. classes, late-night study sessions, and trying to maintain a social life, finding time to eat is hard enough. When you add a strict gluten-free (GF) requirement due to Celiac disease or non-celiac gluten sensitivity, the “what’s for dinner” panic reaches a whole new level.
Campus dining halls can be a minefield of cross-contamination, and relying on pre-packaged GF snacks gets expensive fast.
I’ve been there. Navigating university life while avoiding gluten requires strategy, not just willpower. The solution isn’t skipping meals or eating plain rice cakes; it’s strategic gluten-free meal prep.
This guide isn’t about spending your entire Sunday cooking gourmet meals. It’s about practical, budget-friendly survival tactics optimized for dorm fridges and busy schedules, ensuring you have safe fuel to keep your brain running.
Why Meal Prep is Non-Negotiable for GF Students (The Science)
If you aren’t gluten-free, meal prepping is a convenience. If you are gluten-free in college, it’s almost a safety necessity. Here is why implementing a prep routine is crucial for your health and your GPA.
1. Avoiding the “Dining Hall Gamble” (Safety)
Even dining halls with the best intentions can be high-risk zones for cross-contact. Shared toasters, serving spoons that travel between pasta dishes, and busy staff can lead to accidental glutening.
- The Research: According to the Celiac Disease Foundation, even microscopic amounts of gluten (crumbs in a shared butter tub) can trigger severe autoimmune reactions and intestinal damage. By prepping your own food, you control the environment and eliminate that risk.
2. Controlling the “Gluten-Free Tax” (Budget)
It is a proven fact that gluten-free packaged alternatives cost significantly more than their wheat-based counterparts. A college budget is tight; you don’t want to blow it all on $8 loaves of bread.
- The Research: Studies, including research published in journals like Nutrients, have consistently shown that gluten-free products can be upward of 240% more expensive than regular products. Meal prepping focuses on naturally gluten-free whole foods like rice, beans, potatoes, and eggs, which are shockingly cheap.
3. Sustained Energy for Studying (Nutrition)
When you’re rushing, it’s easy to grab processed GF cookies or chips. While safe, these create blood sugar spikes and crashes that ruin your study focus. Meal prepping ensures you get protein, healthy fats, and complex carbs.
- Expert Insight: Reputable health organizations like the Mayo Clinic emphasize that a healthy gluten-free diet shouldn’t rely on processed substitutes, but rather on naturally gluten-free whole foods to ensure you get adequate fiber and vitamins.
The Strategy: GF Prepping in Small Spaces
You don’t need a chef’s kitchen to meal prep. You need a plan that fits your living situation.
The “Golden Rule” of College Prep: Batching Components
Don’t try to cook five distinct recipes. Instead, cook large batches of versatile components that can be mixed and matched throughout the week.
The essential GF components:
- A cheap carb base: A large pot of rice, quinoa, or roasted potatoes.
- A protein: Rotisserie chicken (double-check ingredients for hidden gluten marinades!), canned chickpeas (rinsed), hard-boiled eggs, or ground turkey.
- Veggies: A big bag of frozen mixed vegetables (microwaveable!) or a tray of roasted broccoli.
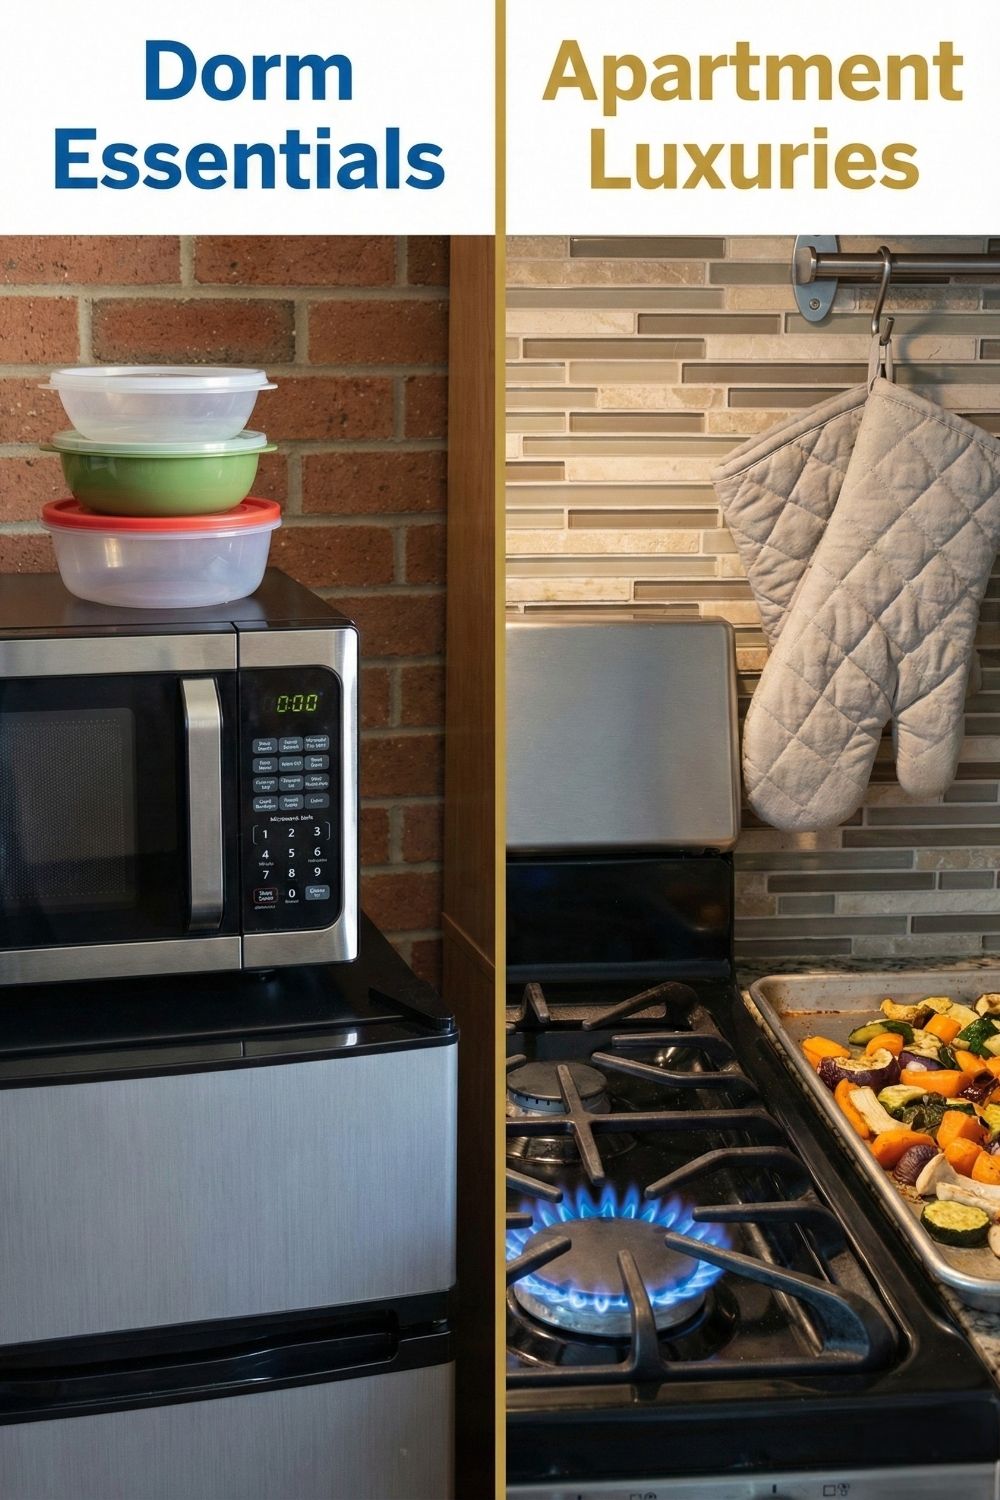
Scenario A: The Dorm Room Warrior (Microwave & Mini-Fridge Only)
If you only have a microwave, you can still win.
- Rely on “Instant” Safe Foods: Use microwaveable rice pouches (check labels carefully), canned beans, canned tuna, and steam-in-bag frozen veggies.
- The “Assemblage” Method: Your prep isn’t cooking; it’s assembling. Portion out Greek yogurt and fruit for breakfasts. Mix canned beans, corn, and salsa in containers for taco bowls you just heat up.
Scenario B: The Apartment Dweller (Stove/Oven Access)
If you have a real kitchen, lean into “Sheet Pan Meals.”
- Toss chicken breast, bell peppers, and onions in olive oil and gluten-free taco seasoning. Bake at 400°F for 20-25 minutes. Divide into containers with rice. You just made four dinners in 30 minutes with one pan to clean.
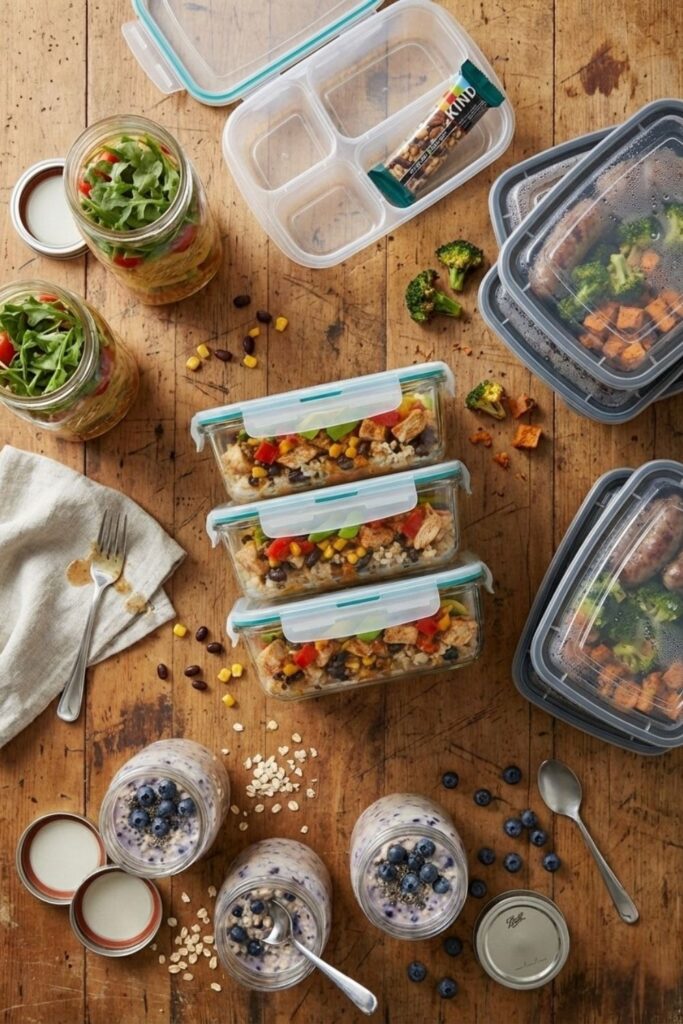
5 Cheap & Easy Gluten-Free Meal Prep Ideas
These ideas prioritize low cost, minimal equipment, and certified gluten-free ingredients.
Crucial Reminder: Always verify labels. Oat products must be specifically labeled “Certified Gluten-Free” due to high cross-contamination risks in standard oats.
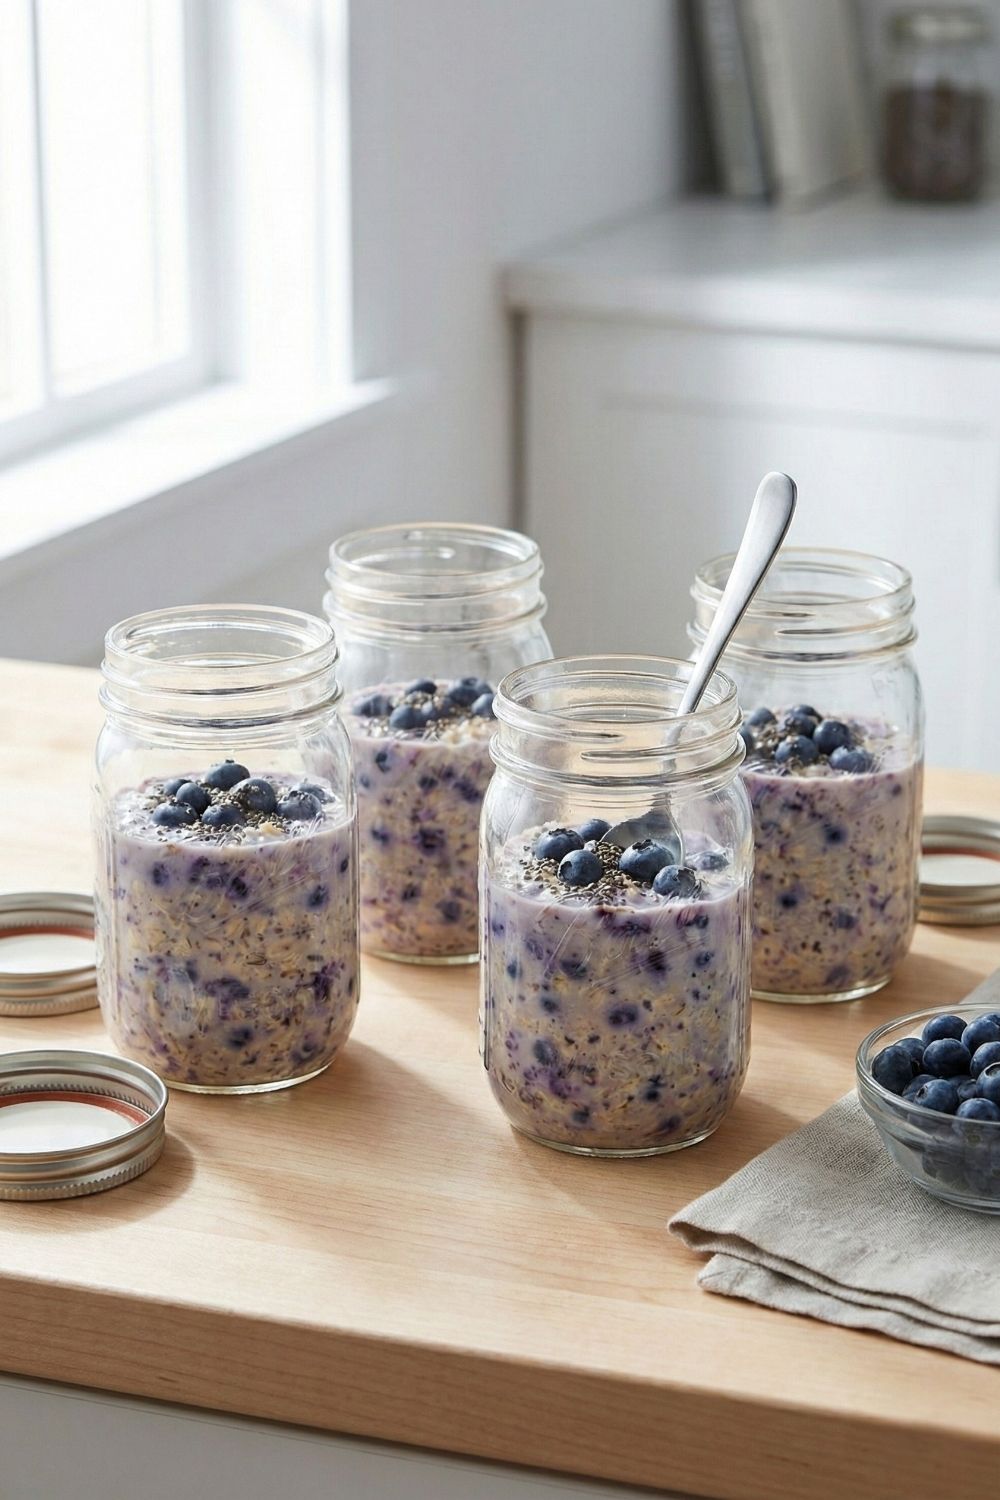
1. “Power Up” Overnight Oats (Breakfast)
This is the ultimate dorm-room breakfast. It requires zero cooking appliances and is incredibly cheap if you buy large bags of certified GF oats.
Ingredients (Per Jar):
- 1/2 cup Certified Gluten-Free rolled oats (Safety Crucial: Regular oats are often cross-contaminated with wheat).
- 1/2 cup milk of choice (dairy or almond/soy).
- 1 tablespoon chia seeds (for healthy fats and thickening).
- 1 tsp maple syrup or honey (optional).
- Toppings: Fresh or frozen fruit, nuts.
Instructions:
- Add oats, milk, chia seeds, and sweetener to a jar or container.
- Seal lid tightly and shake vigorously until well combined.
- Refrigerate overnight (or at least 4 hours).
- In the morning, add your toppings and eat cold right from the jar. These last up to 5 days in the fridge.
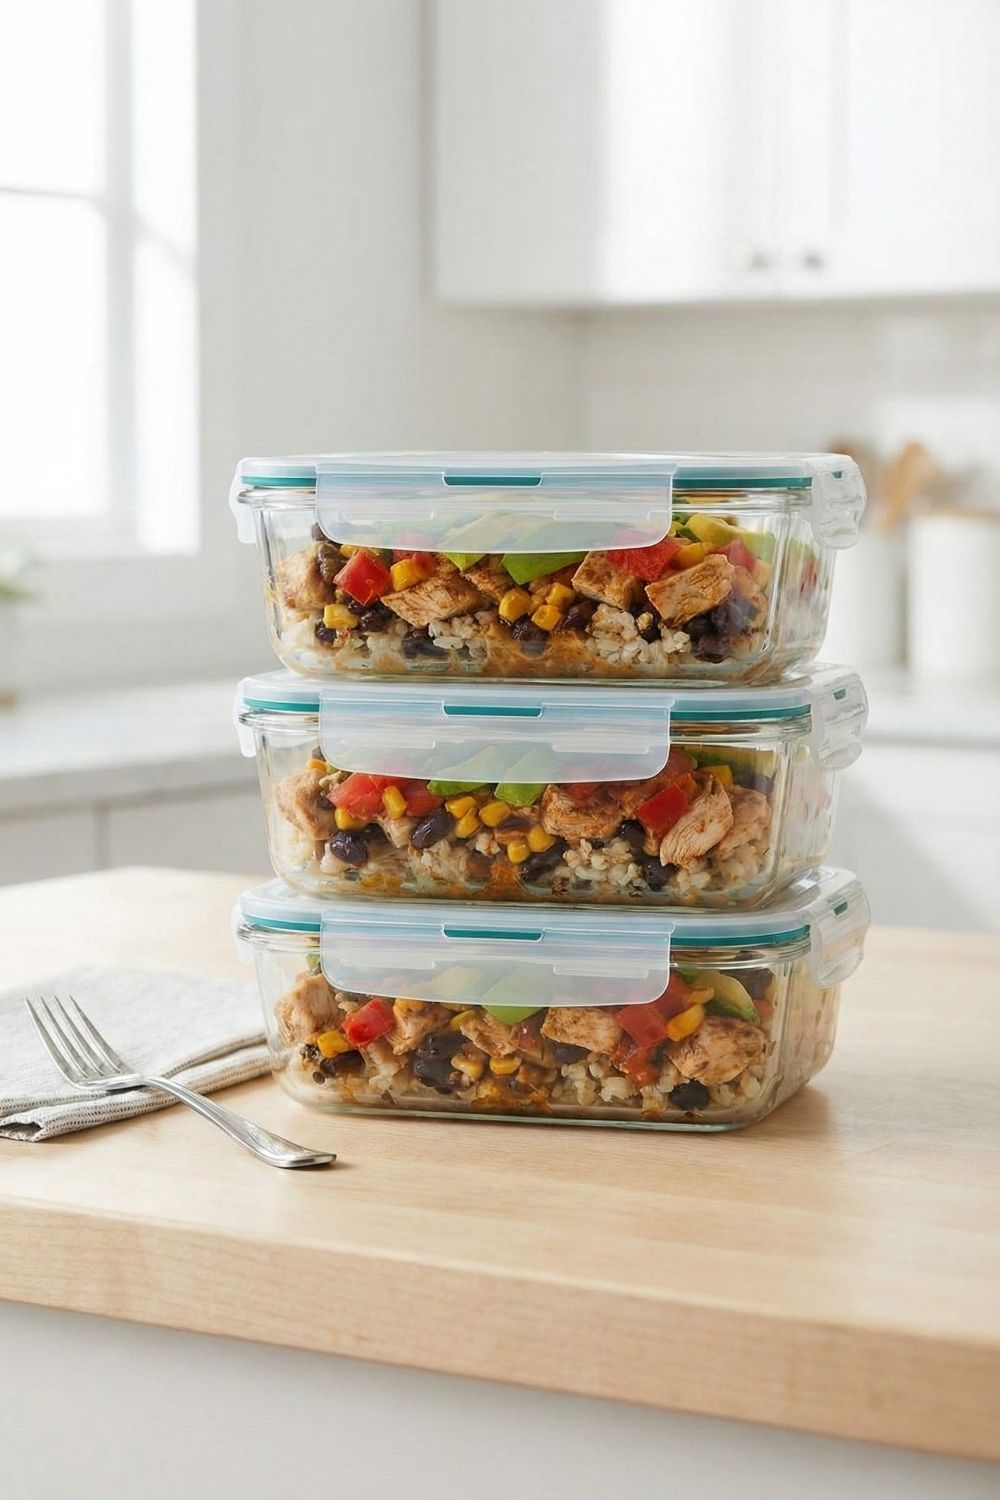
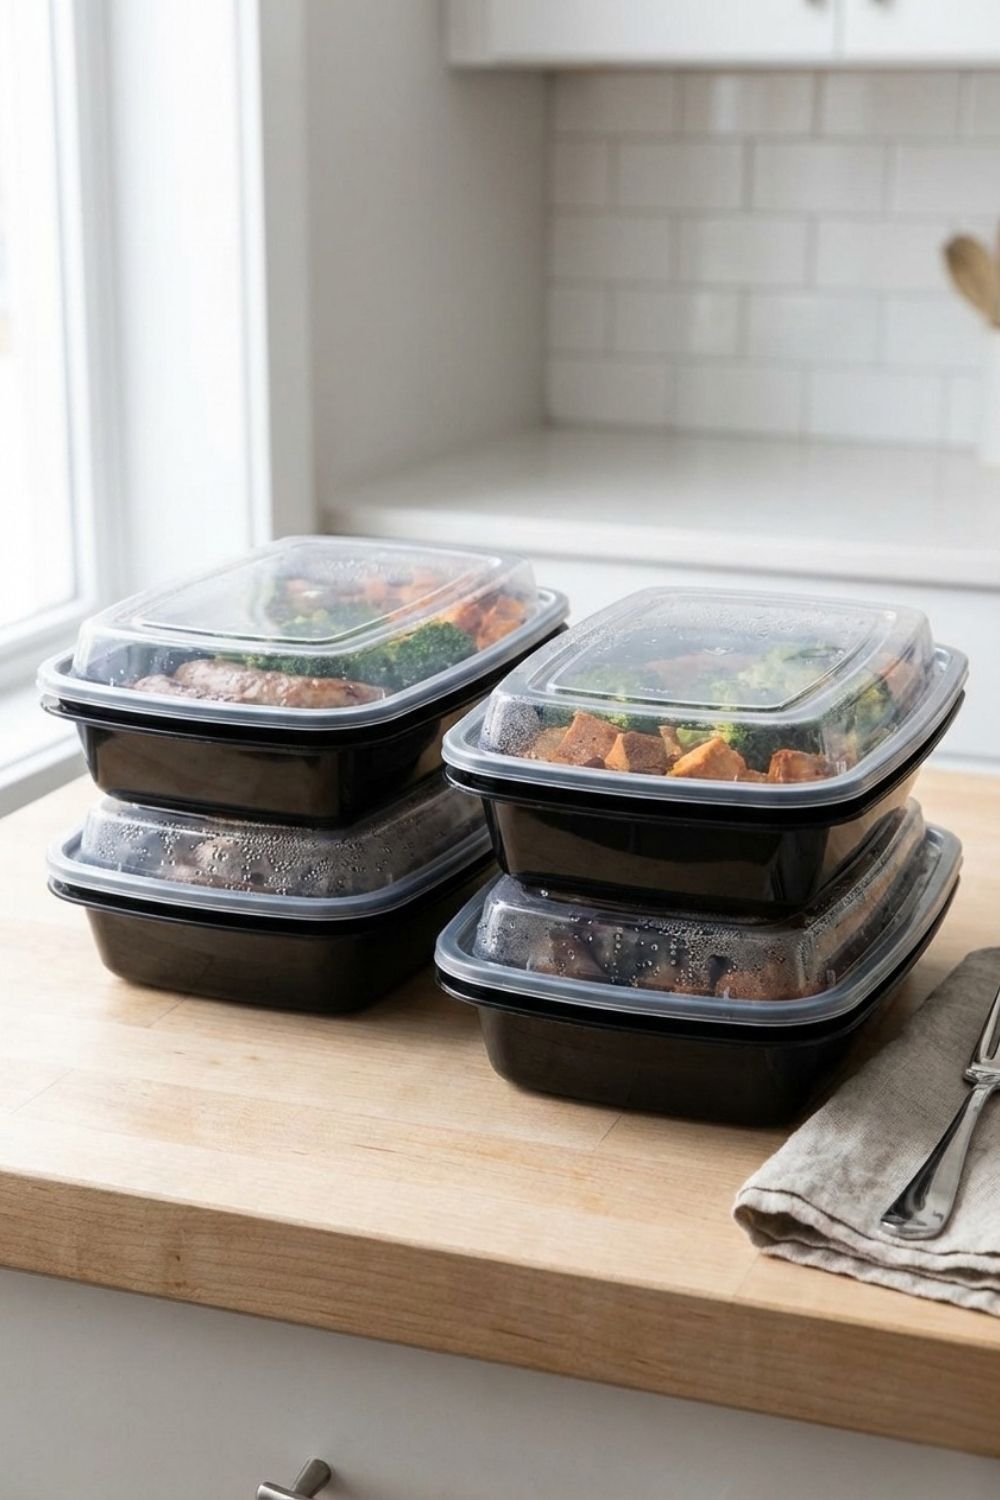
2. The Rotisserie Chicken Burrito Bowl (Microwave Friendly)
This uses store-bought shortcuts to make a filling, hot meal without needing a stove.
Ingredients (For 4 Meals):
- 1 Rotisserie Chicken (Safety Crucial: Verify the ingredients on the label; some grocery store marinades contain wheat).
- 2 cups cooked white rice (use microwave pouches if you don’t have a stove/rice cooker).
- 1 can black beans, rinsed and drained.
- 1 cup frozen corn, thawed.
- Jar of salsa.
Instructions:
- Remove the skin from the chicken and shred the meat using two forks.
- Line up 4 meal prep containers.
- Divide the cooked rice evenly among the containers as the base.
- Top with equal portions of black beans, corn, and shredded chicken.
- Add a spoonful of salsa on top. Seal and refrigerate.
- To eat: Microwave for 1.5–2 minutes until steaming hot.
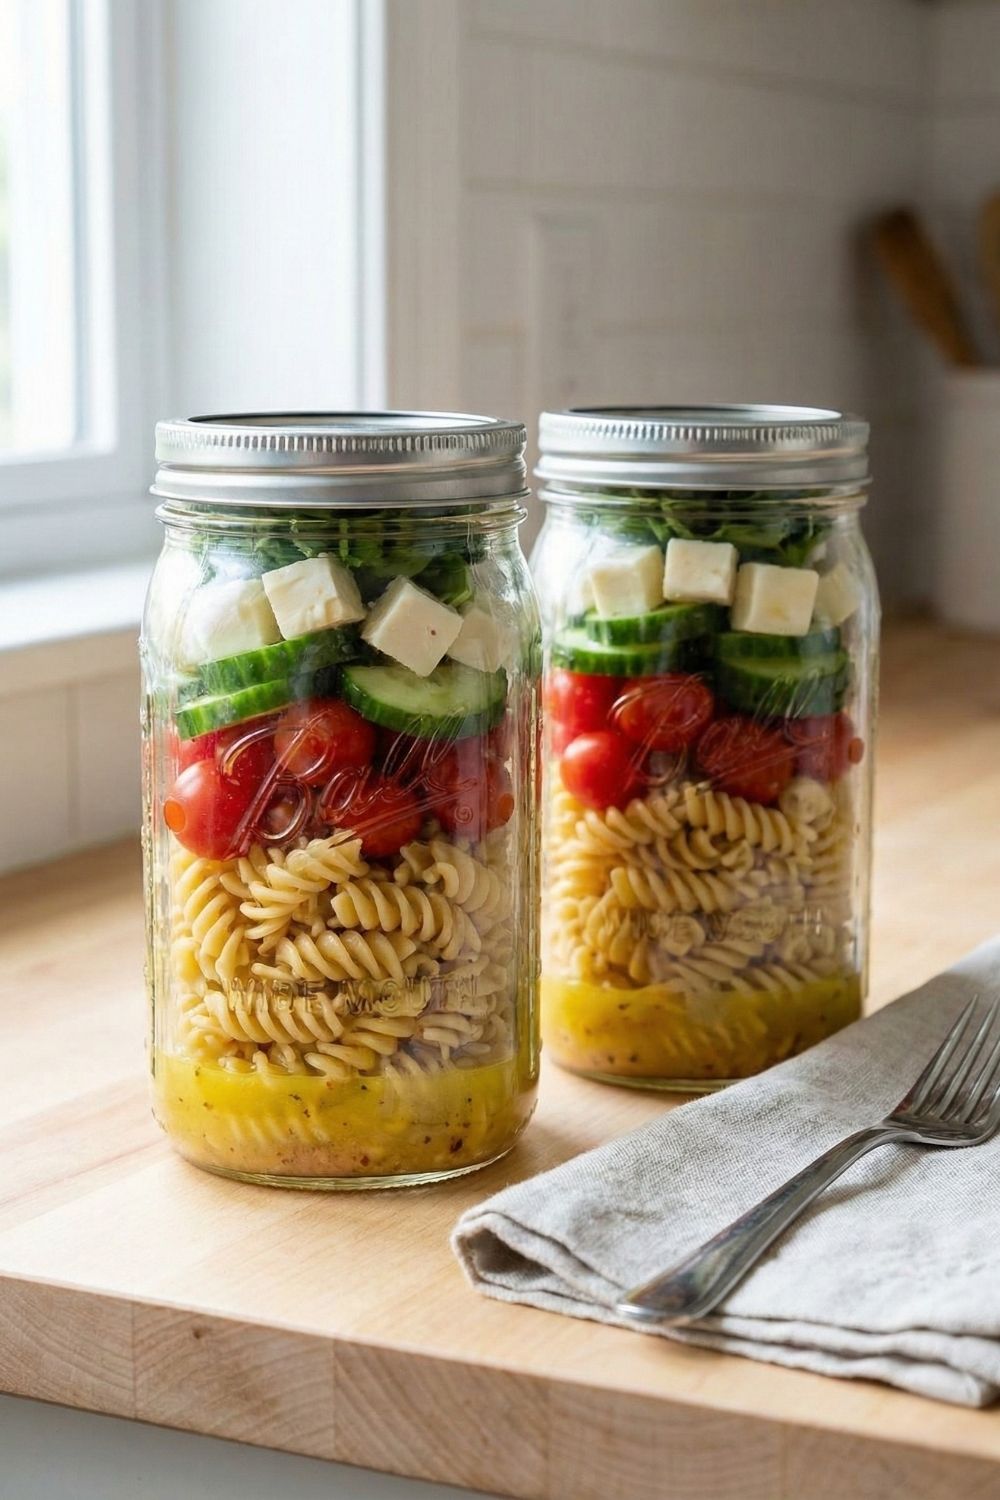
3. GF Pasta Salad “Jars” (Cold Lunch)
Perfect for days when you are on campus all day and don’t have access to a microwave between classes. The jar layering technique keeps the pasta from getting soggy.
Ingredients (For 3 Jars):
- 1 box Gluten-Free Pasta (Chickpea or Lentil pasta holds up best for meal prep; rice pasta can get mushy).
- 1 cup cherry tomatoes, halved.
- 1 cucumber, chopped.
- 1 cup cubed mozzarella cheese or pepperoni slices (verify GF status).
- Your favorite GF Italian dressing.
Instructions:
- Boil the pasta according to the package directions. Drain and rinse immediately with cold water to stop the cooking process.
- Set out 3 large jars or tall containers.
- Pour 2-3 tablespoons of dressing into the very bottom of each jar.
- Layer the ingredients on top of the dressing: Pasta first, then hard veggies (tomatoes/cucumber), then cheese/meat on top.
- Seal and refrigerate. When ready to eat, shake vigorously to distribute the dressing.
4. Sheet Pan Sausage and Veggies (Oven Required)
If you have access to an apartment kitchen or a common area oven, this is the easiest way to cook a large volume of food with minimal cleanup.
Ingredients (For 4 Meals):
- 1 pack (usually 4 links) pre-cooked chicken sausage (Safety Crucial: Many brands are GF, like Aidells or Applegate, but always verify the label).
- 2 large sweet potatoes, cubed.
- 1 large head of broccoli, chopped into florets.
- 2 tbsp olive oil.
- Salt, pepper, and garlic powder.
Instructions:
- Preheat your oven to 400°F (200°C). Line a large baking sheet with foil or parchment paper for easy cleanup.
- Slice the sausage into coins. Place the sausage, sweet potato cubes, and broccoli florets on the baking sheet.
- Drizzle with olive oil and season generously with salt, pepper, and garlic powder. Toss with your hands until everything is coated.
- Spread into an even layer. Bake for 25–35 minutes, flipping halfway through, until the potatoes are fork-tender and the broccoli is slightly charred.
- Let cool, then divide into 4 containers.
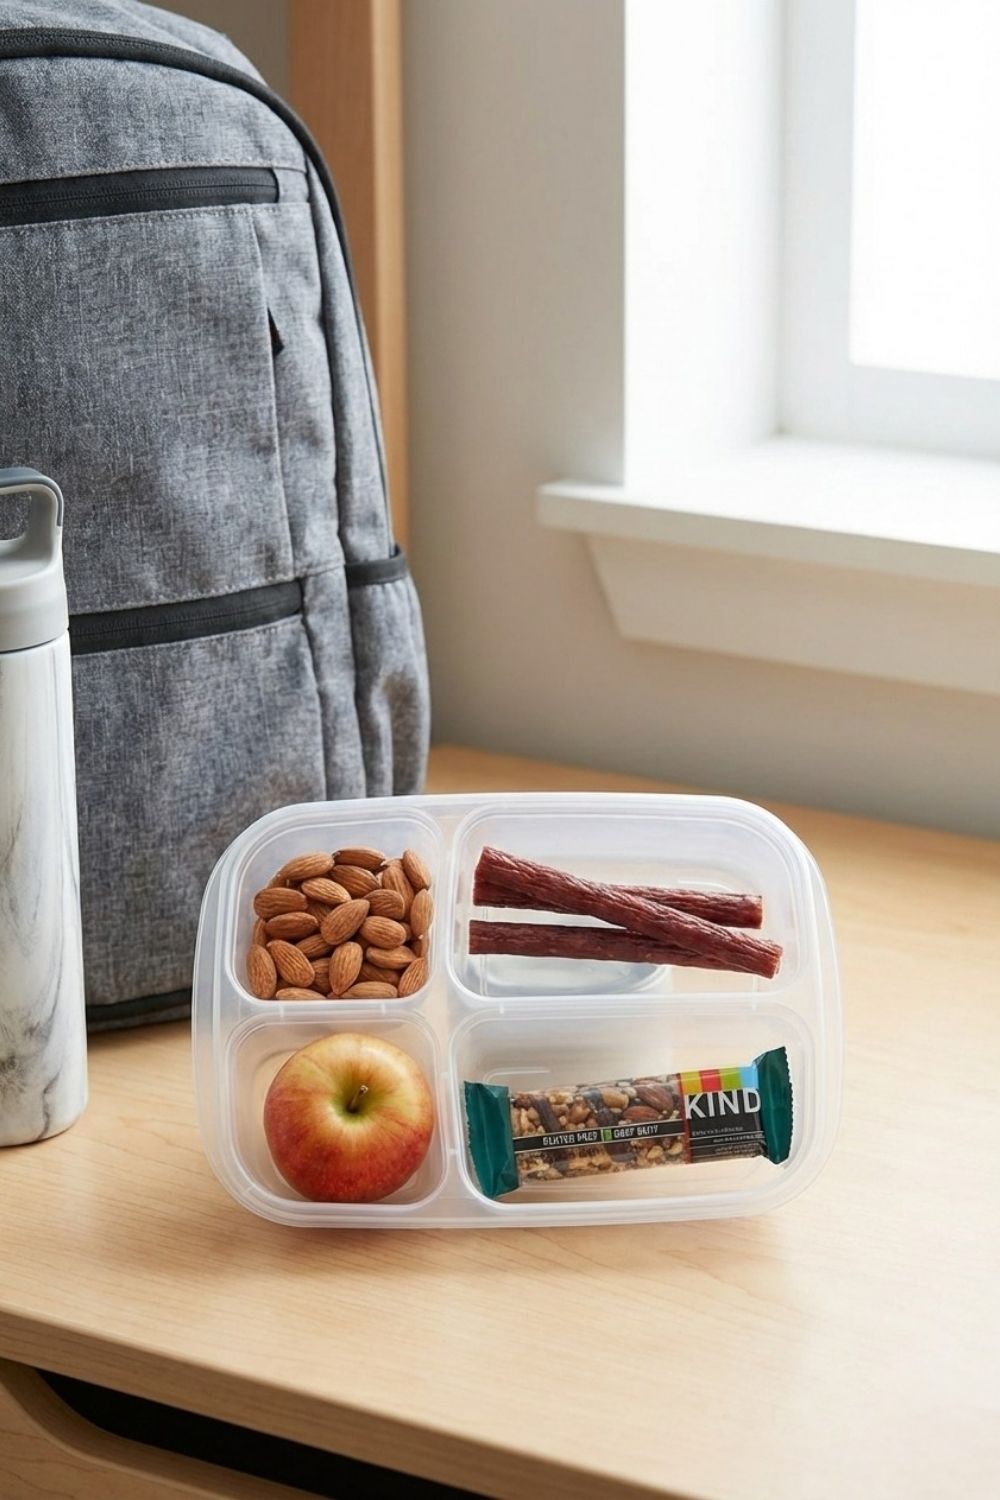
5. The “Emergency” Snack Box (Portable)
The most important meal prep might be the one that stops you from making a desperate, unsafe food choice when you’re stuck on campus.
Ingredients:
- A sturdy container (bento boxes with dividers work great).
- Protein: GF beef jerky sticks (check labels!) or hard-boiled eggs (if eaten within a few hours).
- Healthy Fats: Almonds, walnuts, or single-serve nut butter packets.
- Fruit: An apple, banana, or easy-peel orange.
- Emergency Bar: A Certified GF bar (like KIND, RXBAR, or Larabar).
Instructions:
- This requires no cooking, just assembly.
- Pack 2-3 of these boxes on Sunday.Keep one in your fridge and throw one in your backpack every morning before heading out for a long day of classes.
Communication is key. Explain that even crumbs can make you sick. You absolutely need your own toaster (or toaster bags), your own sponge, and your own cutting board. Label your GF food clearly in the shared fridge with bright tape.
Stop buying “gluten-free bread/cookies/pretzels.” They are expensive luxuries. Base your diet on naturally gluten-free foods that are cheap: Rice (buy in 10lb bags), potatoes, eggs, canned beans, lentils, and frozen vegetables.
It depends on the university. You must meet with dining services dining director and the campus dietitian before you eat there. Ask specific questions: Do they have a dedicated GF prep area? Do they change gloves? Many colleges have excellent dedicated GF “stations” now, but you must verify first.
“Wednesday Prep” is a thing. You don’t have to do it all at once. Or, try “ingredient prepping” only just cook a big batch of rice and chop all your veggies twice a week. That alone cuts 20 minutes off daily cooking time.

Final Thoughts
Being a gluten-free college student takes extra effort, there is no denying that. But mastering meal prep is the hack that gives you back your time and ensures you stay healthy enough to crush your classes. Start small, master one or two recipes, and build your routine from there. Your body (and your wallet) will thank you.