Let’s be honest: that craving for a rich, chunky chocolate bar never really goes away. But the store-bought versions? They are often loaded with unnecessary sugar, preservatives, and “mystery” ingredients I can’t even pronounce. That is exactly why I started making my own Dark Chocolate Fruit and Nut Bars at home.
The inspiration for these struck me during a particularly busy week of blogging. I hit dreaded 3 PM slump and desperately needed energy. I grabbed a so-called “healthy” fruit and nut chocolate bar from the corner store, and honestly? It was shockingly expensive and tasted mostly of corn syrup. I knew I could do better. I wanted something that felt indulgent but actually fueled my body instead of causing a sugar crash.
These bars are my answer to that afternoon slump. By swapping milk chocolate for antioxidant-rich dark chocolate and controlling exactly which dried fruits go inside, you get a snack that feels indulgent but fits perfectly into a balanced lifestyle. Plus, seeing those vibrant jewels of fruit studded in the dark chocolate? It is pure visual therapy.
Why You’ll Love This Recipe
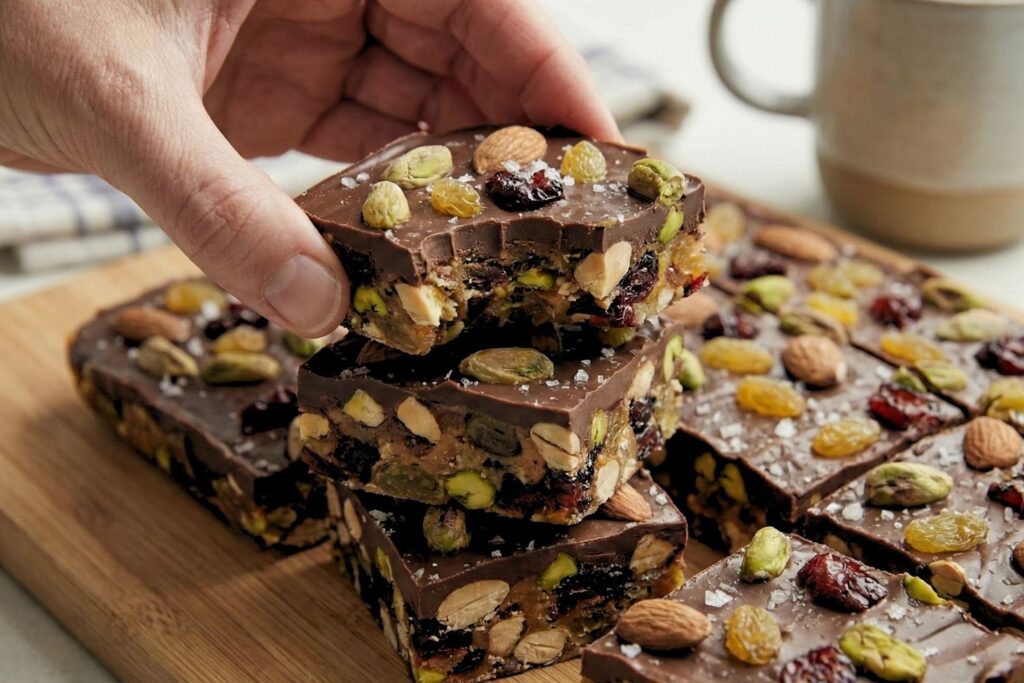
- Better Than Store-Bought: Unlike the classic Cadbury Fruit & Nut bars, this version lets you control the sugar. You get all the crunch and chewiness without the cloying sweetness. The way the tart cranberries cut through the rich, slightly bitter cocoa is an absolute game-changer compared to the flat sweetness of commercial bars.
- 100% Customizable: Don’t like raisins? Swap them for chopped dates. Prefer almonds over cashews? Go for it. This recipe is incredibly forgiving and adapts to whatever is in your pantry.
- No Fancy Equipment: You do not need a candy thermometer or a marble slab. If you have a bowl, a pot, and a piece of parchment paper, you are ready to go.
- Dietary Friendly: Naturally gluten-free and easily made vegan if you use dairy-free dark chocolate. (Always double-check your chocolate labels to be sure!)
Ingredients for Dark Chocolate Fruit Bars
You only need a few high-quality staples to make these bars. Since there are so few ingredients, quality really counts here!
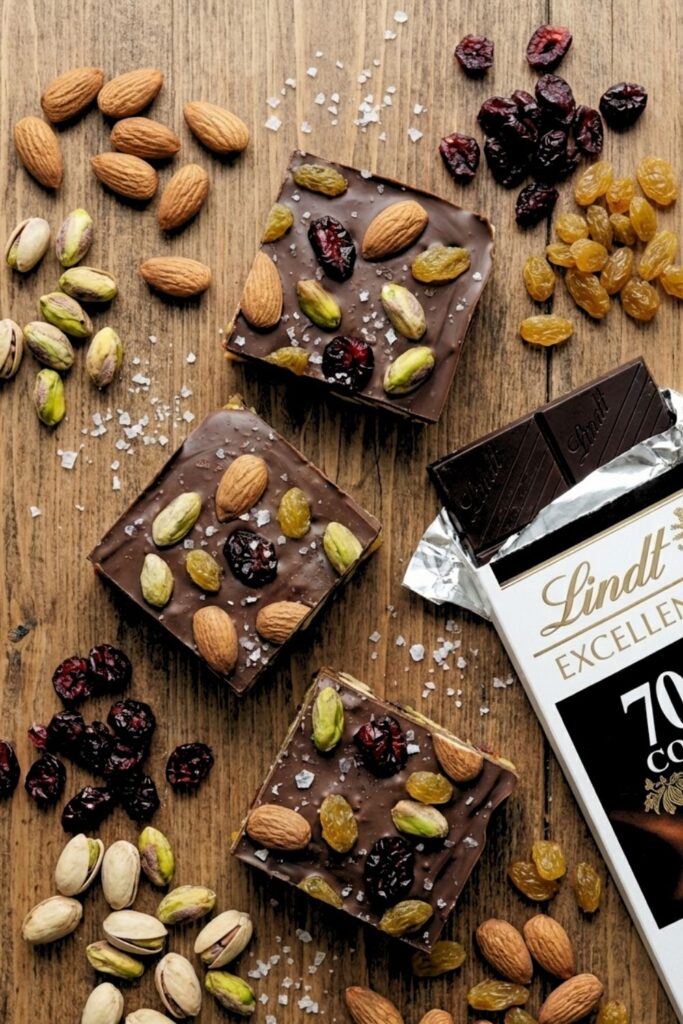
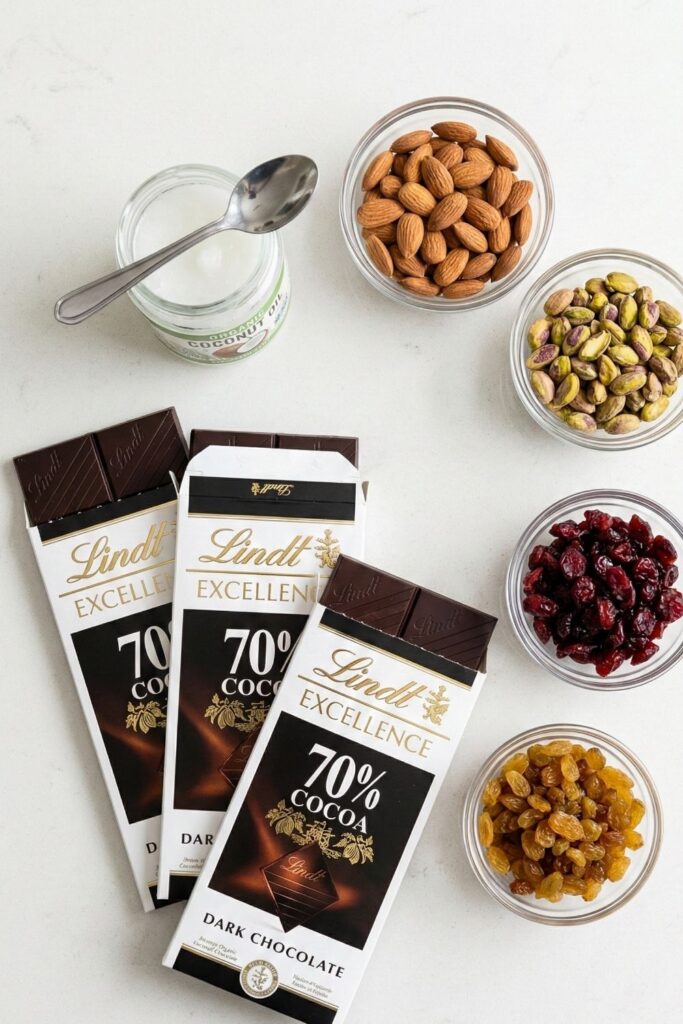
- Dark Chocolate (12 oz / 340g): I recommend using high-quality chocolate bars rather than chocolate chips. Chips contain stabilizers that prevent them from melting smoothly. Aim for 70% cocoa or higher this gives you that deep, intense chocolate flavor and maximizes the health benefits.
- My Pick: I love using [Lindt 70% Excellence Bars] or [Ghirardelli Intense Dark] for consistent melting.
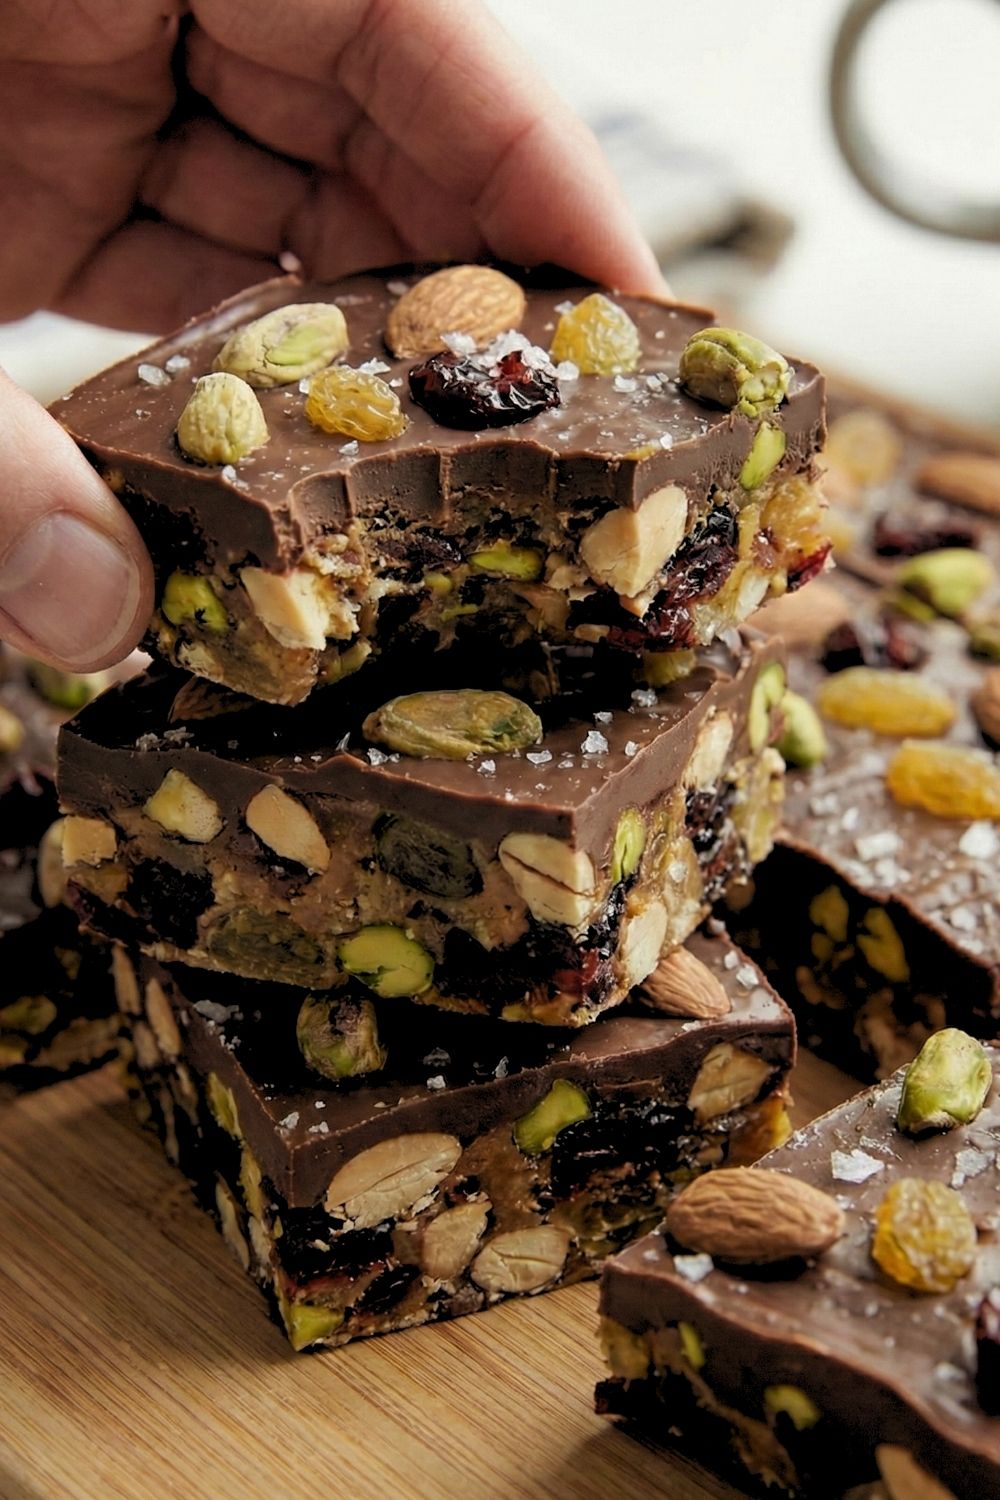
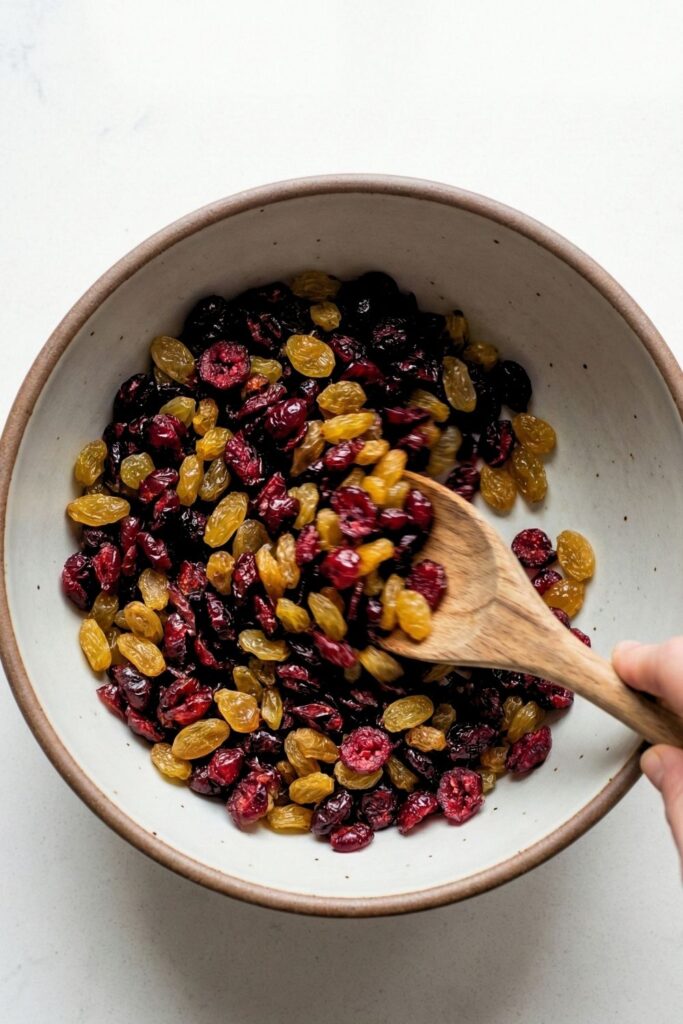
- The Fruit & Nut Mix (Approx. 2 Cups Total): This is where you can get creative. For this specific recipe, I used a classic mix to get a balance of sweet, tart, and crunchy:
- Raw Almonds (1/2 cup): [Bulk Raw Almonds]
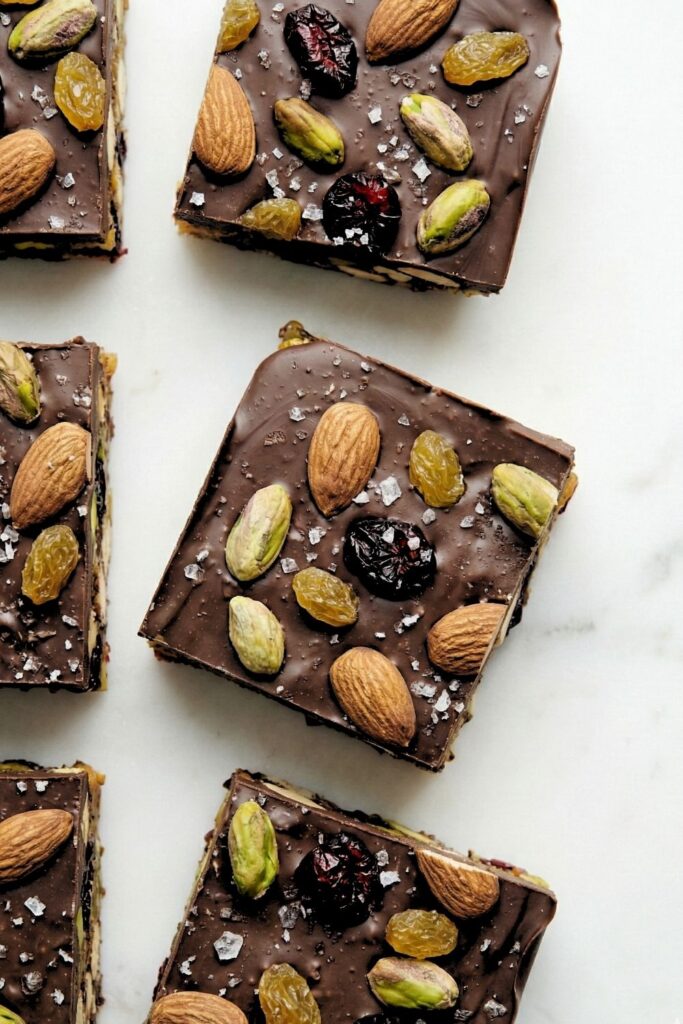
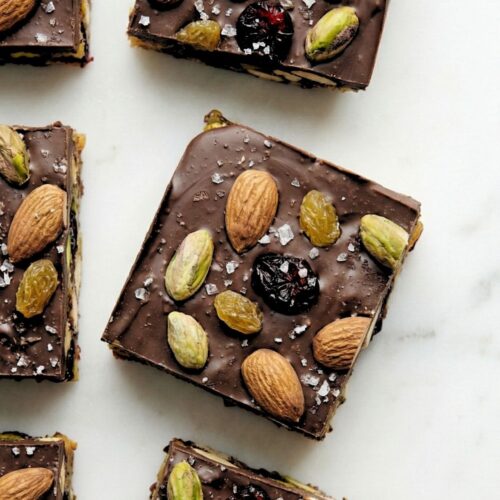
- Raw Pistachios (1/2 cup, shelled): The green color looks amazing against the dark chocolate. [Shelled Pistachios]
- Dried Cranberries (1/2 cup): For a tart pop. [Dried Cranberries]
- Golden Raisins (1/2 cup): Sweeter and prettier than regular raisins. [Golden Raisins]
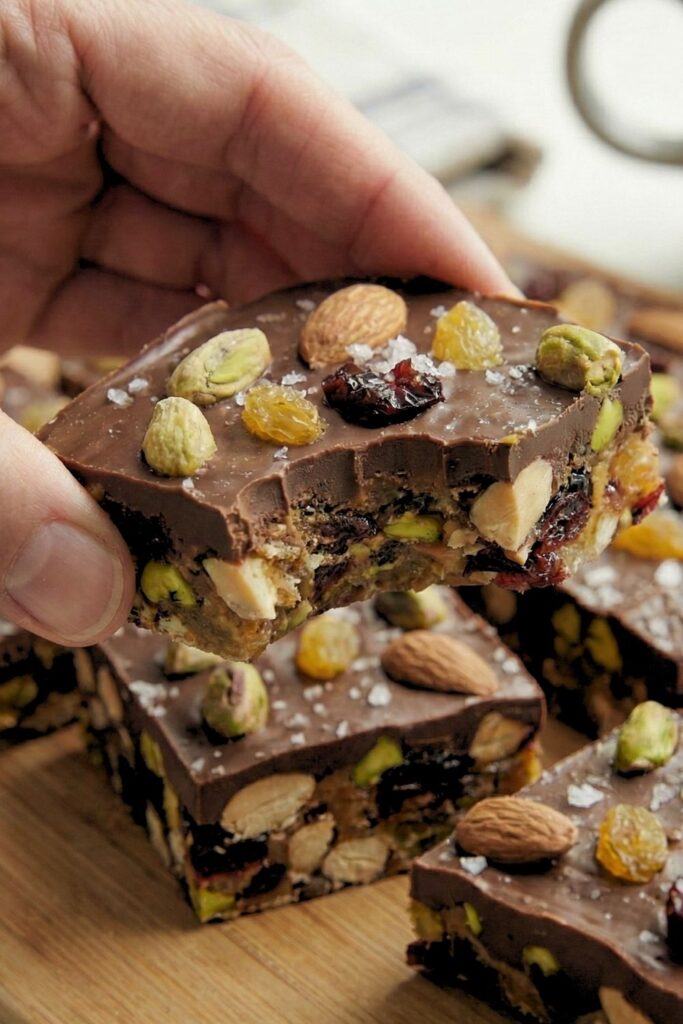
The pistachios add a lovely savory crunch that balances the chewy, sweet raisins perfectly.
- Coconut Oil (1 tsp) – The Secret Ingredient: Just one teaspoon creates a glossy finish and makes the chocolate slightly softer to the bite once set, so you don’t feel like you’re breaking a tooth when you bite into the bar! [Organic Coconut Oil]
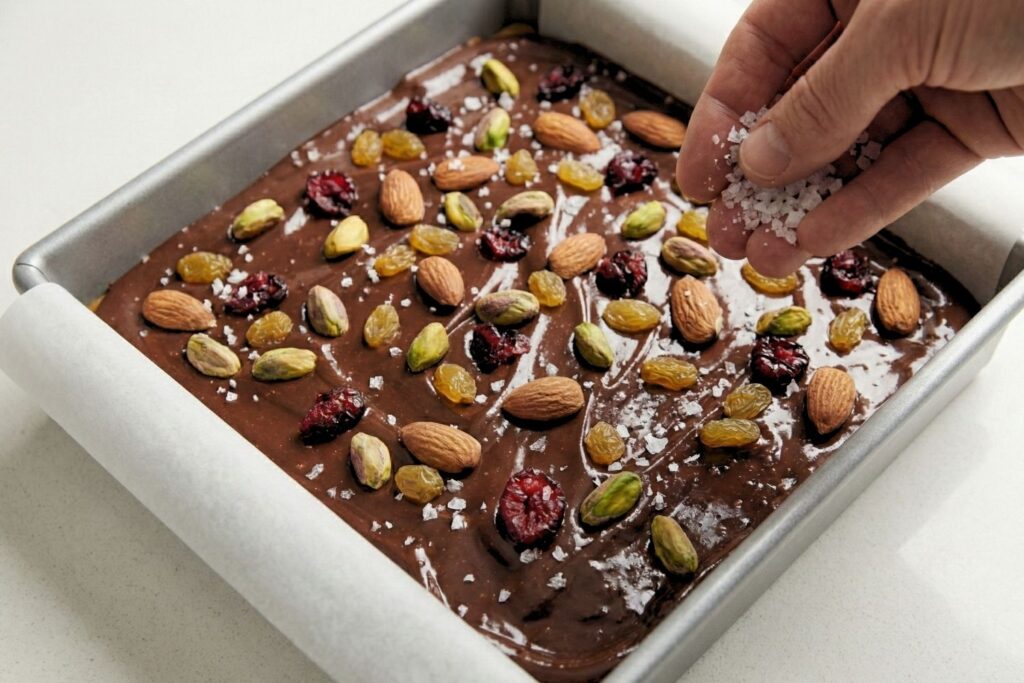
- Flaky Sea Salt (Optional but Recommended): A tiny sprinkle on top enhances the chocolate flavor and makes the sweetness pop. [Maldon Sea Salt Flakes] chicken
Equipment You’ll Need
You don’t need a professional kitchen, but these few tools make the process mess-free and ensure your bars look neat.
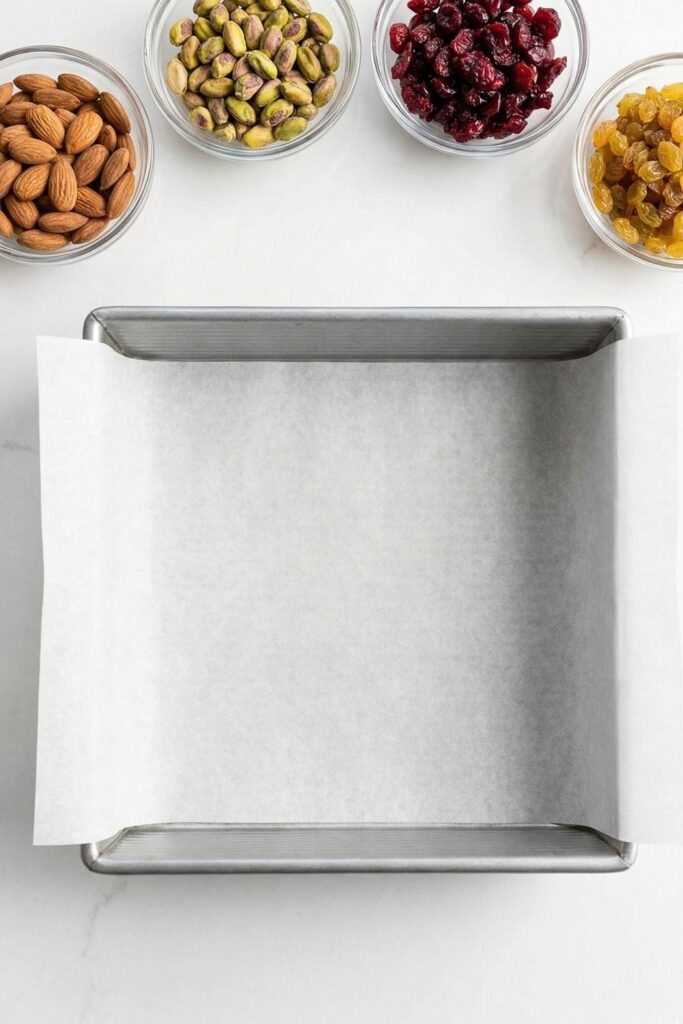
- 8×8 or 9×9 inch Baking Pan: This creates the perfect thickness for a “bar.”
- Parchment Paper: Crucial! Do not skip this, or your chocolate will stick forever to the pan. [Reynolds Parchment Paper]
- Heat-Proof Bowl & Saucepan: To create a “double boiler” for gently melting the chocolate.
- Silicone Spatula: For stirring the glorious melted chocolate. [Heat Resistant Silicone Spatula]
How to Make Fruit and Nut Chocolate Bars (Step-by-Step)
This process is simple, but don’t rush the melting stage. Patience is key to glossy chocolate!
Step 1: Prepare Your Pan and Mix
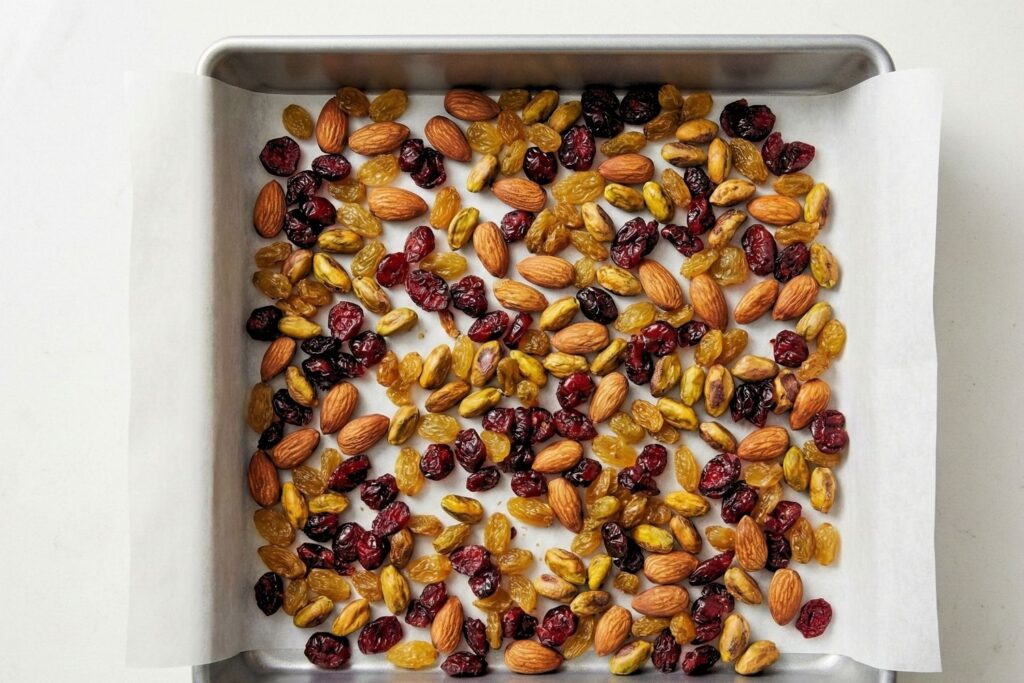
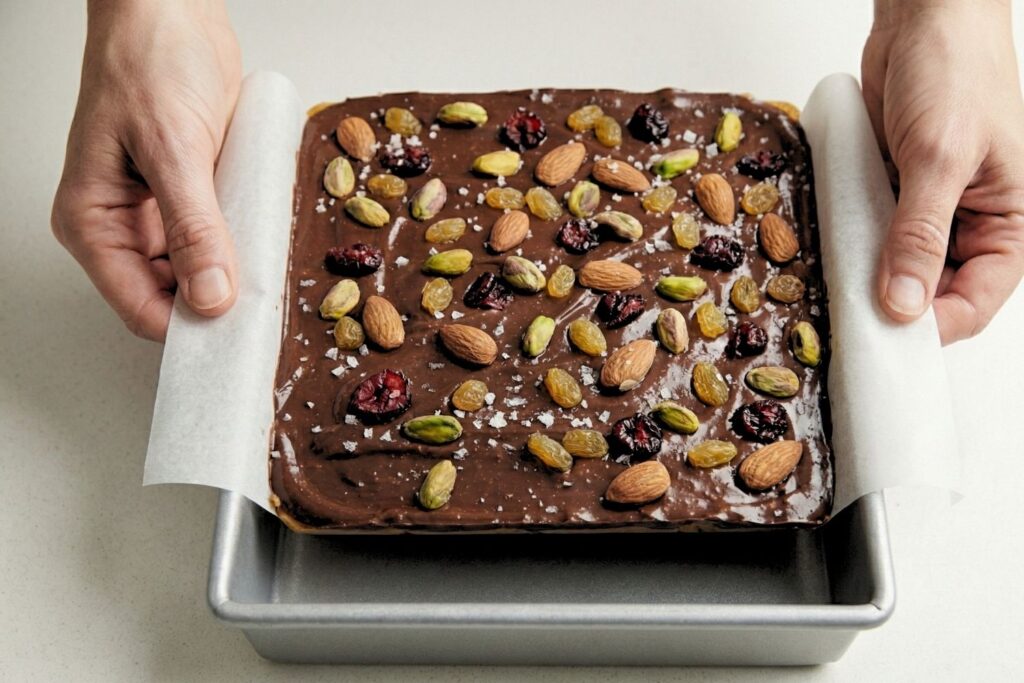
- First, line your 8×8 inch square pan with parchment paper. Leave a little overhang on the sides this creates “handles” that make it super easy to lift the entire chocolate block out later.
- Next, in a medium bowl, toss together your cranberries, and golden raisins until they are well mixed.
Step 2: Toast the Nuts (Crucial Flavor Step!)
Do not skip this! Raw nuts are okay, but toasted nuts have a deeper, nuttier flavor and a much better crunch that stands up to the chocolate.
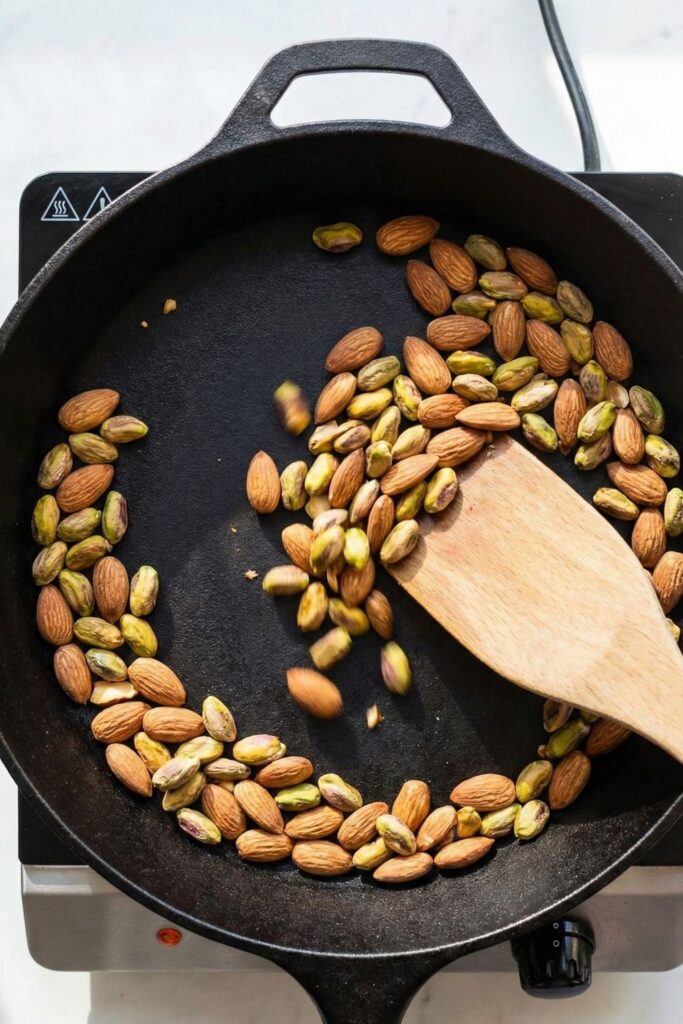
- How to do it: Place your almonds and pistachios in a dry skillet over medium heat. Stir them frequently for about 5-7 minutes. You will know they are done when you can smell that fantastic toasted nut aroma. Remove them from the heat immediately so they don’t burn, and let them cool slightly before mixing them back in with the dried fruit.
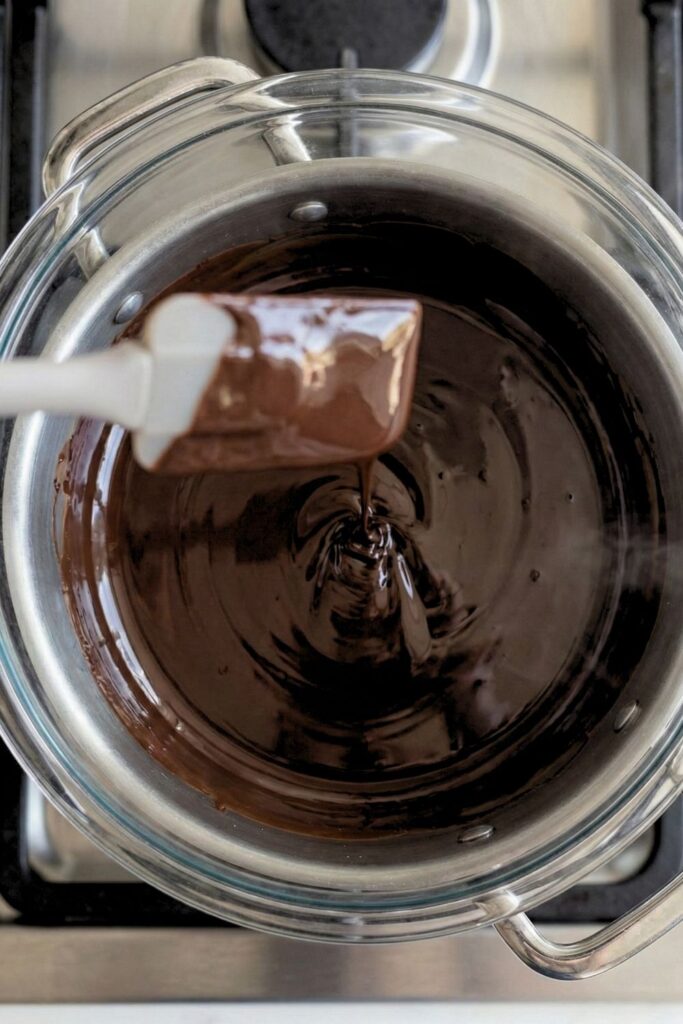
Step 3: Melt the Chocolate Gently
Chocolate hates high heat and water. The best way to melt it without burning it is using a “double boiler.”
- Place a heat-proof bowl over a saucepan filled with an inch or two of simmering water (make sure the bottom of the bowl doesn’t touch the water).
- Break your dark chocolate bars into small pieces and place them in the bowl along with that teaspoon of coconut oil.

- Stir gently and continuously with your silicone spatula until about 90% of the chocolate is melted. Remove the bowl from the heat and keep stirring the residual heat will melt the remaining lumps. This ensures you don’t overheat it.
Step 4: The Assembly
This is the fun part. You have two options here:
- Option A (The Mix-In Method): Pour about 3/4 of your fruit and nut mix directly into the melted chocolate and stir to coat.
- Pour the entire mixture into your prepared pan and spread it out. Then, sprinkle the remaining 1/4 of the fruit and nuts on top for visual appeal.
- Option B (The Layered Method – My Preference): Spread about half of your fruit and nut mix evenly over the bottom of the parchment-lined pan.
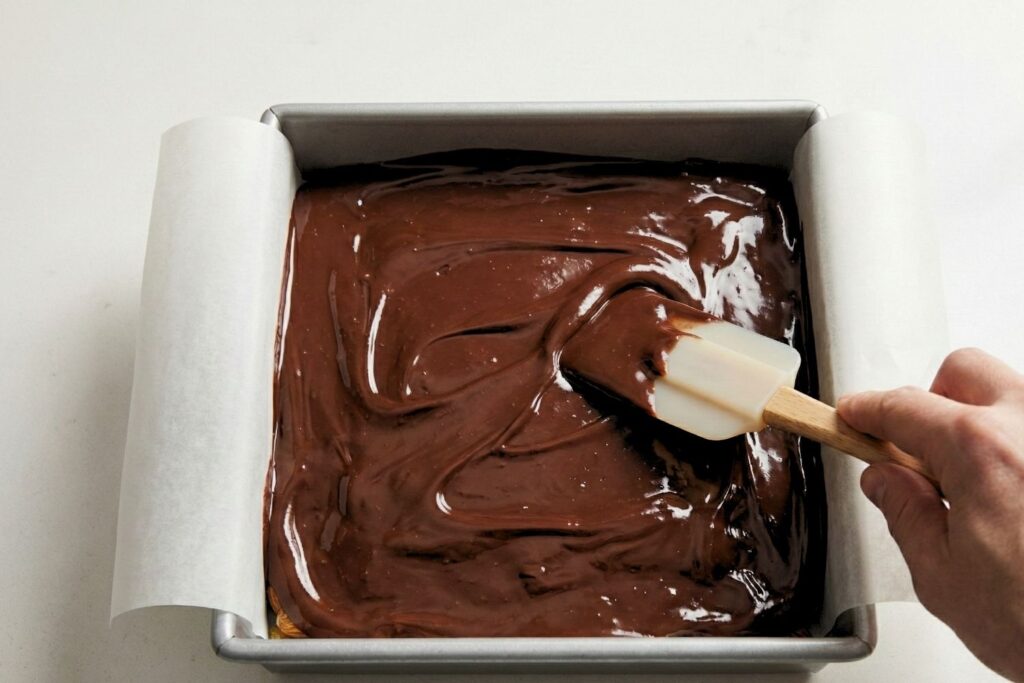
- Pour the melted chocolate evenly over the top,
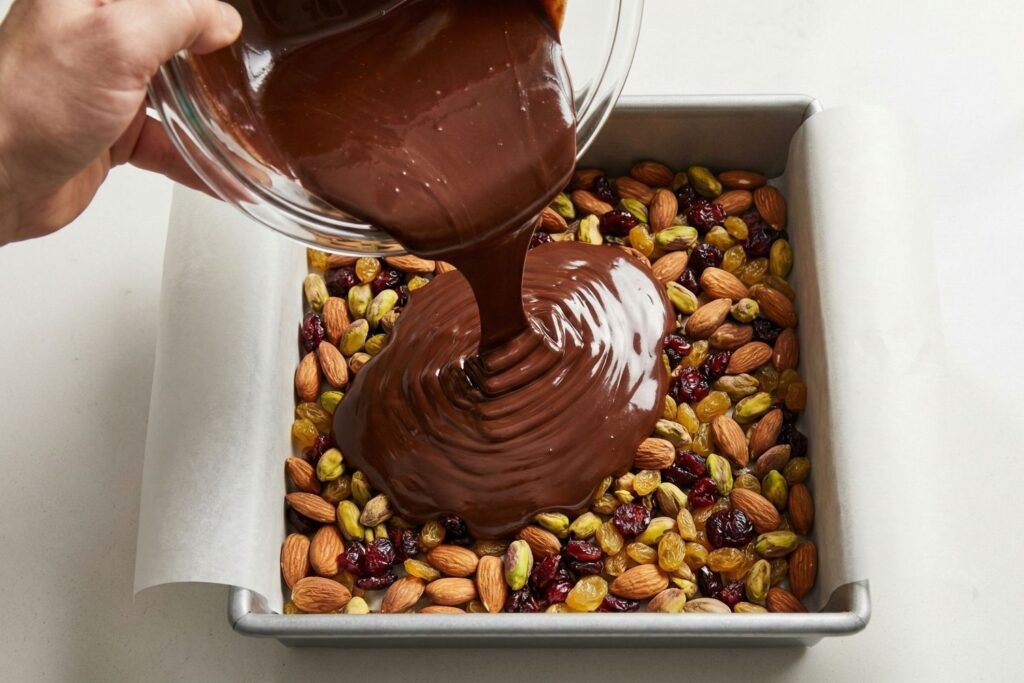
- using your spatula to spread it to the corners. Gently tap the pan on the counter a few times to release air bubbles.
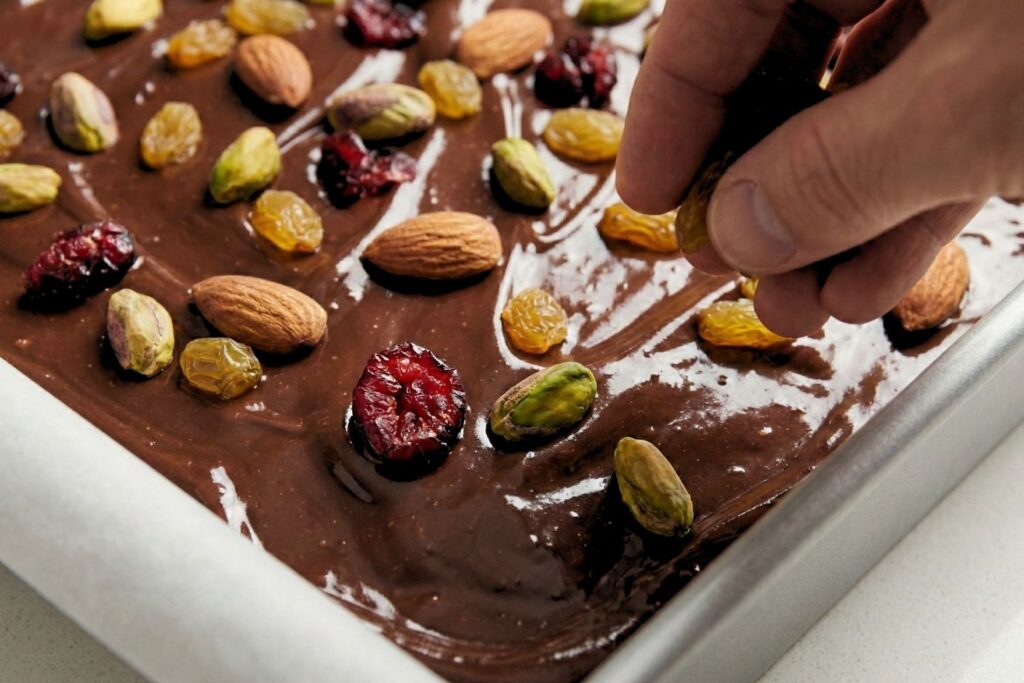
- Finally, sprinkle the remaining fruit and nut mix over the wet chocolate, pressing them down very gently so they stick.
Step 5: Set and Finish
If you are using the flaky sea salt, sprinkle a small pinch over the wet chocolate now. Place the pan in the refrigerator for at least 2 hours, or until the chocolate is completely firm to the touch.
Step 6: Slice and Serve
- Once set, use the parchment paper handles to lift the chocolate block out of the pan onto a cutting board.
- Using a large, sharp knife, cut the block into bars or squares.
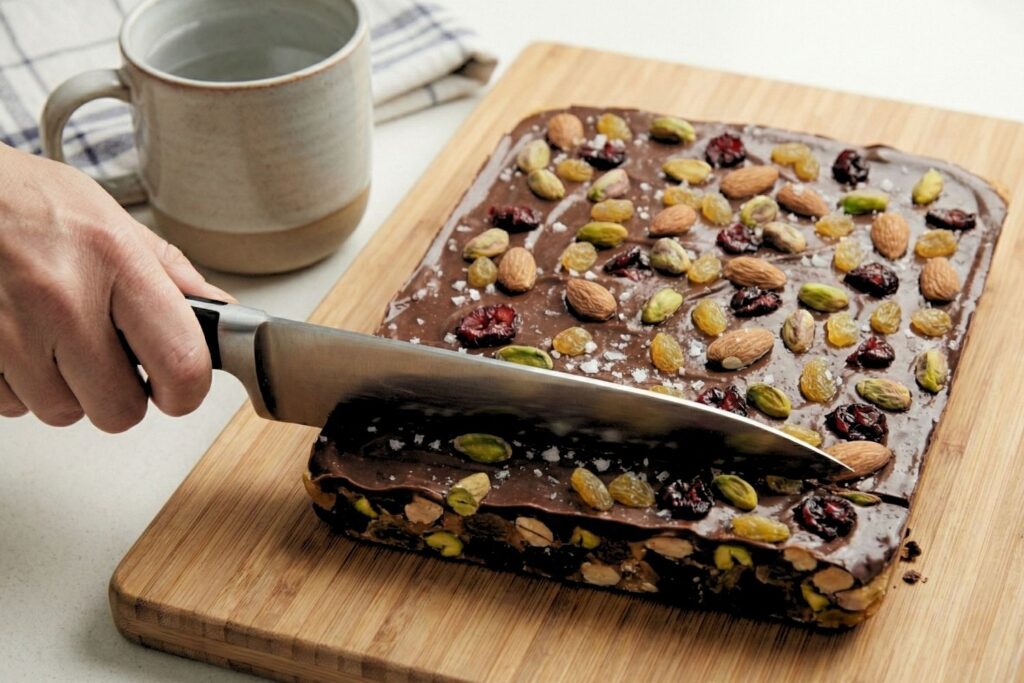
- Pro Tip for Clean Cuts: Run your knife under hot water and wipe it dry before slicing. The warm blade melts through the chocolate neatly instead of cracking it.
Expert Tips for the Best Homemade Bars
- Avoid the Microwave (If Possible): While you can melt chocolate in the microwave in short 20-second bursts, it’s very easy to overheat it. Burnt chocolate gets thick, grainy, and tastes bitter. The double-boiler method is much safer and results in a smoother texture.
- Water is the Enemy: Be incredibly careful not to let even a single drop of water get into your melting chocolate. Water will cause the chocolate to “seize,” turning it into a stiff, lumpy mess that can’t be fixed.
- Make it a Mold: If you want perfectly uniform, professional-looking bars, you can buy silicone molds specifically made for chocolate bars. [Silicone Chocolate Bar Molds]. You just place the fruit/nuts in the mold cavities and pour the chocolate over them.
Variations to Try
The beauty of this dark chocolate fruit bar base is that you can change the flavor profile entirely just by switching the mix-ins.
- The Tropical: Use dried mango, pineapple pieces, and toasted coconut flakes with Macadamia nuts.
- The Berry Bliss: Use freeze-dried strawberries and raspberries (for intense flavor) mixed with pecans.
- The Salty & Sweet: Double down on the pretzels (crushed) and peanuts, finished with extra sea salt.
Frequently Asked Questions
Compared to most store-bought candy bars, absolutely. By using 70%+ dark chocolate, you are getting a good dose of antioxidants and minerals like iron and magnesium, with significantly less sugar than milk chocolate. The nuts provide healthy fats and protein, and the fruit adds fiber. However, it is still an energy-dense food, so enjoy it in moderation as part of a balanced diet!
Because homemade chocolate isn’t tempered the same way commercial chocolate is, it’s best stored in an airtight container in the refrigerator, especially during warmer months. They will keep well in the fridge for up to 2 weeks.
Yes! These freeze beautifully. Wrap individual bars in parchment paper and place them in a freezer-safe bag. They will last for up to 3 months. They are actually delicious eaten straight from the freezer on a hot day.
This is called “bloom.” It happens when chocolate gets too warm or is exposed to moisture, causing the cocoa butter/sugar to rise to the surface. Don’t worry it is still perfectly safe and delicious to eat! It just doesn’t look as pretty. Keeping your bars in the fridge helps prevent this.
Dried fruit is essential. Do not use fresh fruit, as the water content will ruin the chocolate and make the bars soggy within a day. Dried cherries, apricots (chopped), figs, and blueberries are all excellent choices alongside raisins and cranberries.
If you try this recipe, please leave a comment below and let me know what fruit and nut combination you used! I love seeing your creations.
Homemade Dark Chocolate Fruit and Nut Bars
Equipment
- 8×8 inch Baking Pan
- Parchment paper
- Heat-Proof Bowl (for melting)
- Saucepan
- Silicone spatula
- Sharp knife
Ingredients
- 12 oz Dark Chocolate 70% cocoa or higher, chopped (approx. 3-4 standard bars)
- 1 tsp Coconut Oil Organic
- 1/2 cup Raw Almonds Whole or roughly chopped
- 1/2 cup Pistachios Shelled, raw
- 1/2 cup Dried Cranberries
- 1/2 cup Golden Raisins
- 1 pinch Flaky Sea Salt Optional, for garnish
Instructions
- Prep the Pan: Line an 8×8 inch square baking pan with parchment paper. Make sure to leave a few inches of overhang on the sides—this will act as handles to lift the chocolate out later.
- Toast the Nuts (Flavor Step): Place the almonds and pistachios in a dry skillet over medium heat. Toast them for 3–5 minutes, stirring frequently, until they smell nutty and fragrant. Remove from heat and let them cool slightly.
- Mix Fillings: In a medium bowl, toss the toasted nuts together with the dried cranberries and golden raisins until well mixed.
- Melt the Chocolate: Fill a saucepan with 1-2 inches of water and bring to a simmer. Place a heat-proof bowl on top (making sure the bottom doesn’t touch the water) to create a double boiler. Add the chopped dark chocolate and coconut oil to the bowl. Stir gently and continuously until completely melted and glossy.
- Assemble: Remove the chocolate from the heat. Option A (Chunky): Stir 3/4 of your fruit and nut mix directly into the melted chocolate, then pour it into the prepared pan. Option B (Layered): Scatter half the mix on the bottom of the pan, pour the chocolate over it, and tap the pan on the counter to level it.
- Top It Off: Sprinkle the remaining fruit and nut mix over the top of the wet chocolate. Gently press the toppings down with the back of a spoon so they stick. Sprinkle with flaky sea salt if desired.
- Chill: Place the pan in the refrigerator for at least 2 hours, or until the chocolate is completely firm to the touch.
- Slice: Use the parchment paper handles to lift the solid block out of the pan. Run a sharp knife under hot water, wipe it dry, and slice the block into 16 even squares. Serve cold or at room temperature.
Notes
- Storage: Store these bars in an airtight container in the refrigerator for up to 2 weeks. If your kitchen is cool (under 70°F/21°C), they can be stored in a cool, dark cupboard.
- Freezing: These freeze perfectly! Wrap individual bars in parchment paper and freeze for up to 3 months.
- Chocolate Choice: Do not use chocolate chips if possible; they contain stabilizers that prevent smooth melting. Use high-quality baking bars like Lindt or Ghirardelli.
- Coconut Oil: The coconut oil helps the chocolate slice easier without cracking. If you don’t have it, you can use butter or simply omit it (but be careful when cutting!).