There is a fundamental misconception in the post-workout nutrition window. Most enthusiasts prioritize raw protein intake while neglecting the glycogen transport vehicle required to shuttle amino acids into the skeletal muscle tissue. Without an insulin spike from a fast-digesting carbohydrate, the protein you consume is largely oxidized for energy rather than utilized for myofibrillar protein synthesis (MPS).
This protocol solves that efficiency gap.
We are engineering a Hyper-Palatable Recovery Matrix.
By utilizing the enzymatic breakdown of overripe bananas, we create a glucose-heavy delivery system that spikes insulin just enough to drive the amino acids from the protein powder directly into the muscle cell. The lipid source (peanut butter) is titrated to slow digestion slightly, ensuring a sustained release of nutrients without blunting the immediate recovery response.
This is not a “treat.” This is a calculated macronutrient injection designed to optimize your nitrogen balance post-exertion.
We are strictly avoiding flour. Also avoiding refined sugars. We are relying entirely on the chemical interaction between hydrolyzed whey (or casein) isolates, natural fructose, and lipid emulsification.
The result is a dense, fudgy, high-utility cookie that effectively halts catabolism (muscle breakdown) and initiates anabolism (muscle repair).
Let’s get into the chemistry.
The Science: Why This Matrix Works
To understand why this specific ratio of 2:1:1 (Bananas to PB to Protein) works, you must understand the concept of “Binder-Free Structure.”
Standard cookies rely on gluten networks (flour + water) to trap air and create structure. When you remove the flour, you lose that elastic network. We are replacing the gluten network with a Protein-Polysaccharide Complex.
The Glycogen Driver (The Banana)
The ripeness of the banana is a chemical non-negotiable here. A green or yellow banana contains resistant starch (hard to digest). As the banana develops brown spots, amylase enzymes break those starches down into simple sugars (glucose and fructose). This increases the “Binding Index” (stickiness) and provides the immediate glycogen replenishment your depleted muscles require after training.
The Structural Agent (The Protein Powder)
Protein powder is hygroscopic it absorbs moisture. In this matrix, the powder acts as the “dry” agent, soaking up the water content from the bananas. However, unlike flour, protein does not gelatinize. If you overheat it, it denatures and becomes rubbery. We are baking at a moderate 350°F to set the structure without seizing the proteins into a tough, inedible puck.
The Lipid Emulsifier (The Peanut Butter)
Fat creates “shortness” in baking (a tender crumb). Without the peanut butter, the banana and protein mixture would bake into a gummy, rubbery mass. The oil in the peanut butter coats the protein particles, preventing them from bonding too tightly. This is what creates the “fudge-like” texture rather than a “rubber-like” texture.
Ingredient Deep Dive: The Variablesp
Precision in ingredient selection is the difference between a high-utility fuel source and a crumbling mess. Do not deviate from these specifications.
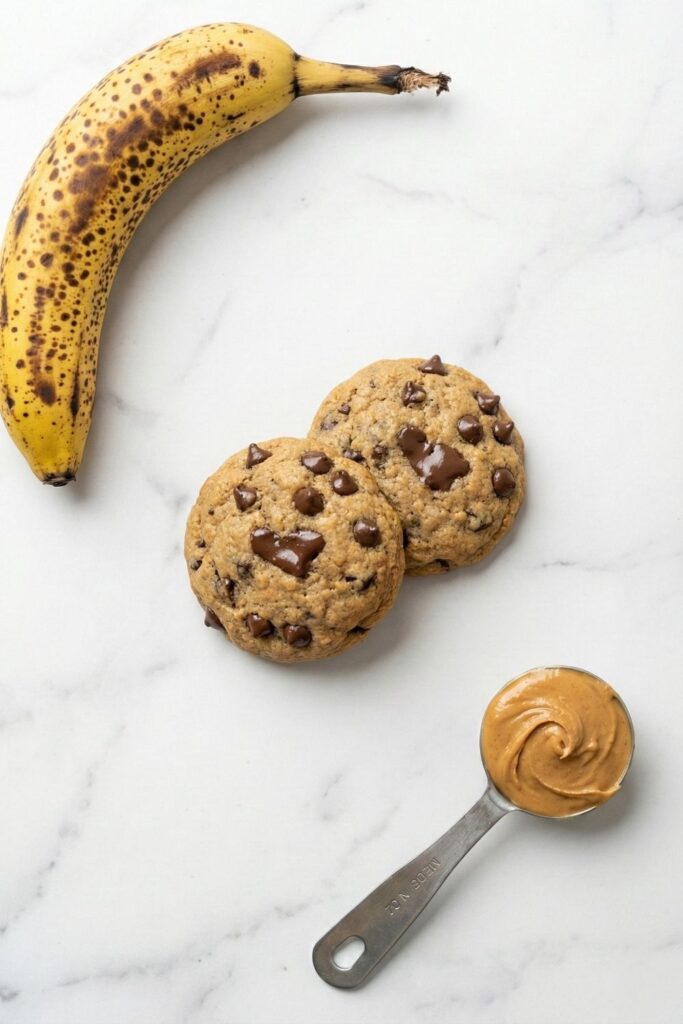
The Potassium Source: Bananas (Musa Acuminata)
- Status: Highly Oxidized (Brown/Spotted).
- The Spec: You need exactly two medium bananas.
- If they are too green, the starch content will be too high, the cookies will taste distinctively “grassy,” and the texture will be dry. You need the enzymatic breakdown to be at roughly 85%. The banana should essentially be a puree inside the peel before you even mash it. This ensures maximum moisture release to hydrate the protein powder.
The Nitrogen Source: Vanilla Protein Powder
- The Spec: 1 Cup (approx. 90-100g).
- Type: Whey/Casein Blend or a High-Quality Plant Isolate.
- Warning: Pure Whey Isolate can dry out very quickly because it has very little fat or lactose. A Whey/Casein blend is superior because Casein thickens when wet, mimicking the texture of dough. If using plant-based, ensure it is a “finely milled” powder. Gritty powders will result in a sandy mouthfeel because there is no butter to mask the texture.
- Flavor: Vanilla is the baseline. It contains vanillin, which enhances the perception of sweetness without adding calories.
The Lipid Source: Natural Creamy Peanut Butter
- The Spec: 1 Cup.
- Texture: “Drippy” or Runny.
- The Chemistry: You must use natural peanut butter (Ingredients: Peanuts, Salt). Commercial peanut butters with added hydrogenated vegetable oils (palm oil) are semi-solid at room temperature. They will not emulsify properly with the banana. You need the natural peanut oil to be in a liquid state to fully saturate the protein powder.
- Note: Salt is a flavor potentiator. If your PB is unsalted, add a pinch of flaky salt to the dough.
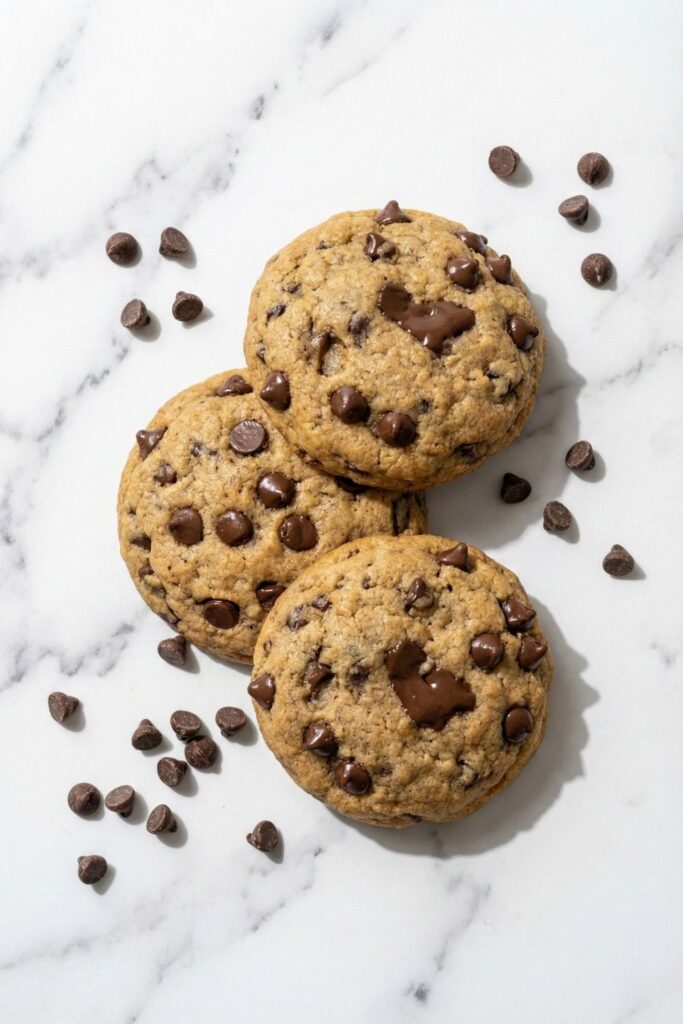
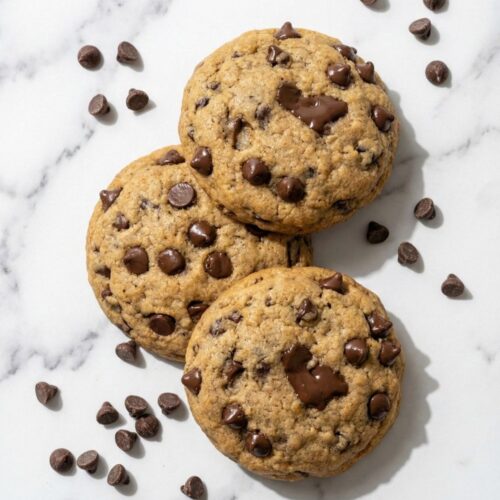
The Texture Contrast: Mini Chocolate Chips
- The Spec: 1 Cup.
- Why Mini? Surface area distribution. Standard chips are too heavy for this flourless matrix and will sink to the bottom. Mini chips remain suspended in the dough, ensuring every bite has a textural “snap” against the soft cookie.

Equipment Clinic: The Hardware
Your tools dictate your consistency.
- The Mixing Vessel: Use a Medium Glass Bowl. Glass is non-reactive and allows you to check the bottom for unmixed dry pockets of protein powder.
- The Agitator: A standard Table Fork is superior to a whisk here. A whisk will get clogged by the dense peanut butter. You need the tines of the fork to mechanically shear the bananas into a liquid state.
- The Thermal Mass: Large Spring-Loaded Cookie Scoop (3 tbsp). This ensures uniform density. If cookies are different sizes, the protein will overcook in the smaller ones while the larger ones remain raw. Uniformity is critical for protein texture.
- The Surface: Parchment Paper. Do not use aluminum foil (cookies will burn) or a bare pan (cookies will stick). Silicone mats are acceptable, but parchment yields a crispier bottom.
Step-by-Step Protocol
This is the execution phase. Follow the visual cues precisely.
Step 1: The Foundation
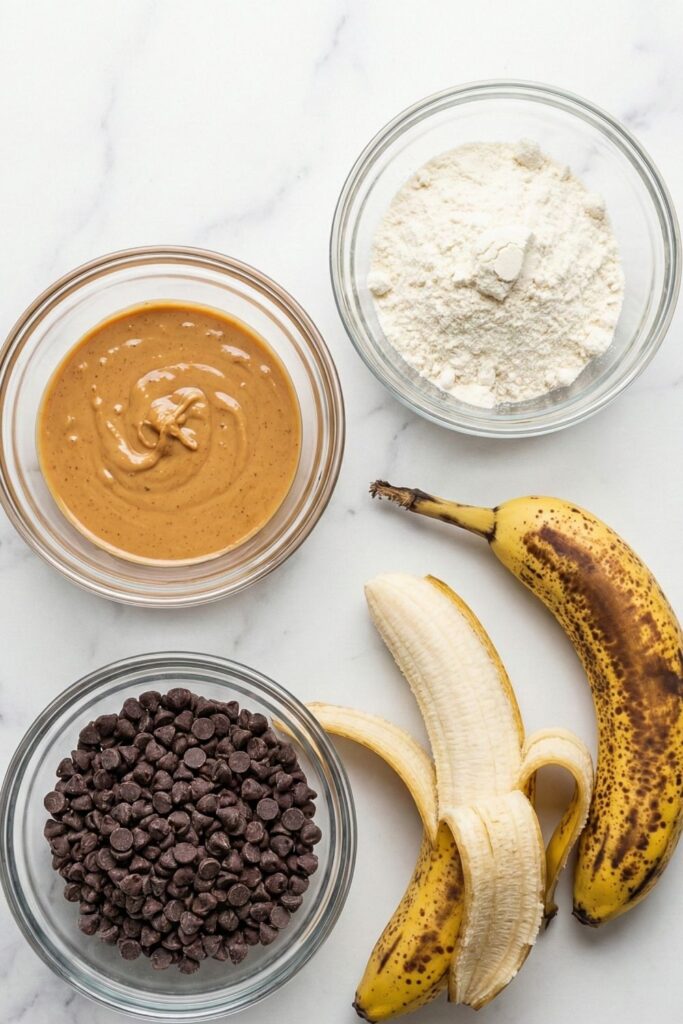
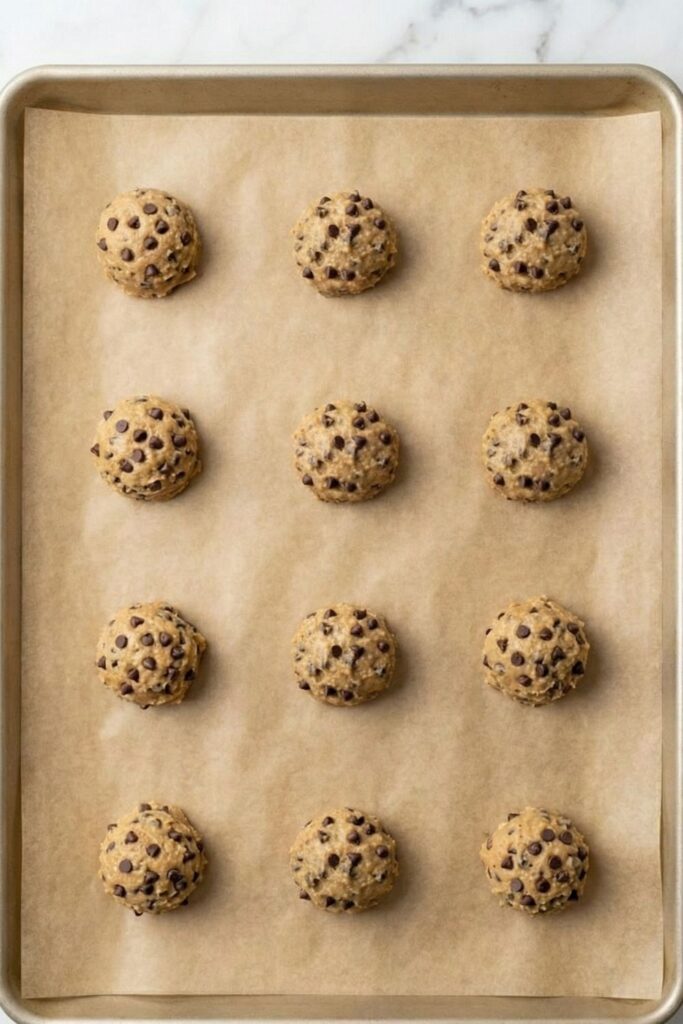
Preheat your oven to 350 degrees. Line your aluminum baking sheet with parchment paper. Do not use foil. Look at your ingredients now. You need exactly 2 spotty bananas, 1 cup creamy natural peanut butter, 1 cup vanilla protein powder, and 1 cup mini chocolate chips.
Ensure your peanut butter is in a liquid state before beginning.
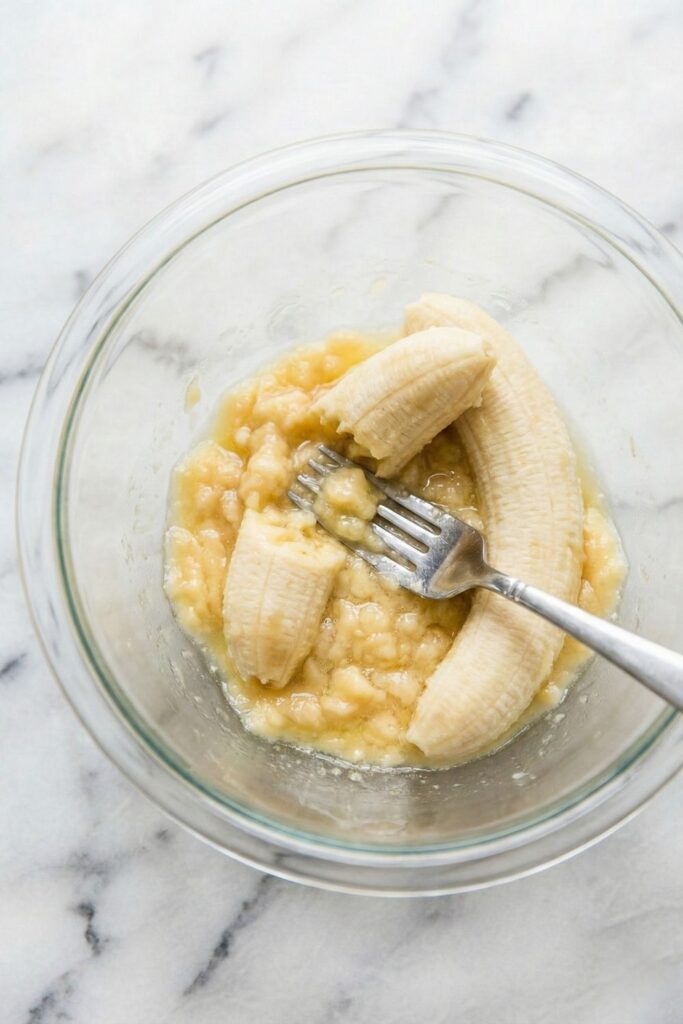
Drop your two spotty bananas into a glass bowl. Use a fork to aggressively mash them. Stop when you achieve a wet, smooth puree. This liquid is your binder.
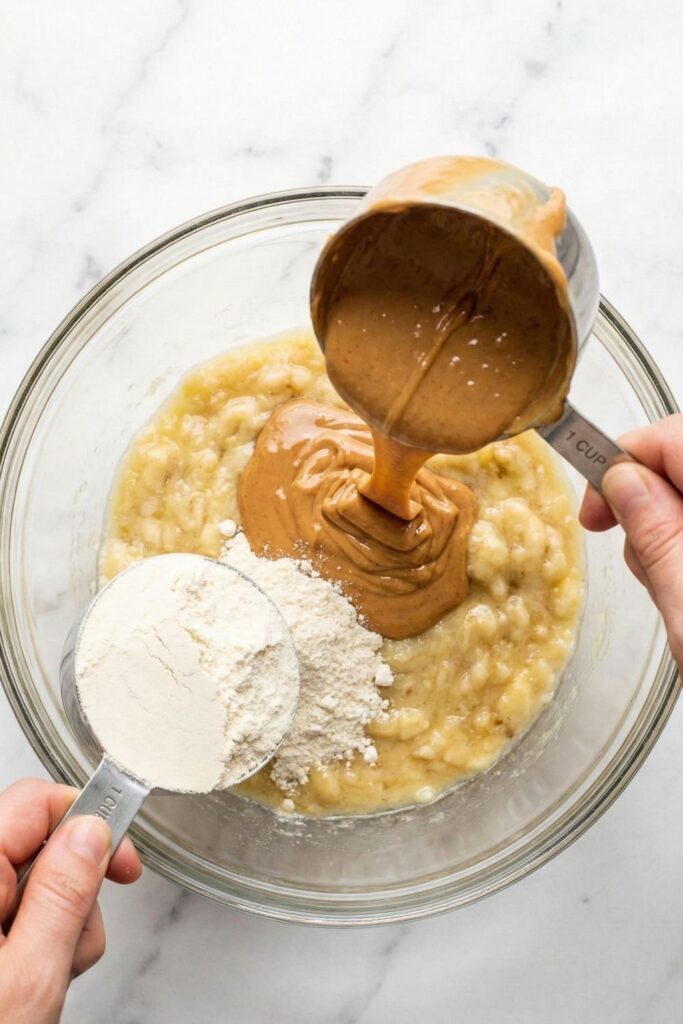
Pour the cup of liquid peanut butter and the cup of protein powder directly over the mashed bananas. Switch to a spoon.
Watch the texture change.
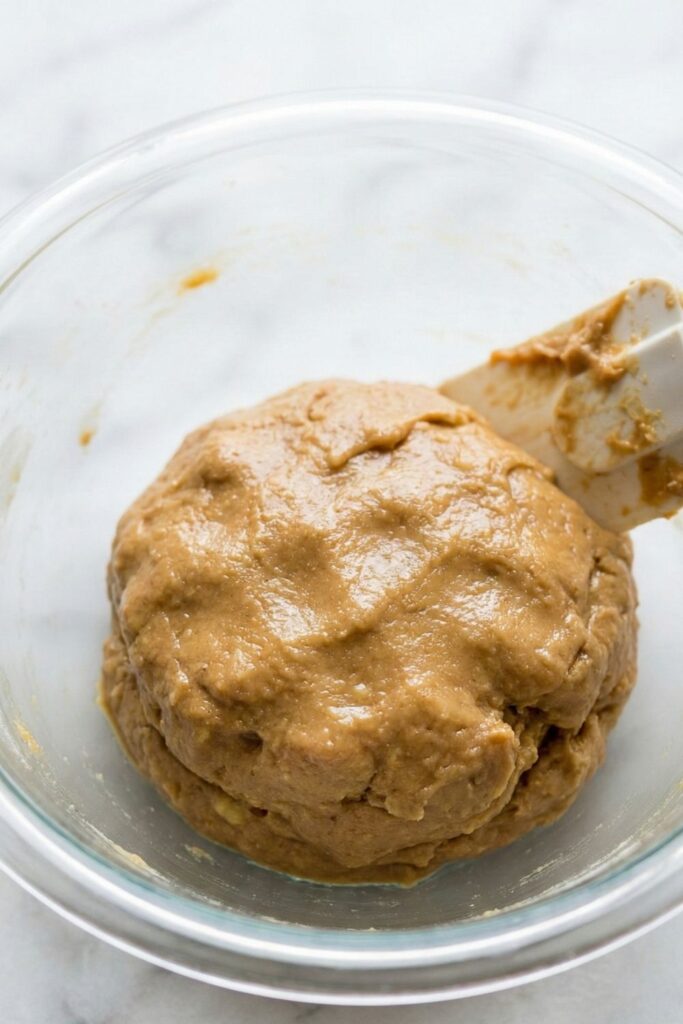
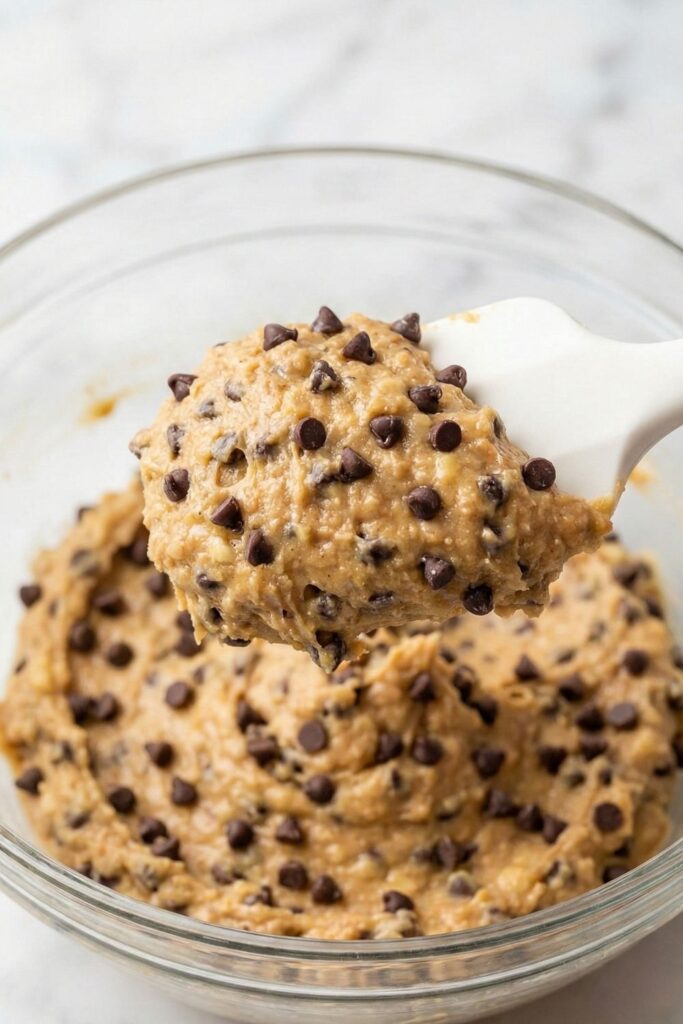
Mix until the protein powder is fully hydrated. The dough must look thick, glossy, and uniform. If you see dry white streaks, keep mixing.

Pour in the cup of mini chocolate chips. Fold them in gently. Lift a spoonful. The dough should hold its shape perfectly against gravity.
Are you ready to bake?
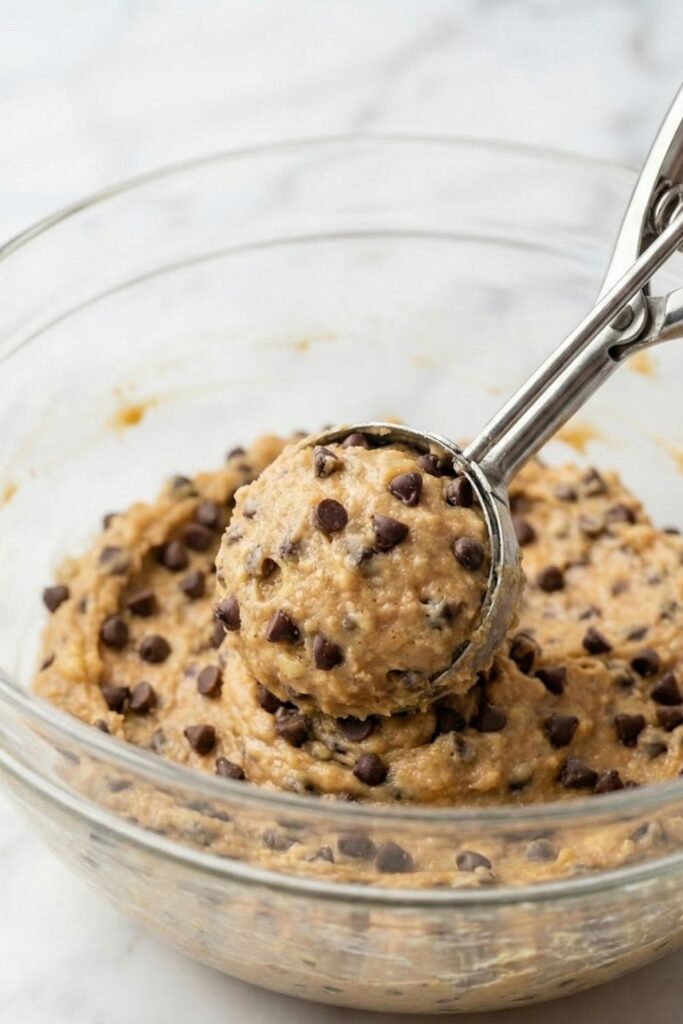
Step 6: The Portioning
When the cookie dough has been completely mixed make sure not to over-mixe the batter and has that thick consistency Grab a three tablespoon cookie scoop. Pack the dough tightly to remove air pockets. Drop the spheres onto your parchment paper.
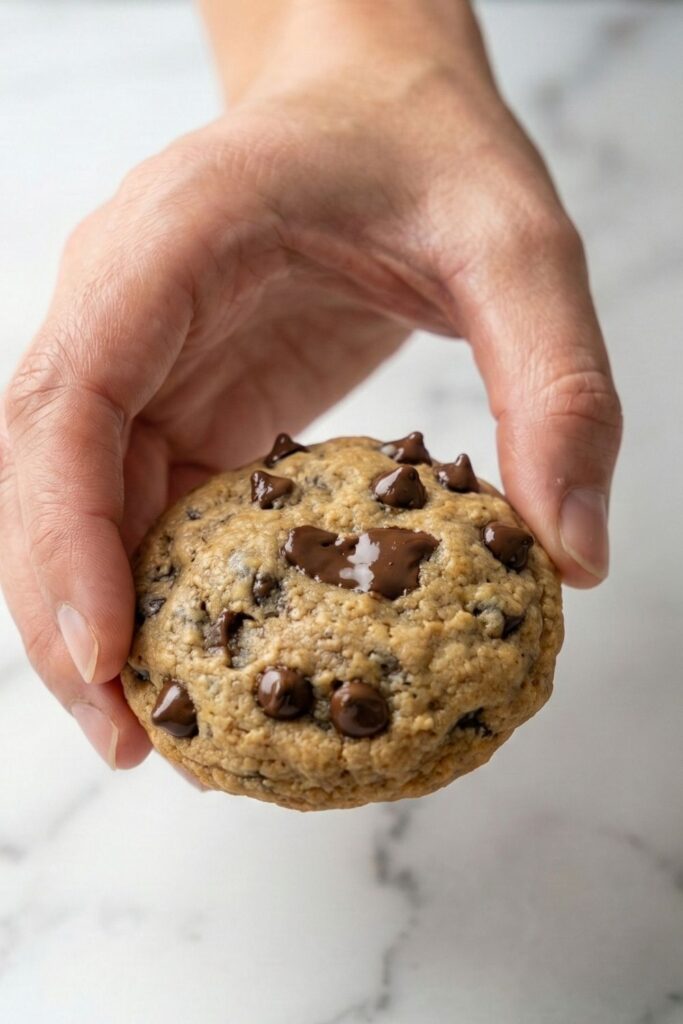
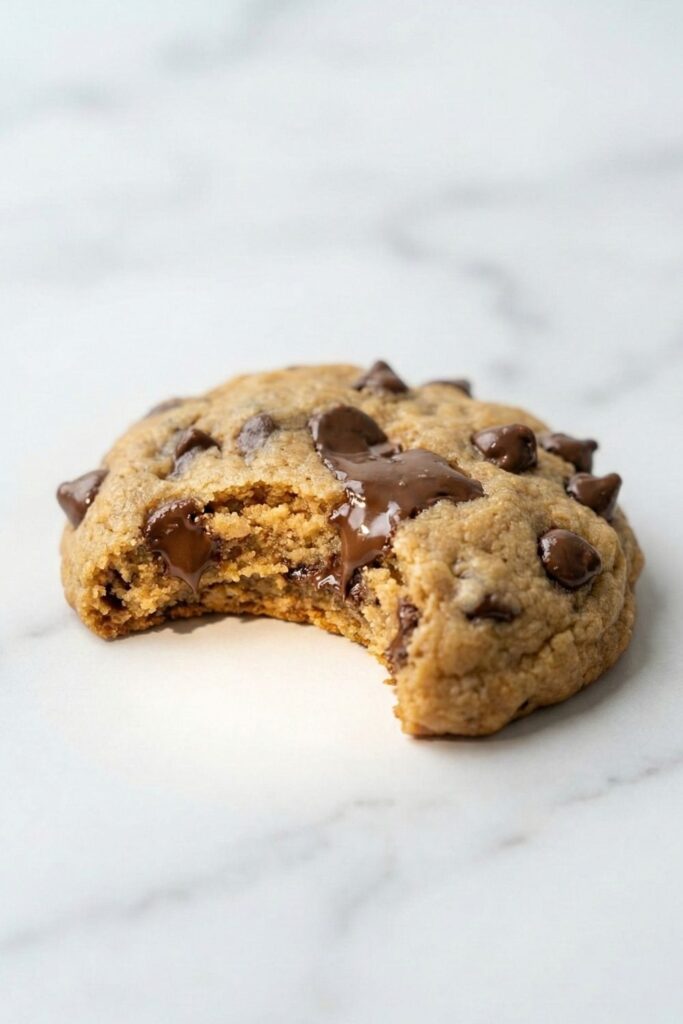
Bake for 10 to 11 minutes. Pull them when the edges are set but the centers remain soft.
Do not touch them yet.
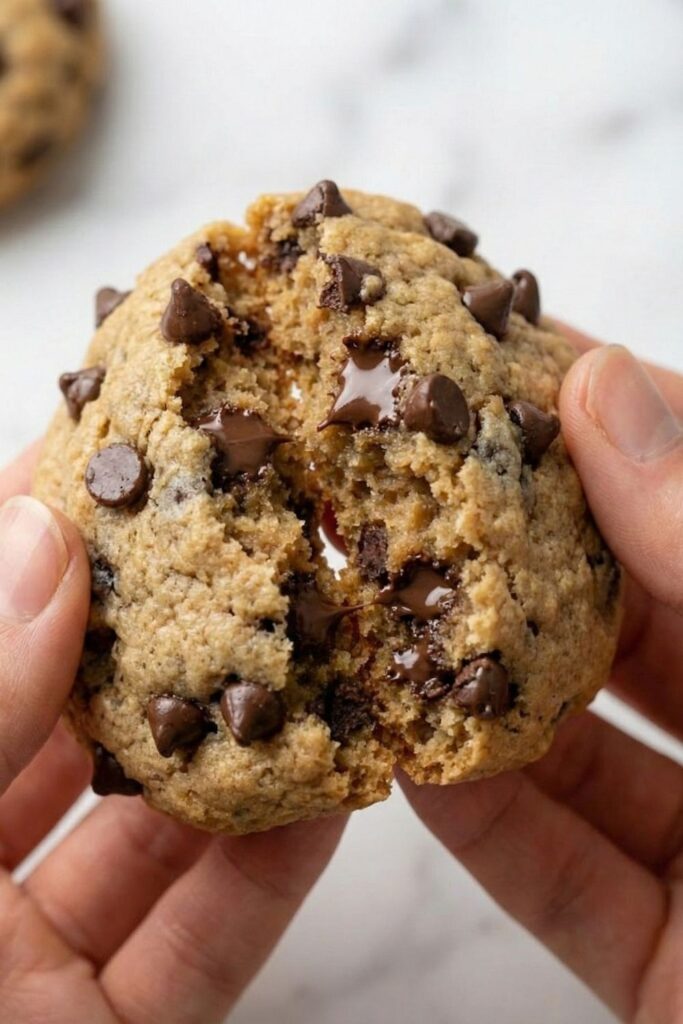
Leave them on the hot pan for exactly 15 minutes to finish setting before breaking them open to enjoy the warm melted chocolate interior.
If you love recipes like this check out my The High-Protein Sweet Potato Brownie
Troubleshooting: The Failure Points
I have analyzed the common points of failure in flourless protein baking. If your result is sub-optimal, diagnose it here.
The “Chalky” Mouthfeel.
- The Cause: High ratio of protein powder to banana moisture.
- The Fix: Your bananas were likely too small or under-ripe. Next time, add a tablespoon of almond milk to the dough or use a kitchen scale to ensure you have at least 200g of banana flesh. Also, check your protein source pea protein is naturally grittier than whey.
The “Spread” Issue
- The Cause: Your peanut butter was too oily or warm.
- The Fix: If your PB is liquid at room temperature, chill the dough for 10 minutes before baking. This solidifies the fats and helps the cookie hold its vertical structure.
The “Gummy” Center.
- The Cause: Under-baking or insufficient cooling.
- The Fix: Because there is no gluten, these cookies rely on thermal setting. If you pick them up hot, they will fall apart. They must cool to room temperature to achieve the correct “chew.” If they are still wet after cooling, bake them for 2 extra minutes next time.
Bitter Aftertaste
- The Cause: Burnt Protein or bad powder.
- The Fix: Protein powder burns faster than flour. Ensure your oven rack is in the center, not the top third. Also, taste your raw protein powder. If it tastes chemical or bitter on its own, baking it will only concentrate that flavor. Use a brand you actually enjoy drinking.
Serving & Storage Protocols
Storage Architecture:
- Room Temperature: Store in an airtight container for up to 3 days. The high moisture content of the banana makes these prone to spoiling faster than dry cookies.
- Refrigeration: Highly recommended. Store for up to 7 days. The cold temperature solidifies the peanut butter, giving the cookie a denser, “fudgier” bite.
- Freezing: Flash freeze on a baking sheet, then transfer to a freezer bag. They thrive in the freezer for up to 3 months.
Serving Suggestion:
For maximum post-workout utility, consume two cookies within 45 minutes of cessation of exercise. Pair with a black coffee (caffeine aids glycogen replenishment rates) or a glass of almond milk.
Frequently Asked Questions (FAQ)
Negative. PB2 lacks the lipid content required to emulsify the dough. If you use powdered peanut butter, you must reconstitute it with water first, but even then, the lack of fat will result in a rubbery, dry texture. You need the fat for the “shortness” of the cookie.
Wet your hands. Protein dough is naturally tacky. Run your hands under cold water and shake them off before pressing the cookies down. The water creates a barrier that prevents sticking.
That changes the recipe entirely. Oats are a carb source; protein powder is a nitrogen source. Substituting oats will turn this into a standard “breakfast cookie” and drastically reduce the anabolic (muscle-building) potential of the protocol.
You likely over-mixed the batter or your bananas were huge. If the batter is runny, add one more tablespoon of protein powder to stiffen the matrix before scooping.
Strictly speaking, no. The bananas contain fructose. However, this is a Targeted Ketogenic option if consumed strictly post-workout when your body will utilize the carbs immediately for glycogen rather than storing them as fat.
The Anabolic Protocol: 3-Ingredient Nitrogen-Retaining Recovery Cookies
Ingredients
- 2 medium Bananas Highly oxidized/heavily spotted for maximum enzymatic sugar breakdown
- 1 cup Creamy Peanut Butter All-natural. Ingredients must be only peanuts and salt. Must be in a liquid/drippy state
- 1 cup Vanilla Protein Powder Whey/Casein blend or finely milled plant isolate. Do not use pure whey isolate or it will dry out
- 1 cup Mini Chocolate Chips Must be mini to ensure even suspension and proper surface area distribution within the dough matrix
Instructions
- Preheat your oven to 350°F (175°C). Line a heavy-bottomed aluminum baking sheet with parchment paper. Do not use cooking spray or aluminum foil.
- Peel the two overripe bananas and place them into the glass mixing bowl. Using the tines of a table fork, aggressively mash the fruit until it forms a smooth, wet slurry. Leave as few lumps as possible to ensure maximum hydration for the dry ingredients.
- Pour the 1 cup of liquid natural peanut butter and the 1 cup of vanilla protein powder directly into the banana slurry.
- Switch to a mixing spoon. Fold the wet and dry ingredients together. Continue mixing until the powder is fully saturated by the banana moisture and peanut oil. The dough should look thick, glossy, and entirely uniform with no white streaks of dry powder.
- Pour the 1 cup of mini chocolate chips into the dough matrix. Fold gently until the chips are evenly distributed throughout the mixture.
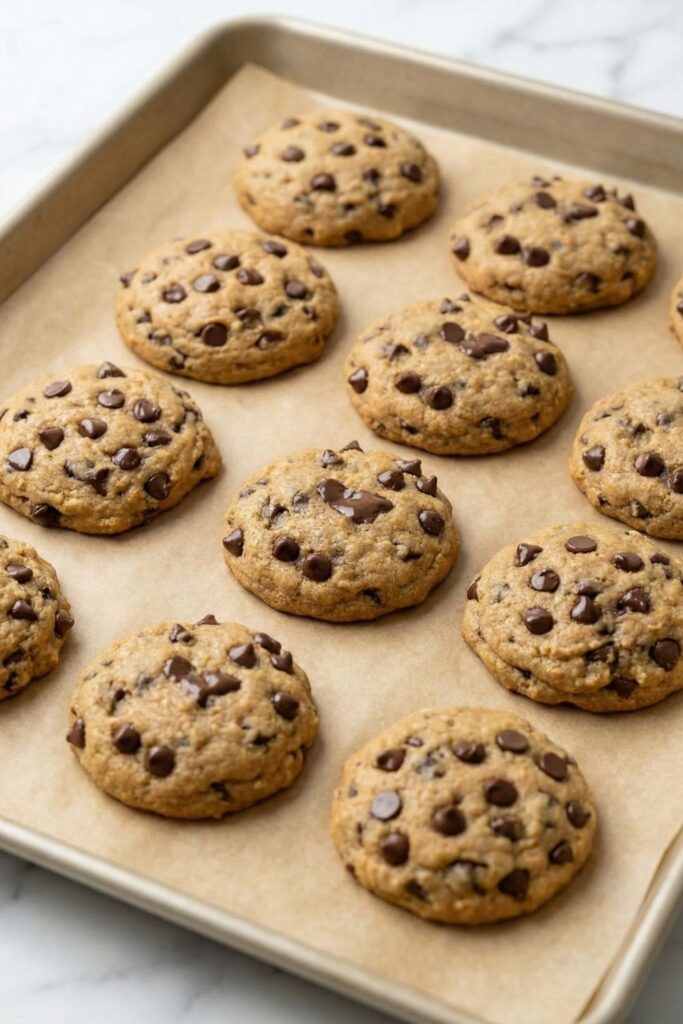
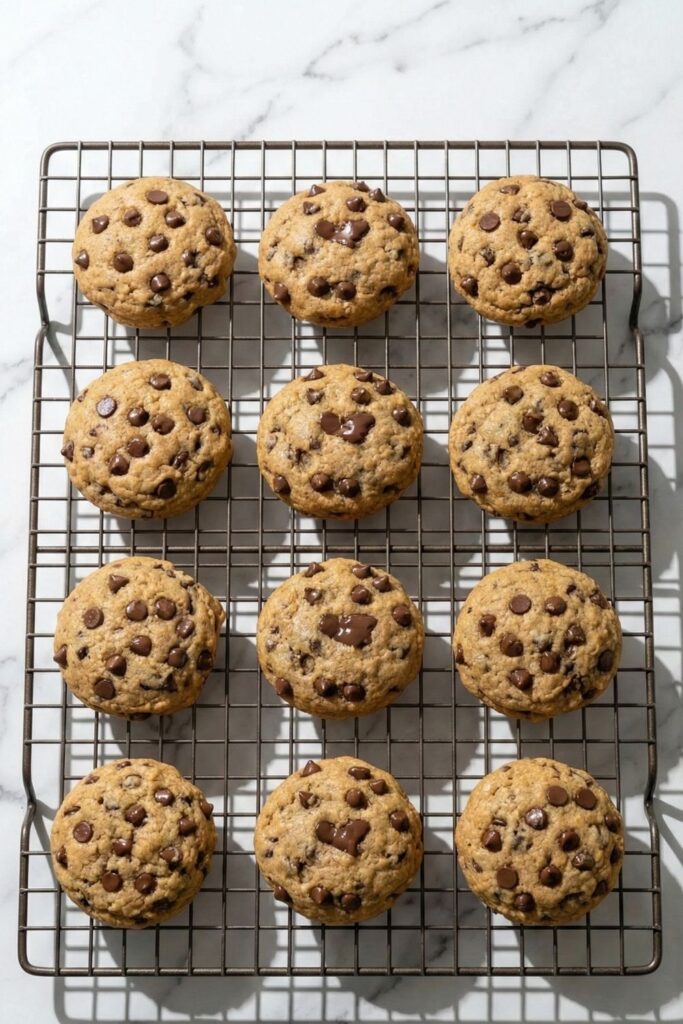
- Using a large, 3-tablespoon capacity cookie scoop, portion the dough tightly to remove air pockets. Drop the dough spheres onto the parchment-lined baking sheet. Space them exactly 3 inches apart. Use your palm to gently flatten the tops of each dough ball, as they will not spread dynamically in the oven.
- Bake on the center rack for 10 to 11 minutes. Execute the doneness test: the edges must be matte and firm to the touch, while the absolute center still appears slightly soft and gooey.
- Remove the baking sheet from the oven. Do not touch the cookies. Allow them to rest undisturbed on the hot baking sheet for exactly 15 minutes. This carry-over cooking is structurally mandatory. Transfer to a wire cooling rack only after the 15-minute mark.
Notes
- Storage Architecture: Store in an airtight container at room temperature for up to 3 days, or refrigerate for up to 7 days for a denser, fudgier texture. To freeze, flash freeze on a baking sheet before transferring to an airtight bag for up to 3 months.
- Troubleshooting Dryness: If your dough feels chalky or sandy before baking, your bananas lacked sufficient moisture mass. Add 1 to 2 teaspoons of almond milk to hydrate the protein powder before adding the chocolate chips.
- Peanut Butter Protocol: If you attempt to use commercial peanut butter containing hydrogenated oils (like Jif or Skippy), the dough will seize and bake into a dry puck. You must use natural peanut oil to emulsify the protein.
Equipment Matrix
- Medium Glass Mixing Bowl (Non-reactive, heavy base)
- Table Fork (For mechanical shearing of bananas)
- Large Cookie Scoop (3-Tablespoon capacity for uniform thermal mass)
- Baking Sheet (Aluminum, light-colored to prevent bottom burning)
- Parchment Paper (Non-stick substrate; do not substitute foil)
- Wire Cooling Rack (For airflow during carry-over cooking)
Nutrition Facts (Estimated Per Cookie)
- Serving Size: 1 Cookie
- Calories: 244 kcal
- Carbohydrates: 20 g
- Protein: 13 g
- Fat: 15 g
- Saturated Fat: 4 g
- Polyunsaturated Fat: 3 g
- Monounsaturated Fat: 7 g
- Cholesterol: 15 mg (will vary based on whey powder brand)
- Sodium: 115 mg
- Potassium: 230 mg
- Fiber: 3 g
- Sugar: 12 g (mostly natural fructose from the bananas)