We have all been there. You open the fridge after a long, stressful day. Your are hungry, tired, and your willpower is at zero. You stare into the abyss: a clutter of half-empty condiment bottles, a wilted bag of spinach shoved in the back, and a mysterious Tupperware container from last week.
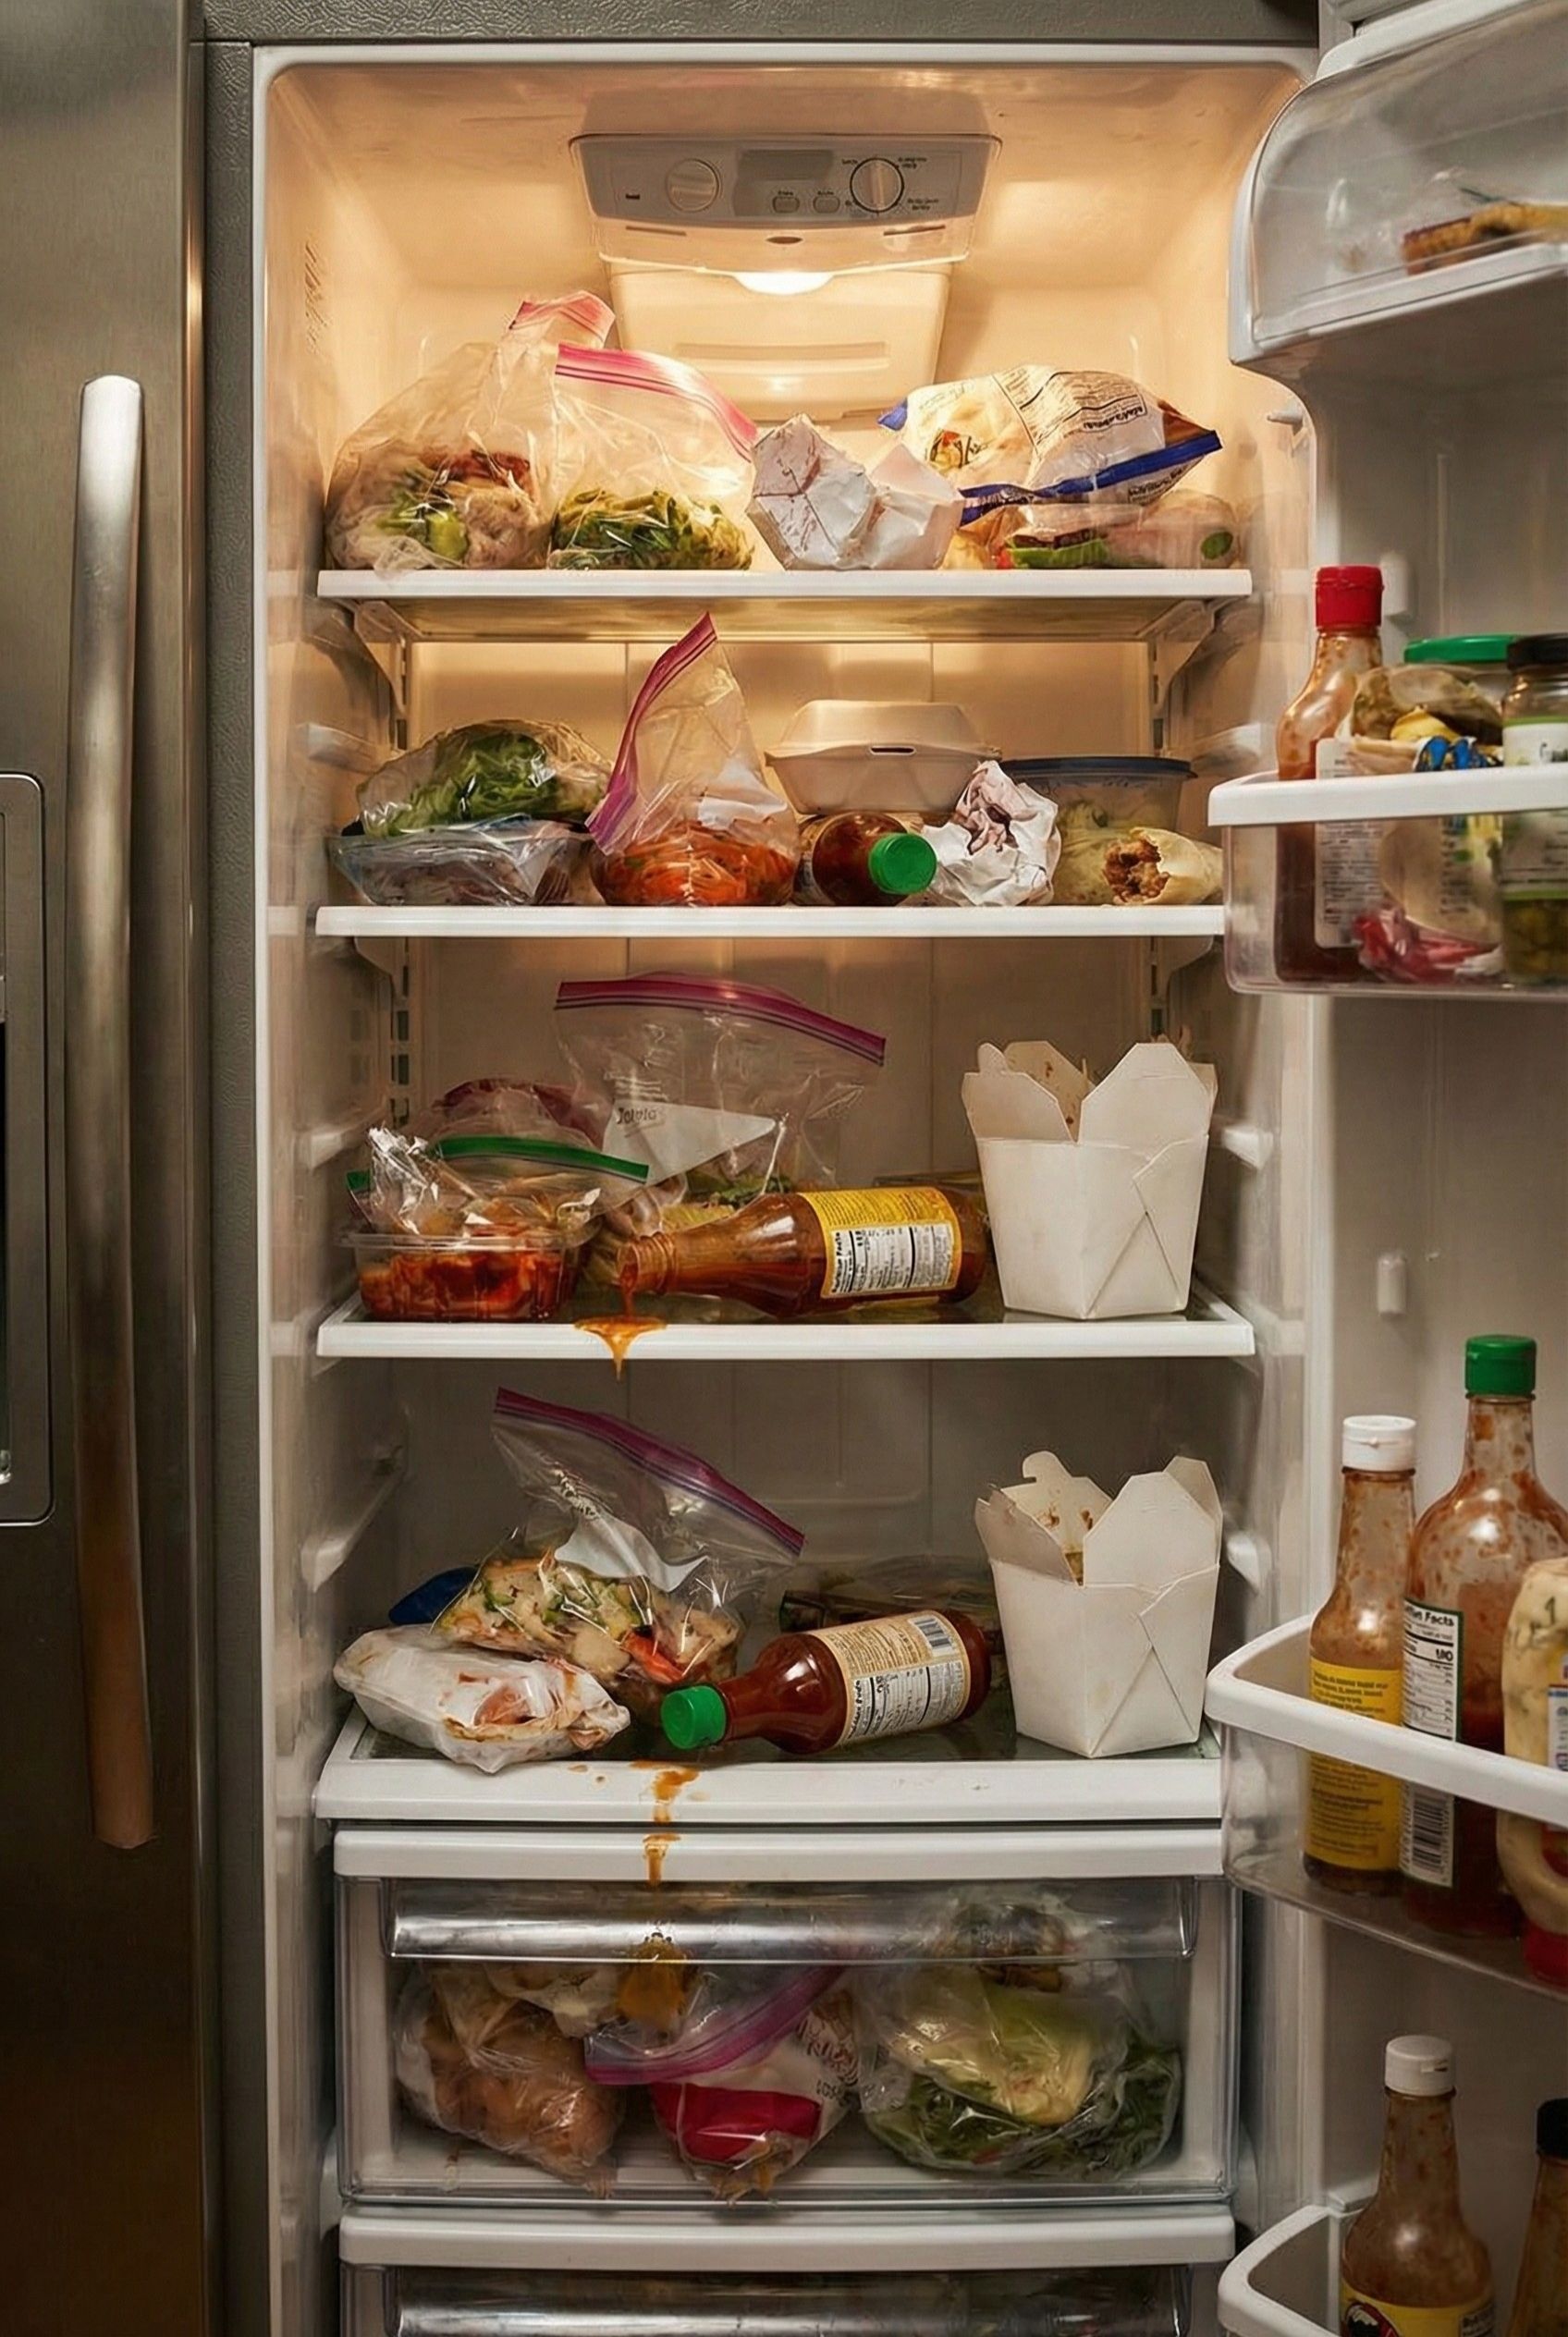
Overwhelmed by the visual chaos, you close the fridge and order takeout. Again.
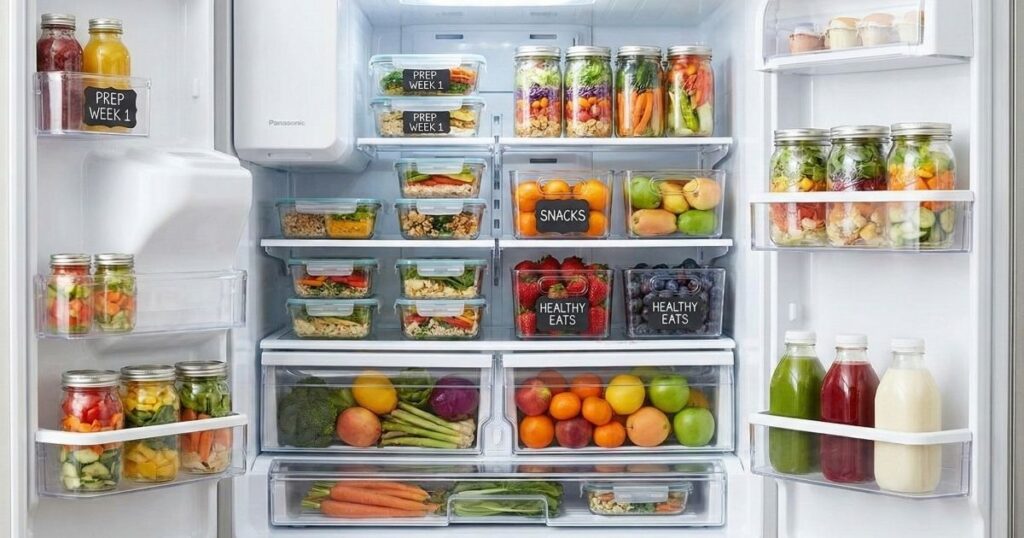
Welcome to the world of Aesthetic Meal Prep. This isn’t just about making your fridge look like a viral Pinterest pin (although, we definitely want that!). It is about using organization and psychology to make the healthy choice the easiest choice.
The “Why”: How a Pretty Fridge Hacks Your Brain
Before we dive into the containers and labels, we need to understand the psychology behind why this works. You might think “fridgescaping” is just an internet trend, but for those of us on a health journey, it is a legitimate tool for success.
The Science of “Visual Hunger”
Our brains are wired to eat what we see. This is a concept known as visual hunger. When you see food, your body prepares to digest it. If the first thing you see when you open the fridge is a bright, beautiful jar of crisp cucumbers or a rainbow fruit salad, your brain registers that as the “available” option.
Conversely, if your healthy food is hidden in opaque drawers or wrapped in aluminum foil, it suffers from the “out of sight, out of mind” phenomenon. Friction kills habits. If you have to move three soy sauce bottles and unwrap a plastic bag to get to your carrots, you probably won’t eat the carrots.
Let me take you back to a few months ago. When I was hitting a plateau in my health journey, and I couldn’t figure out why. I was buying healthy groceries, but I was throwing half of them away at the end of the week. One Tuesday evening, I came home exhausted. And I knew I had chicken and broccoli somewhere in the fridge. But when I opened the door, it was chaos. A precariously stacked tower of leftovers fell over, spilling sauce on the shelf. That was the breaking point. I slammed the door and ordered a pizza.
That weekend, I took everything out. switched to clear glass containers. washed and chopped my produce immediately. The next time I opened the fridge for a snack, then saw a beautiful glass container of washed grapes right at eye level. Then ate the grapes. That small shift in friction removing the barrier between me and the healthy food changed everything.
Phase 1: The Gear (Investing in Aesthetics)
To achieve that “Pinterest-worthy” look that actually functions for weight loss, you need to ditch the mismatching plastic tubs. We want uniformity, clarity, and safety.
Why Glass is Non-Negotiable
If you are serious about aesthetic meal prep, glass is the gold standard.
- Visibility: You can see exactly what is inside. No more guessing games.
- Safety: Plastic can degrade over time and harbor bacteria or leach chemicals (like BPA) into your food, especially when reheated. Glass is non-toxic and non-porous.
- Longevity: Glass lasts forever. It doesn’t stain when you store curry or tomato sauce.

The Essential Shopping List
To replicate the look I use on Abby’s Health Series, here is what you need:
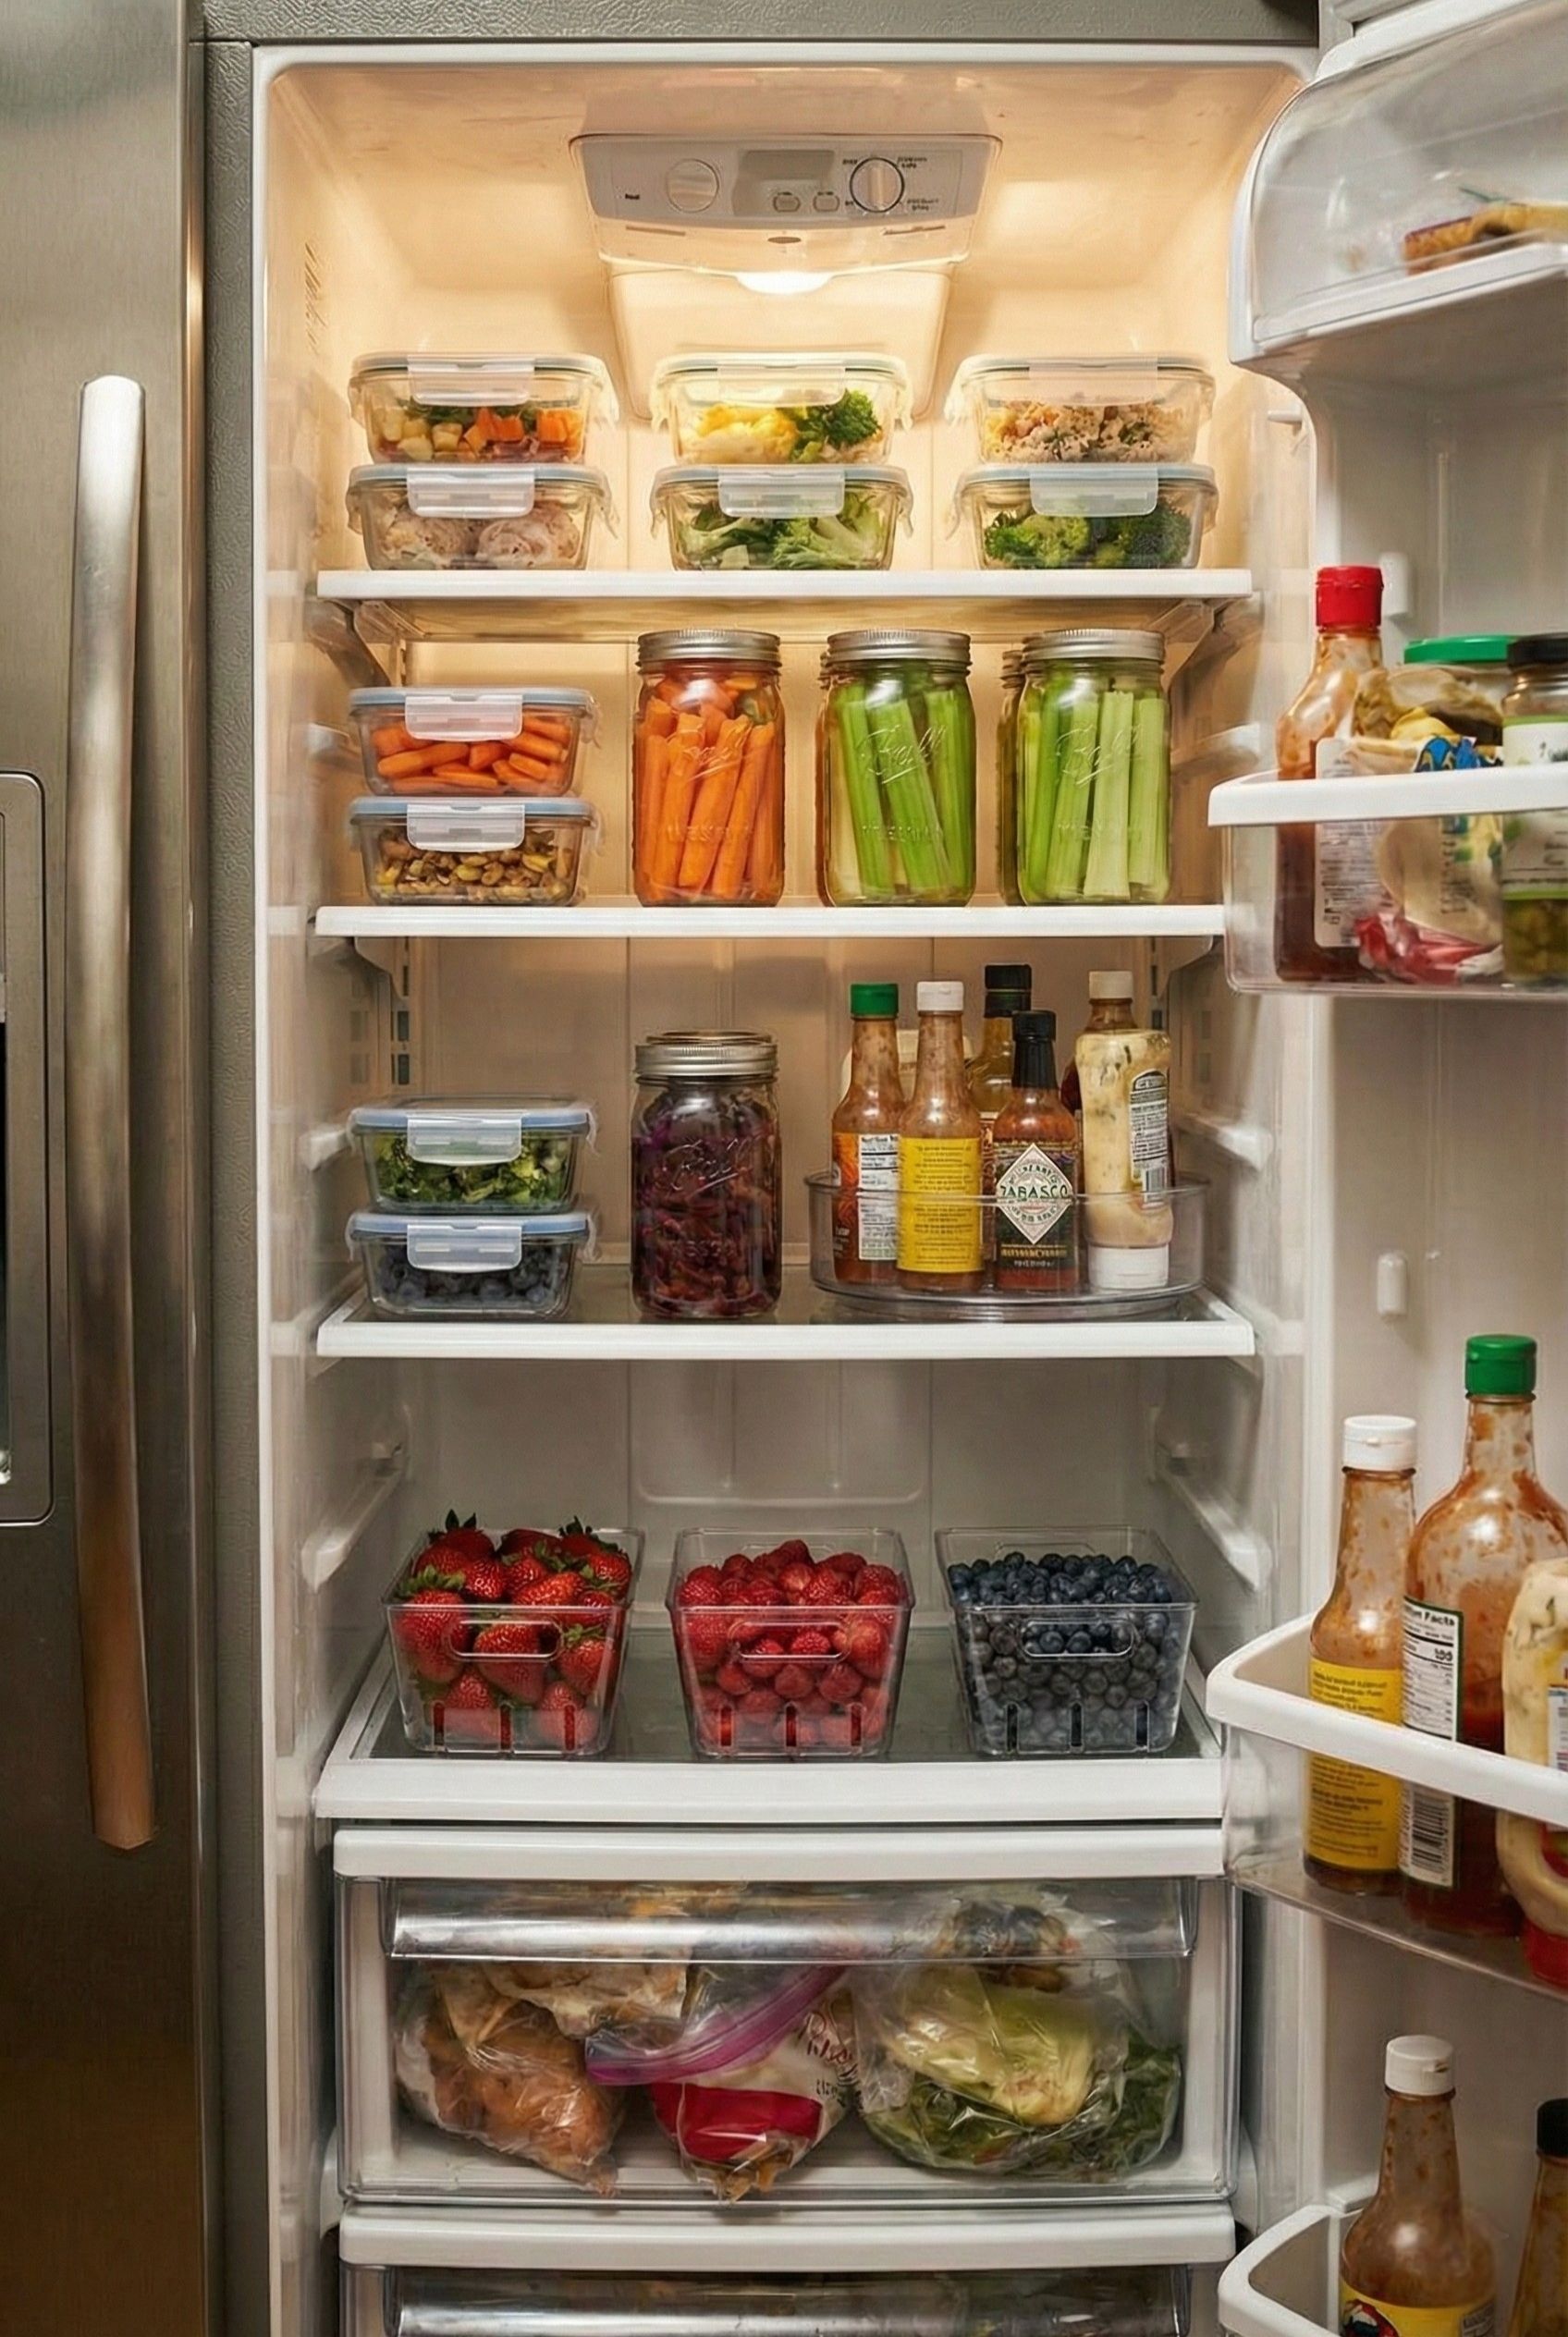
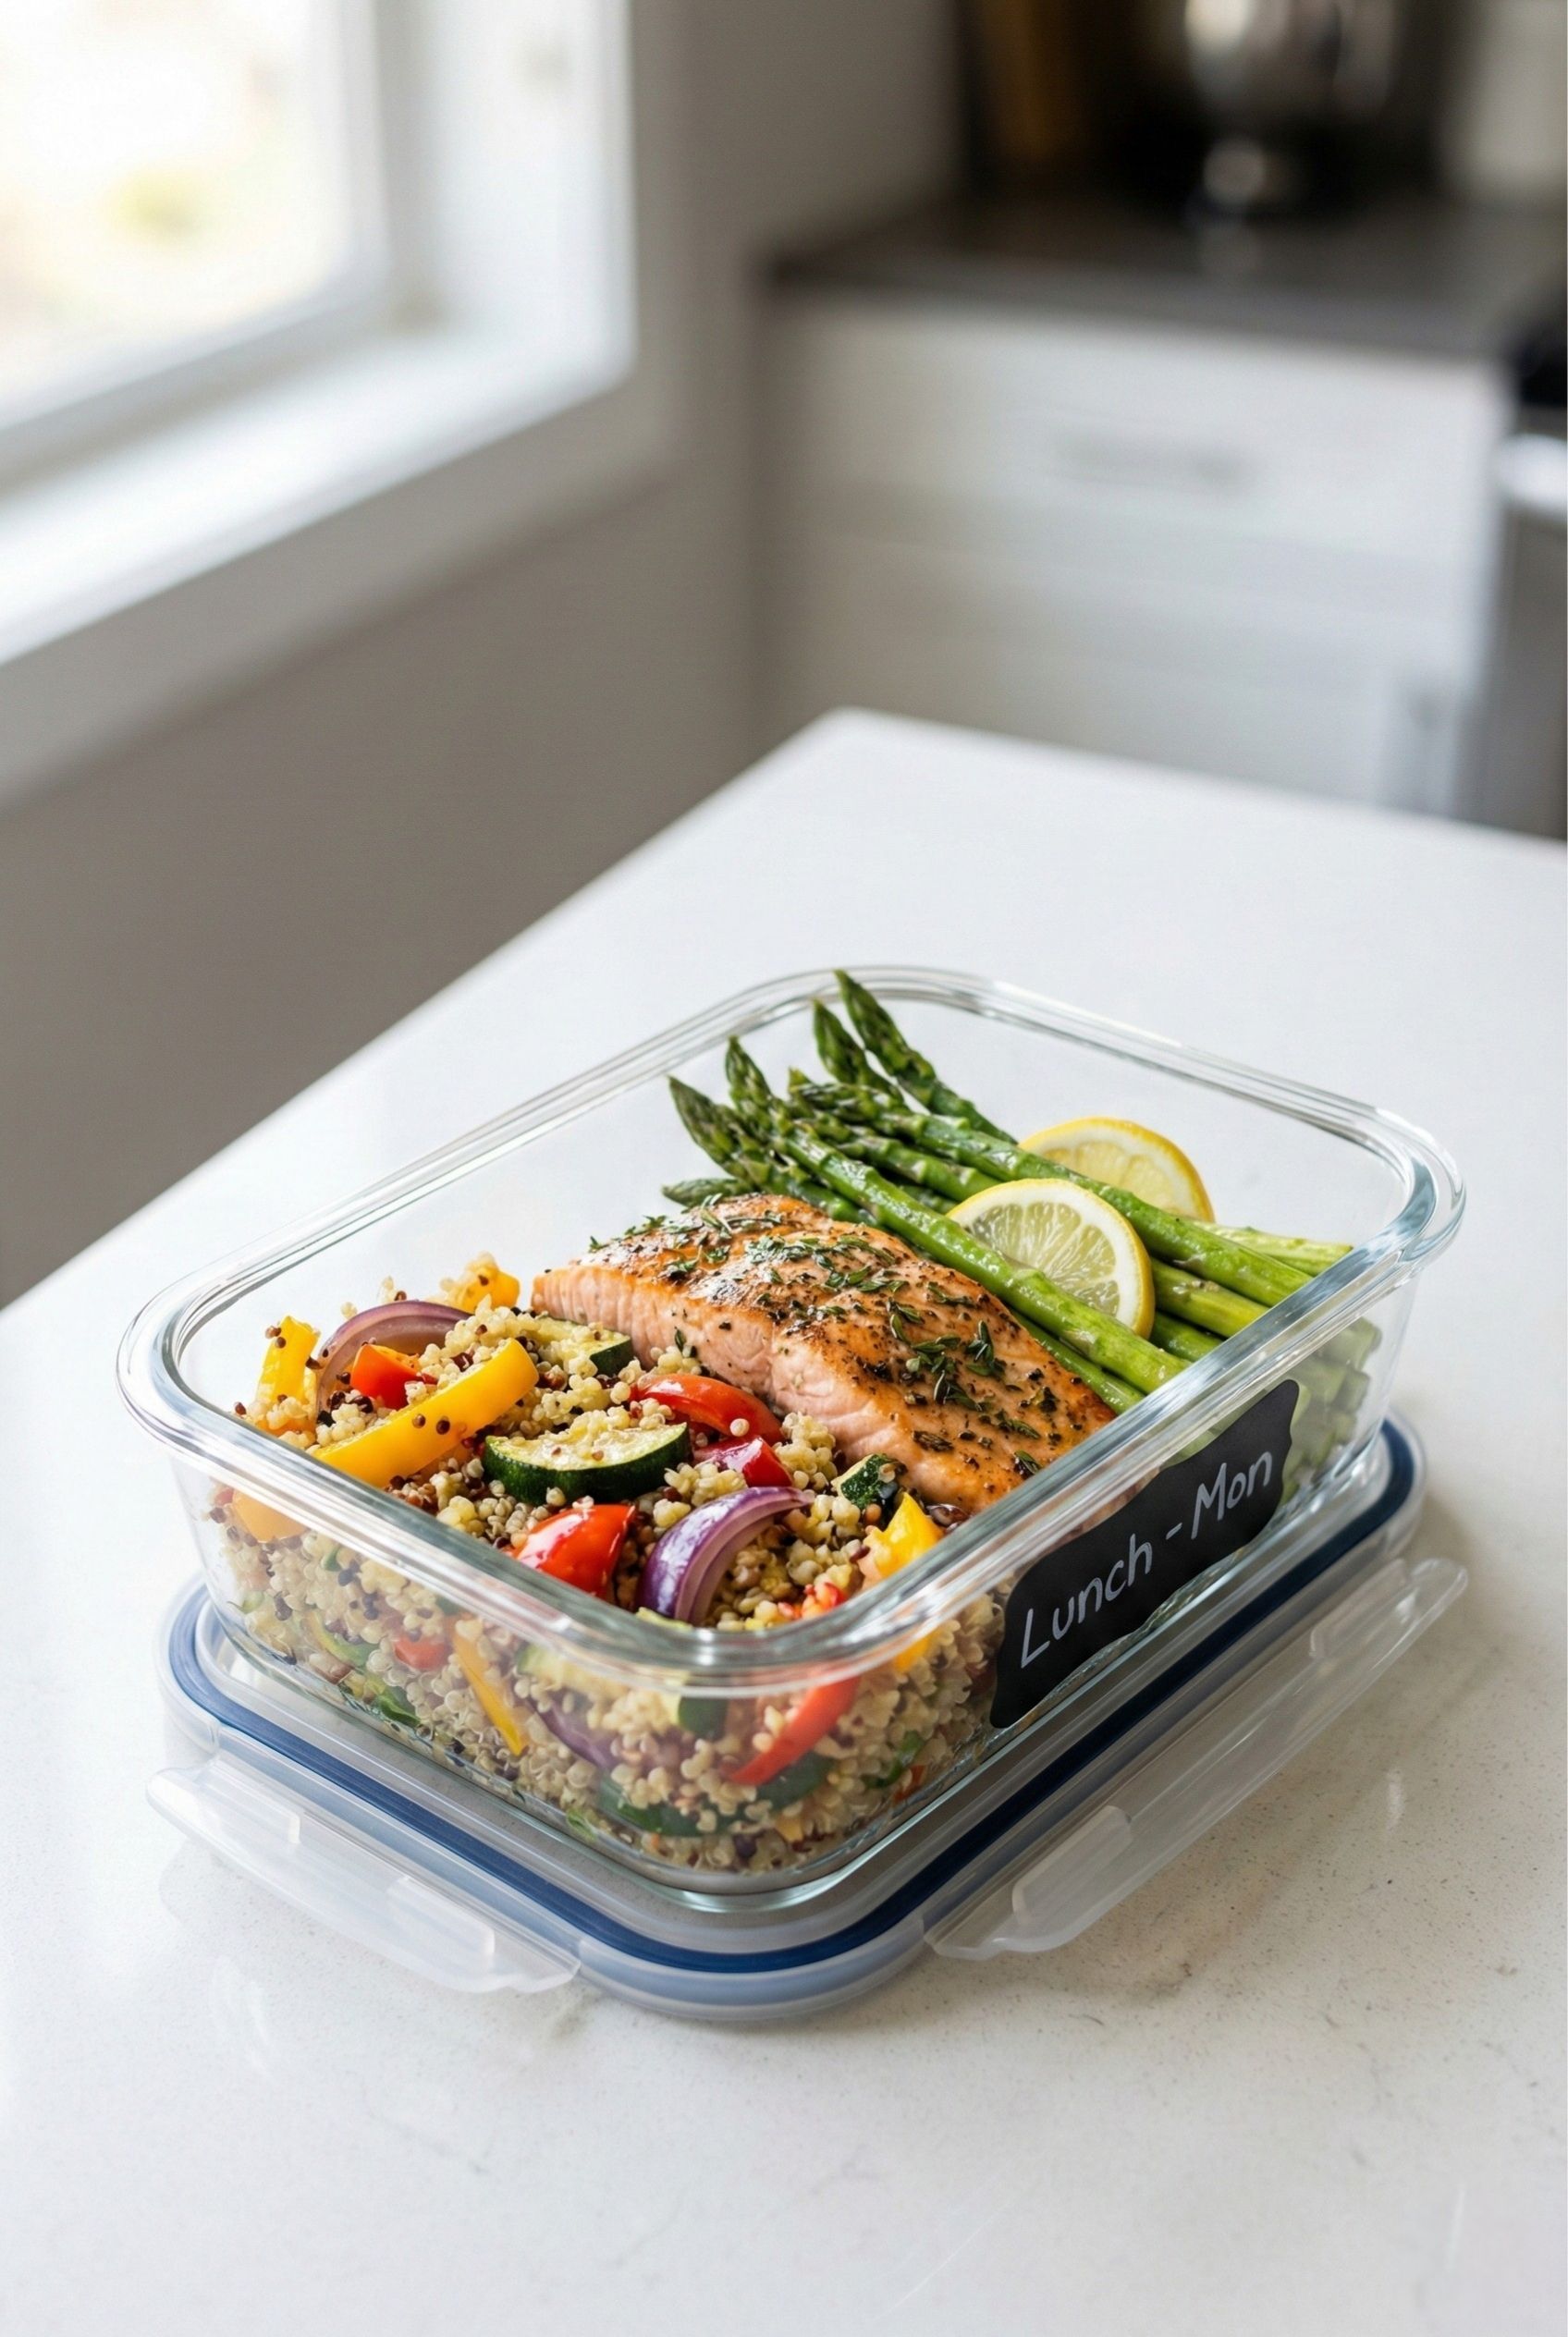
- Clear Rectangular Glass Containers (with locking lids): These stack perfectly. Use them for your prepared meals (chicken, quinoa, roasted veggies).
- Large Mason Jars (Wide Mouth): Perfect for “salad in a jar” or storing cut vegetables in water (more on that later).
- Lazy Susans (Turntables): These are a game-changer for the top shelf. You place your condiments or yogurts on them, so nothing gets lost in the back “void.”
- Chalkboard Labels: Nothing says “organized” like a clean label. It also helps you track the date you prepped the food.
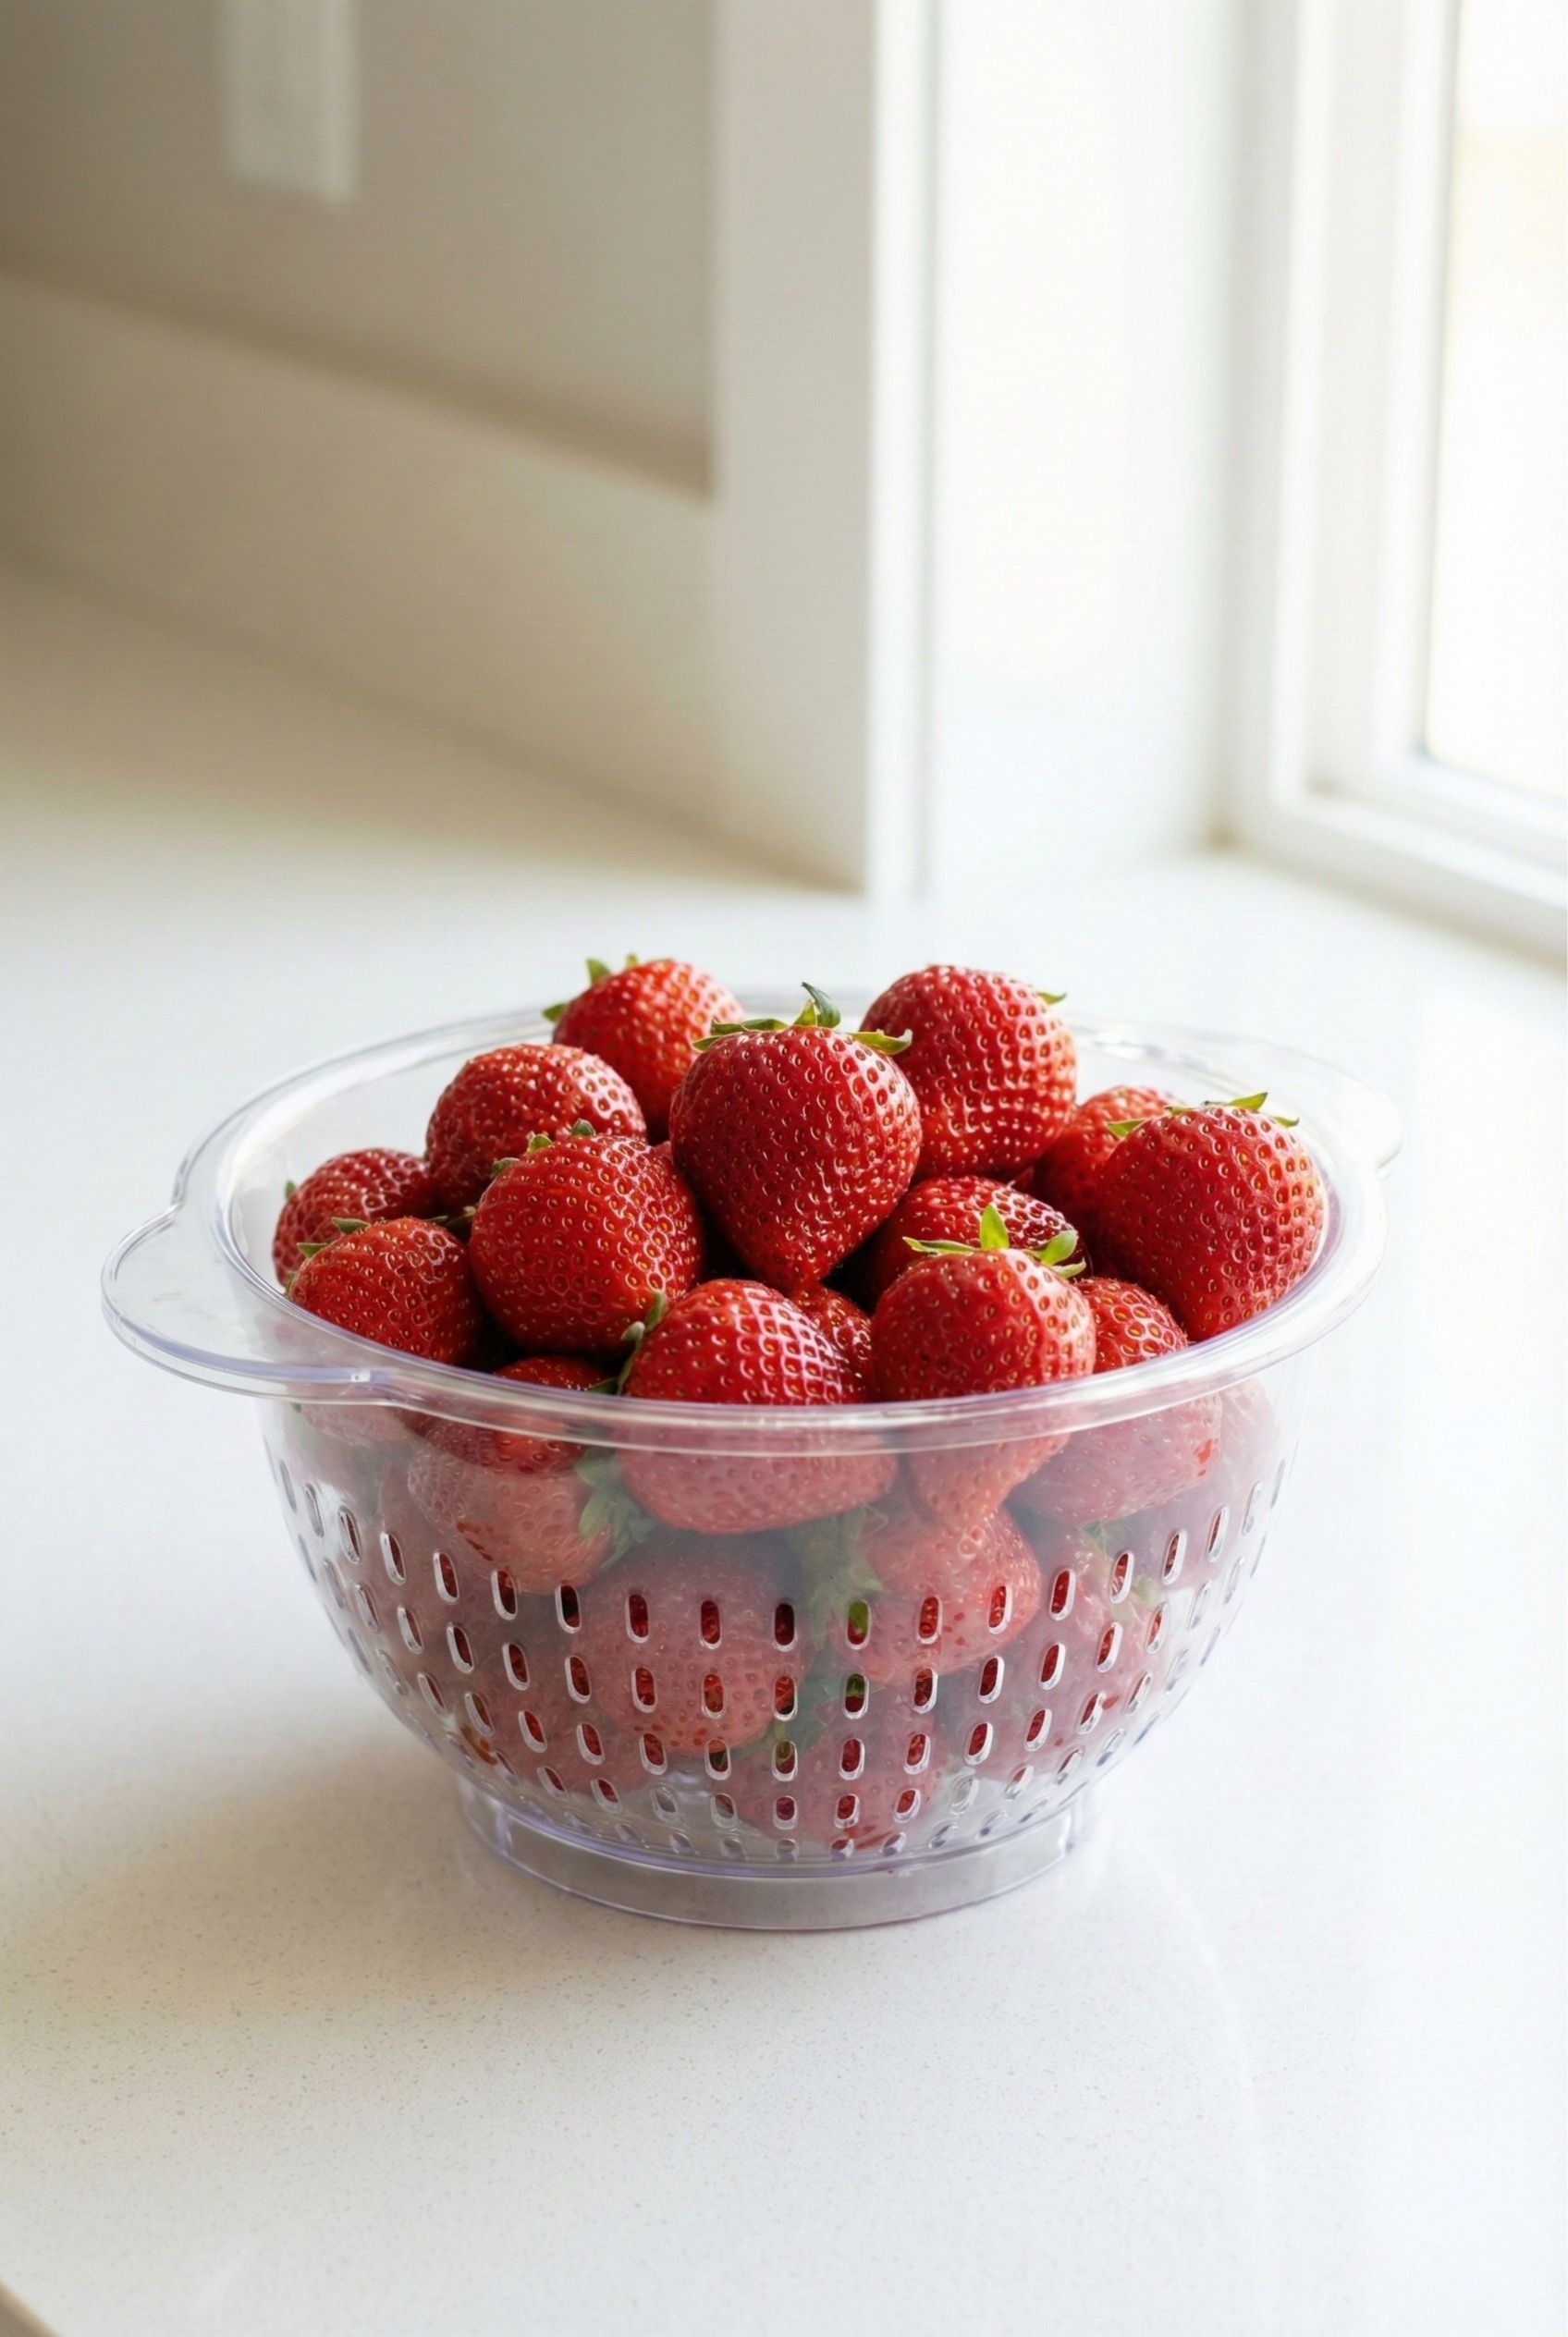
- A “Berry Bin” with Colander: These are specific containers with holes in the bottom to let air circulate, keeping berries fresh for twice as long.
Phase 2: The “Weight Loss Layout” System
This is the most critical part of this guide. Most people organize their fridge based on where things fit. We are going to organize based on how we want to eat.
We are going to treat the fridge like a grocery store map. Prime real estate goes to the high-value items.
Zone 1: Eye Level (The “Green Zone”)
The middle shelf, right at eye level, is your VIP section. This is where your willpower is preserved. Nothing unhealthy is allowed here.
This shelf should be stocked with “Grab-and-Go” items. When you open the door, your eyes should immediately land on bright colors.
- What goes here: Pre-cut veggies in water, washed fruit in clear bins, hard-boiled eggs, and prepared overnight oats.
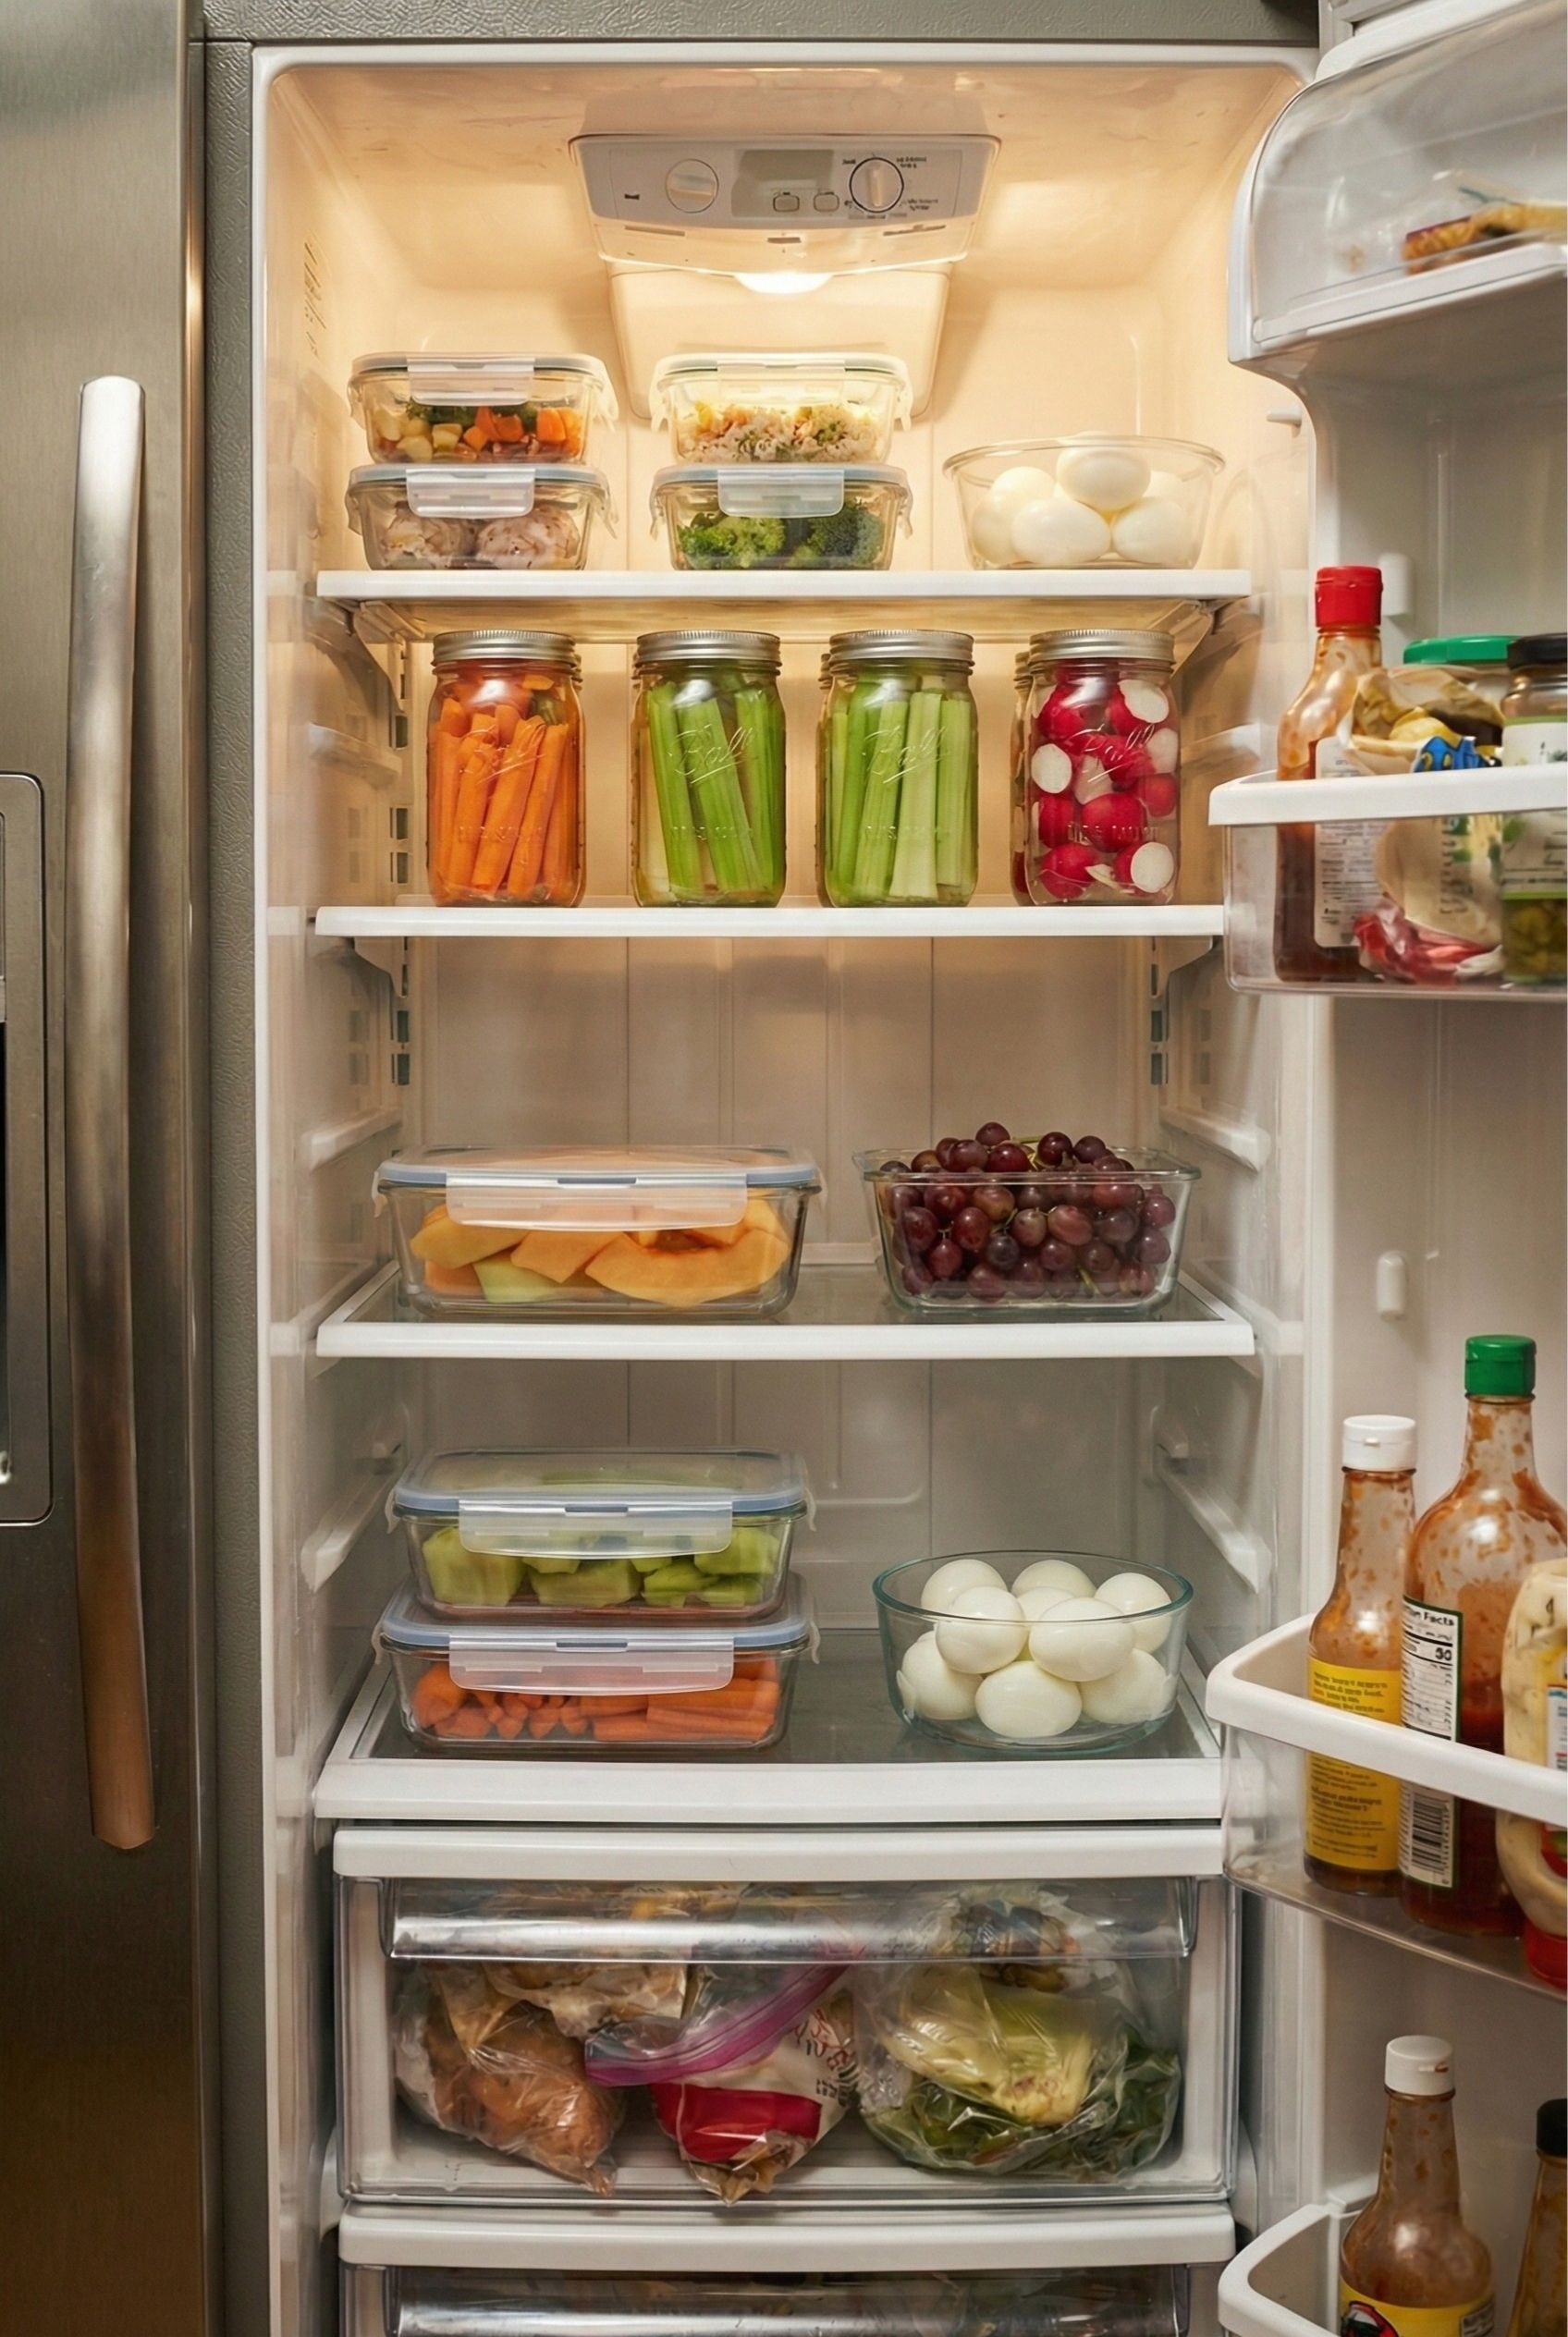
Zone 2: The Top Shelf (Ready-to-Eat Meals)
The top shelf usually has the most consistent temperature. Use this for your meal-prepped lunches and dinners that just need to be reheated.
- The Strategy: Stack your rectangular glass containers here. If you meal prep for 3 days at a time, stack Monday, Tuesday, and Wednesday here.
- Why it works: You don’t have to think “What’s for dinner?” You just see the container.
Zone 3: The Drawers (The Ingredient Station
In a standard fridge, the drawers are often called “crispers,” but I call them the “Ingredient Station.” This is for raw items that require cooking raw meats (bottom drawer to prevent cross-contamination drips) and whole vegetables you haven’t chopped yet.
- The Logic: You only go into the drawers when you are actively cooking a meal. You don’t browse the drawers for a snack.
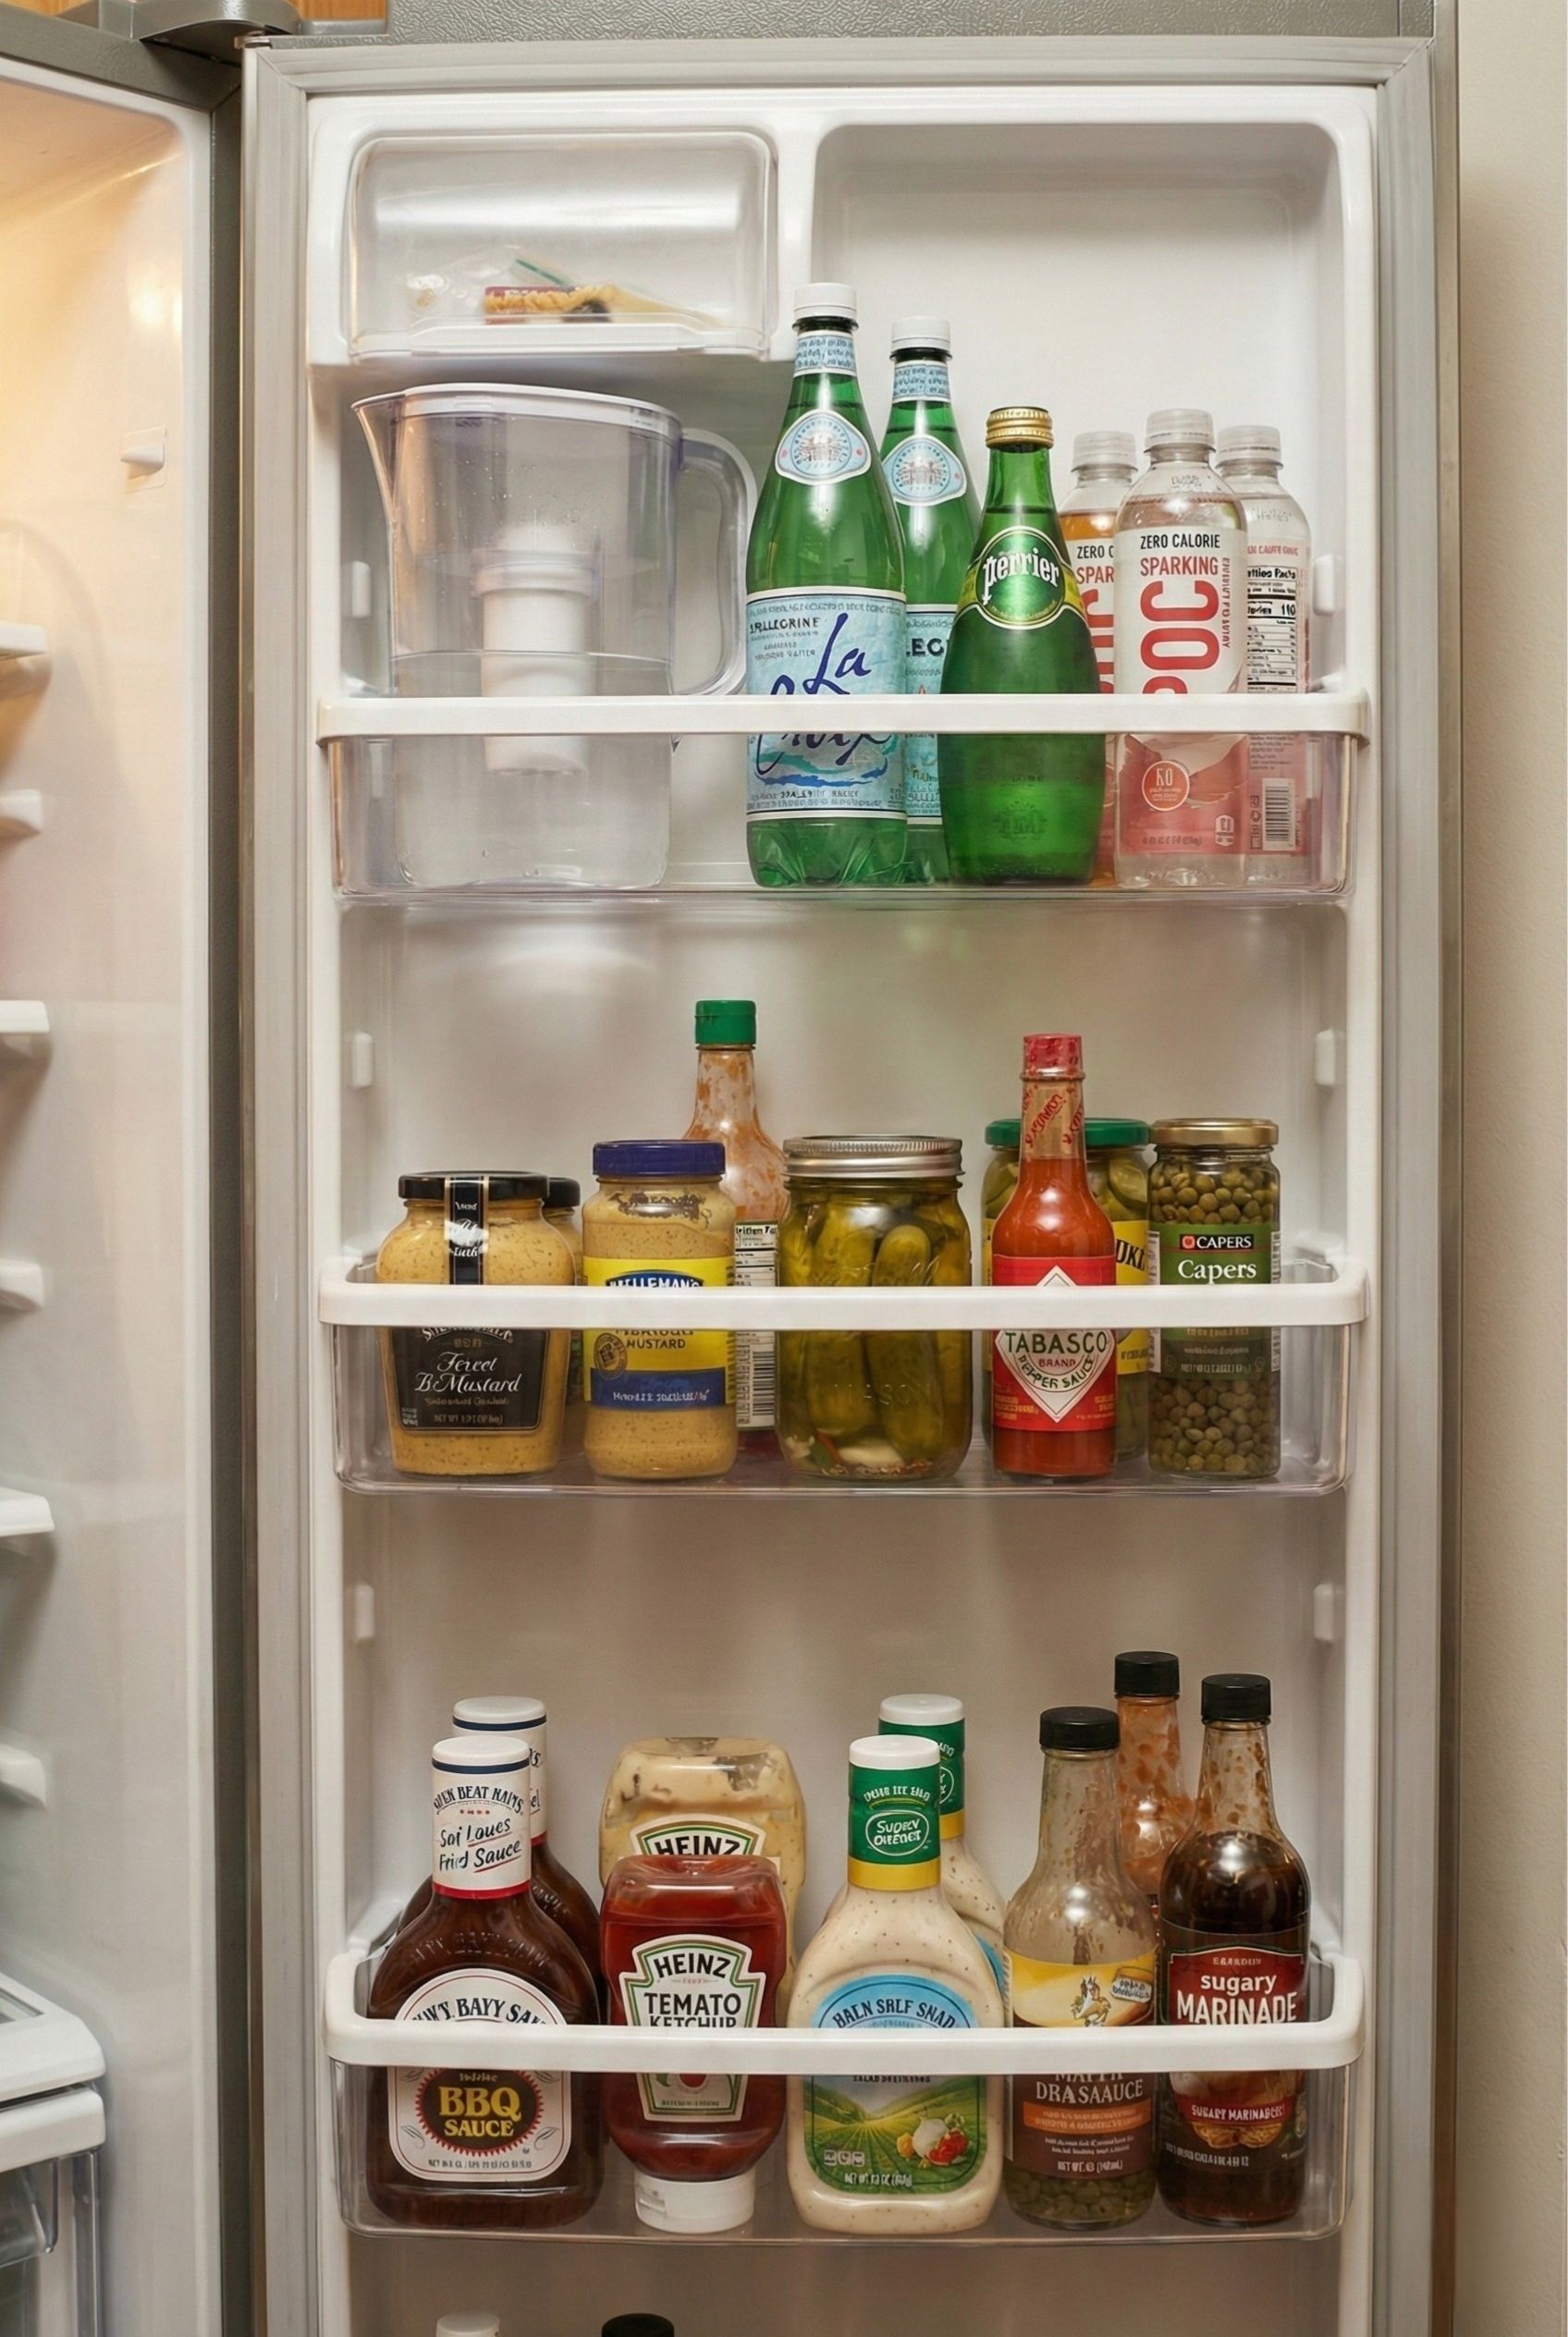
Zone 4: The Door (The Condiment Trap)
The door is the warmest part of the fridge. Never put milk or eggs here.
- The Audit: Most of us have 30 condiments and use 3. The door is often where hidden calories live (sugary BBQ sauces, creamy dressings).
- The Fix: Move the high-calorie condiments to the bottom shelf of the door. Move your water, sparkling water, and zero-calorie drinks to the top shelf of the door. When you reach for a drink, you grab water first.
Phase 3: Aesthetic Prep Ideas That Last
Now that the structure is set, let’s talk about the food itself. To get that aesthetic look, we need to focus on textures and colors.
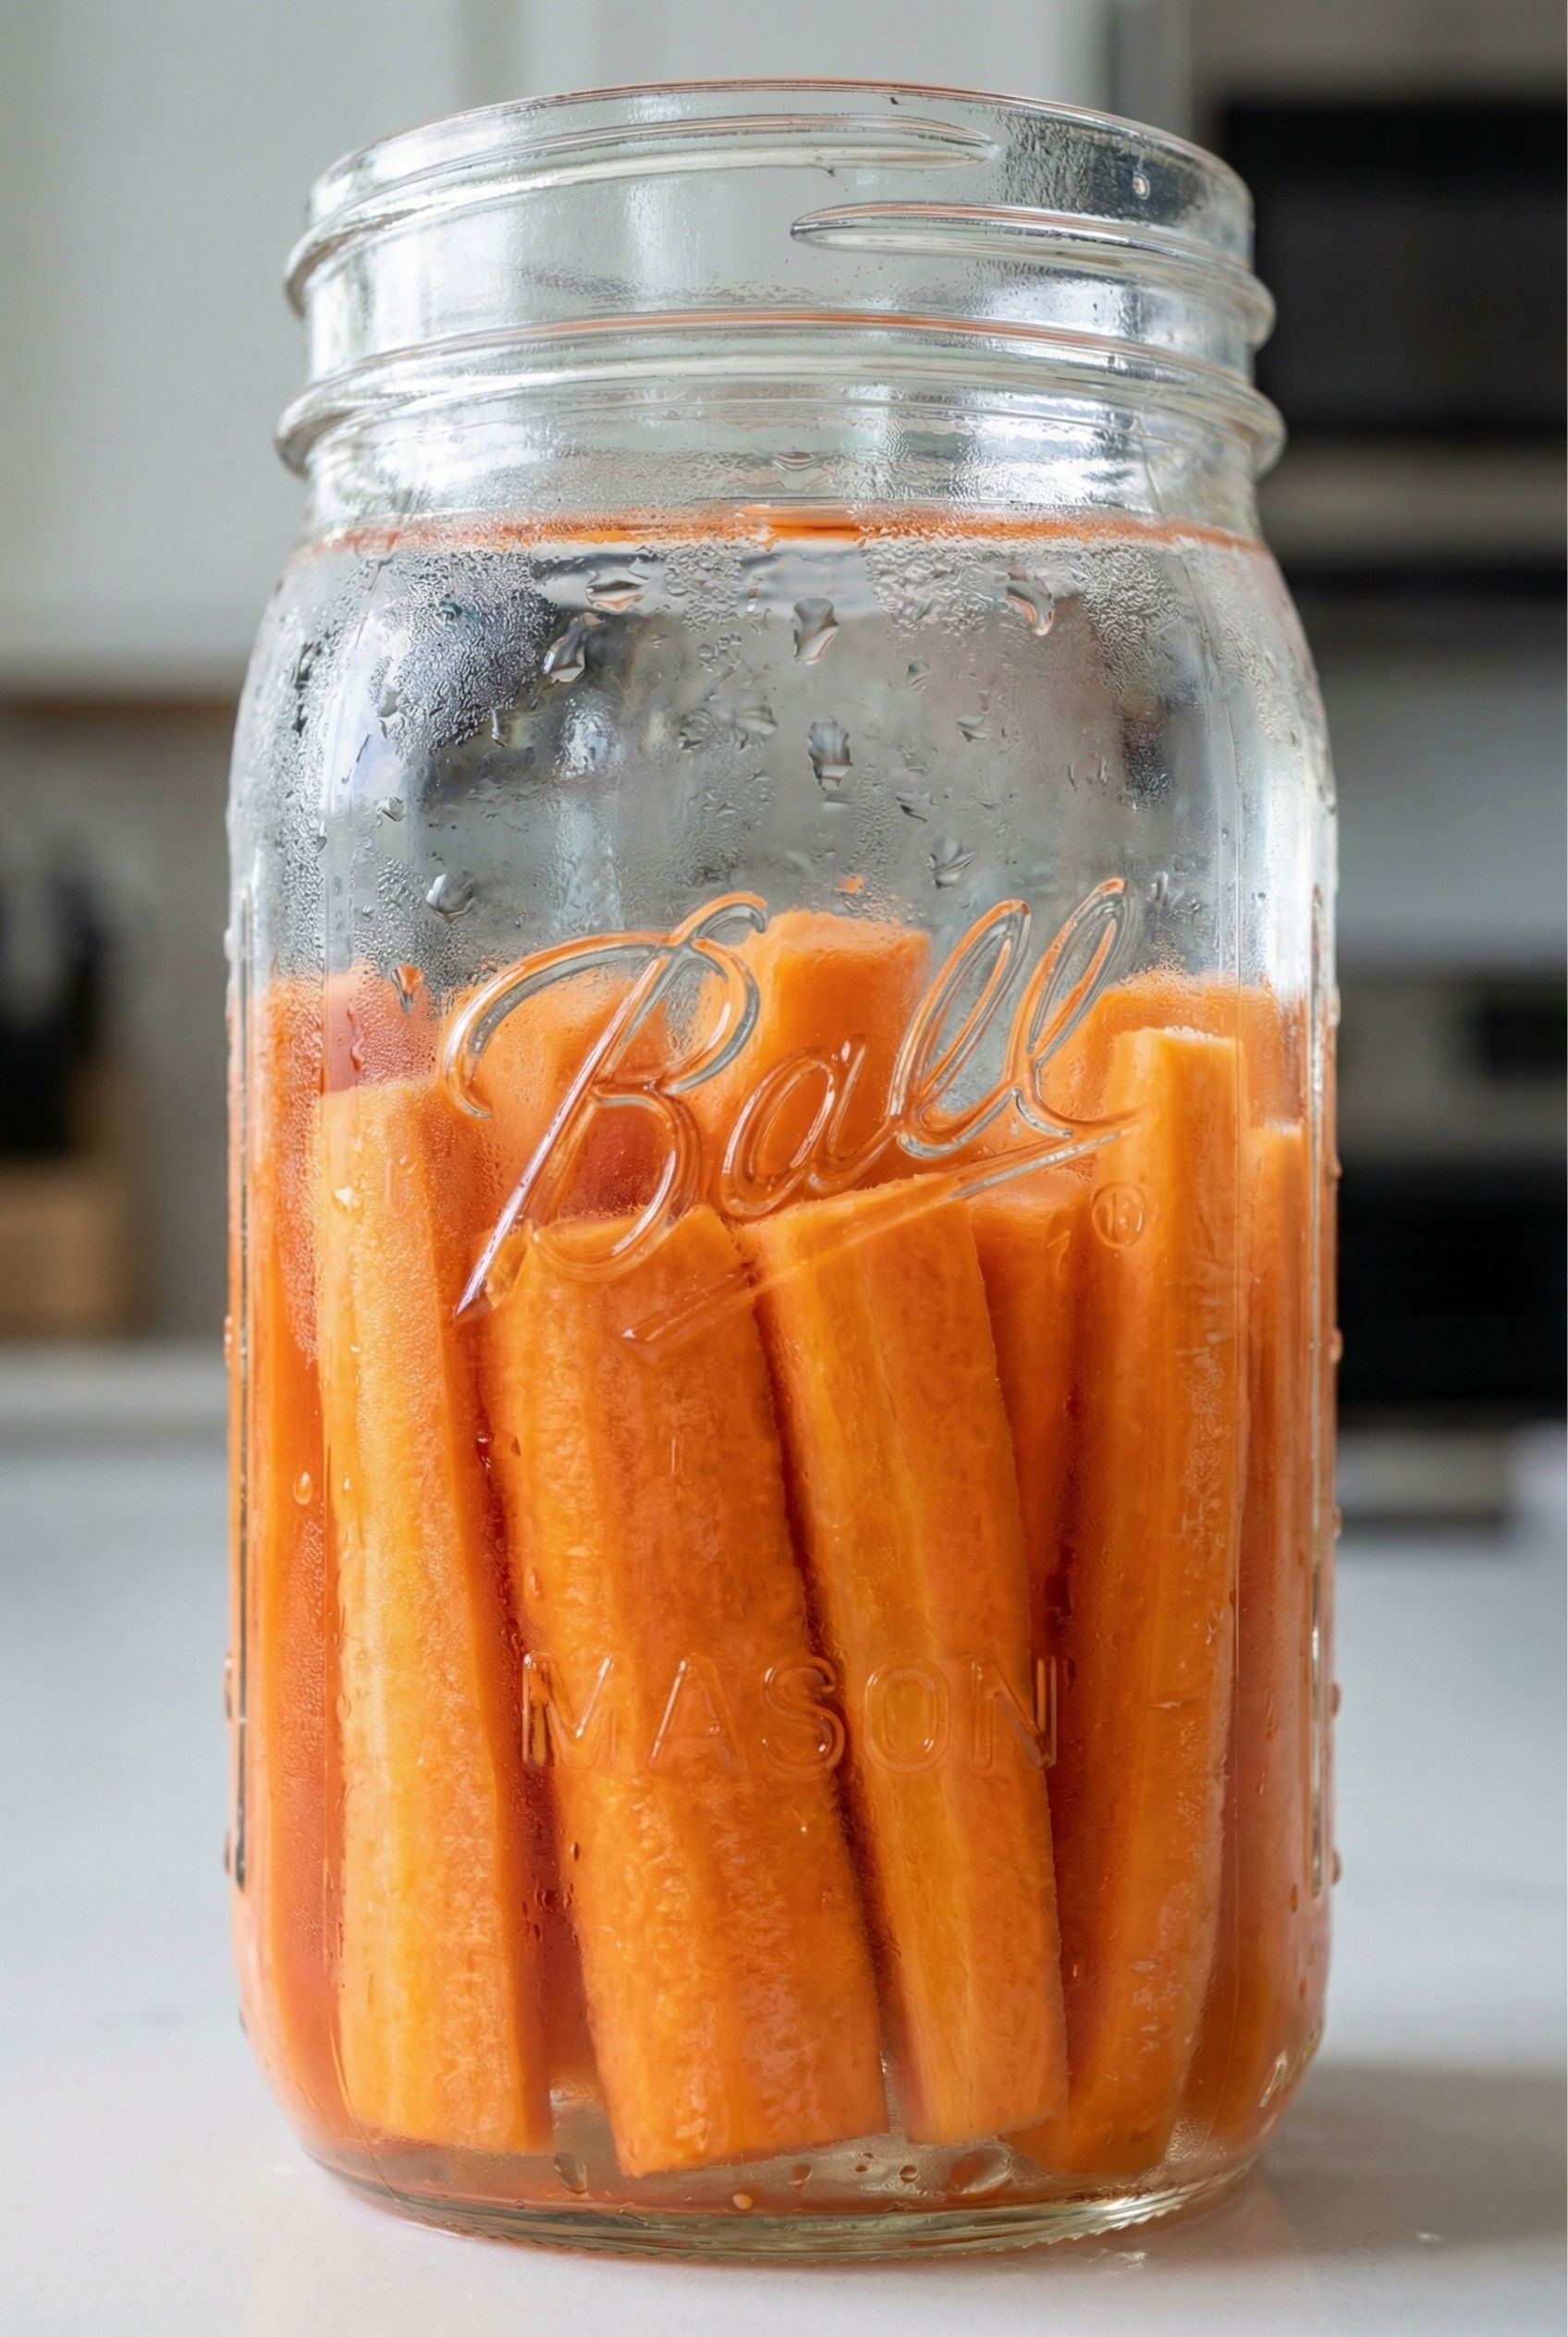
The “Water Bath” Method for Veggies
This is my favorite trick for keeping vegetables crunchy and beautiful for days.
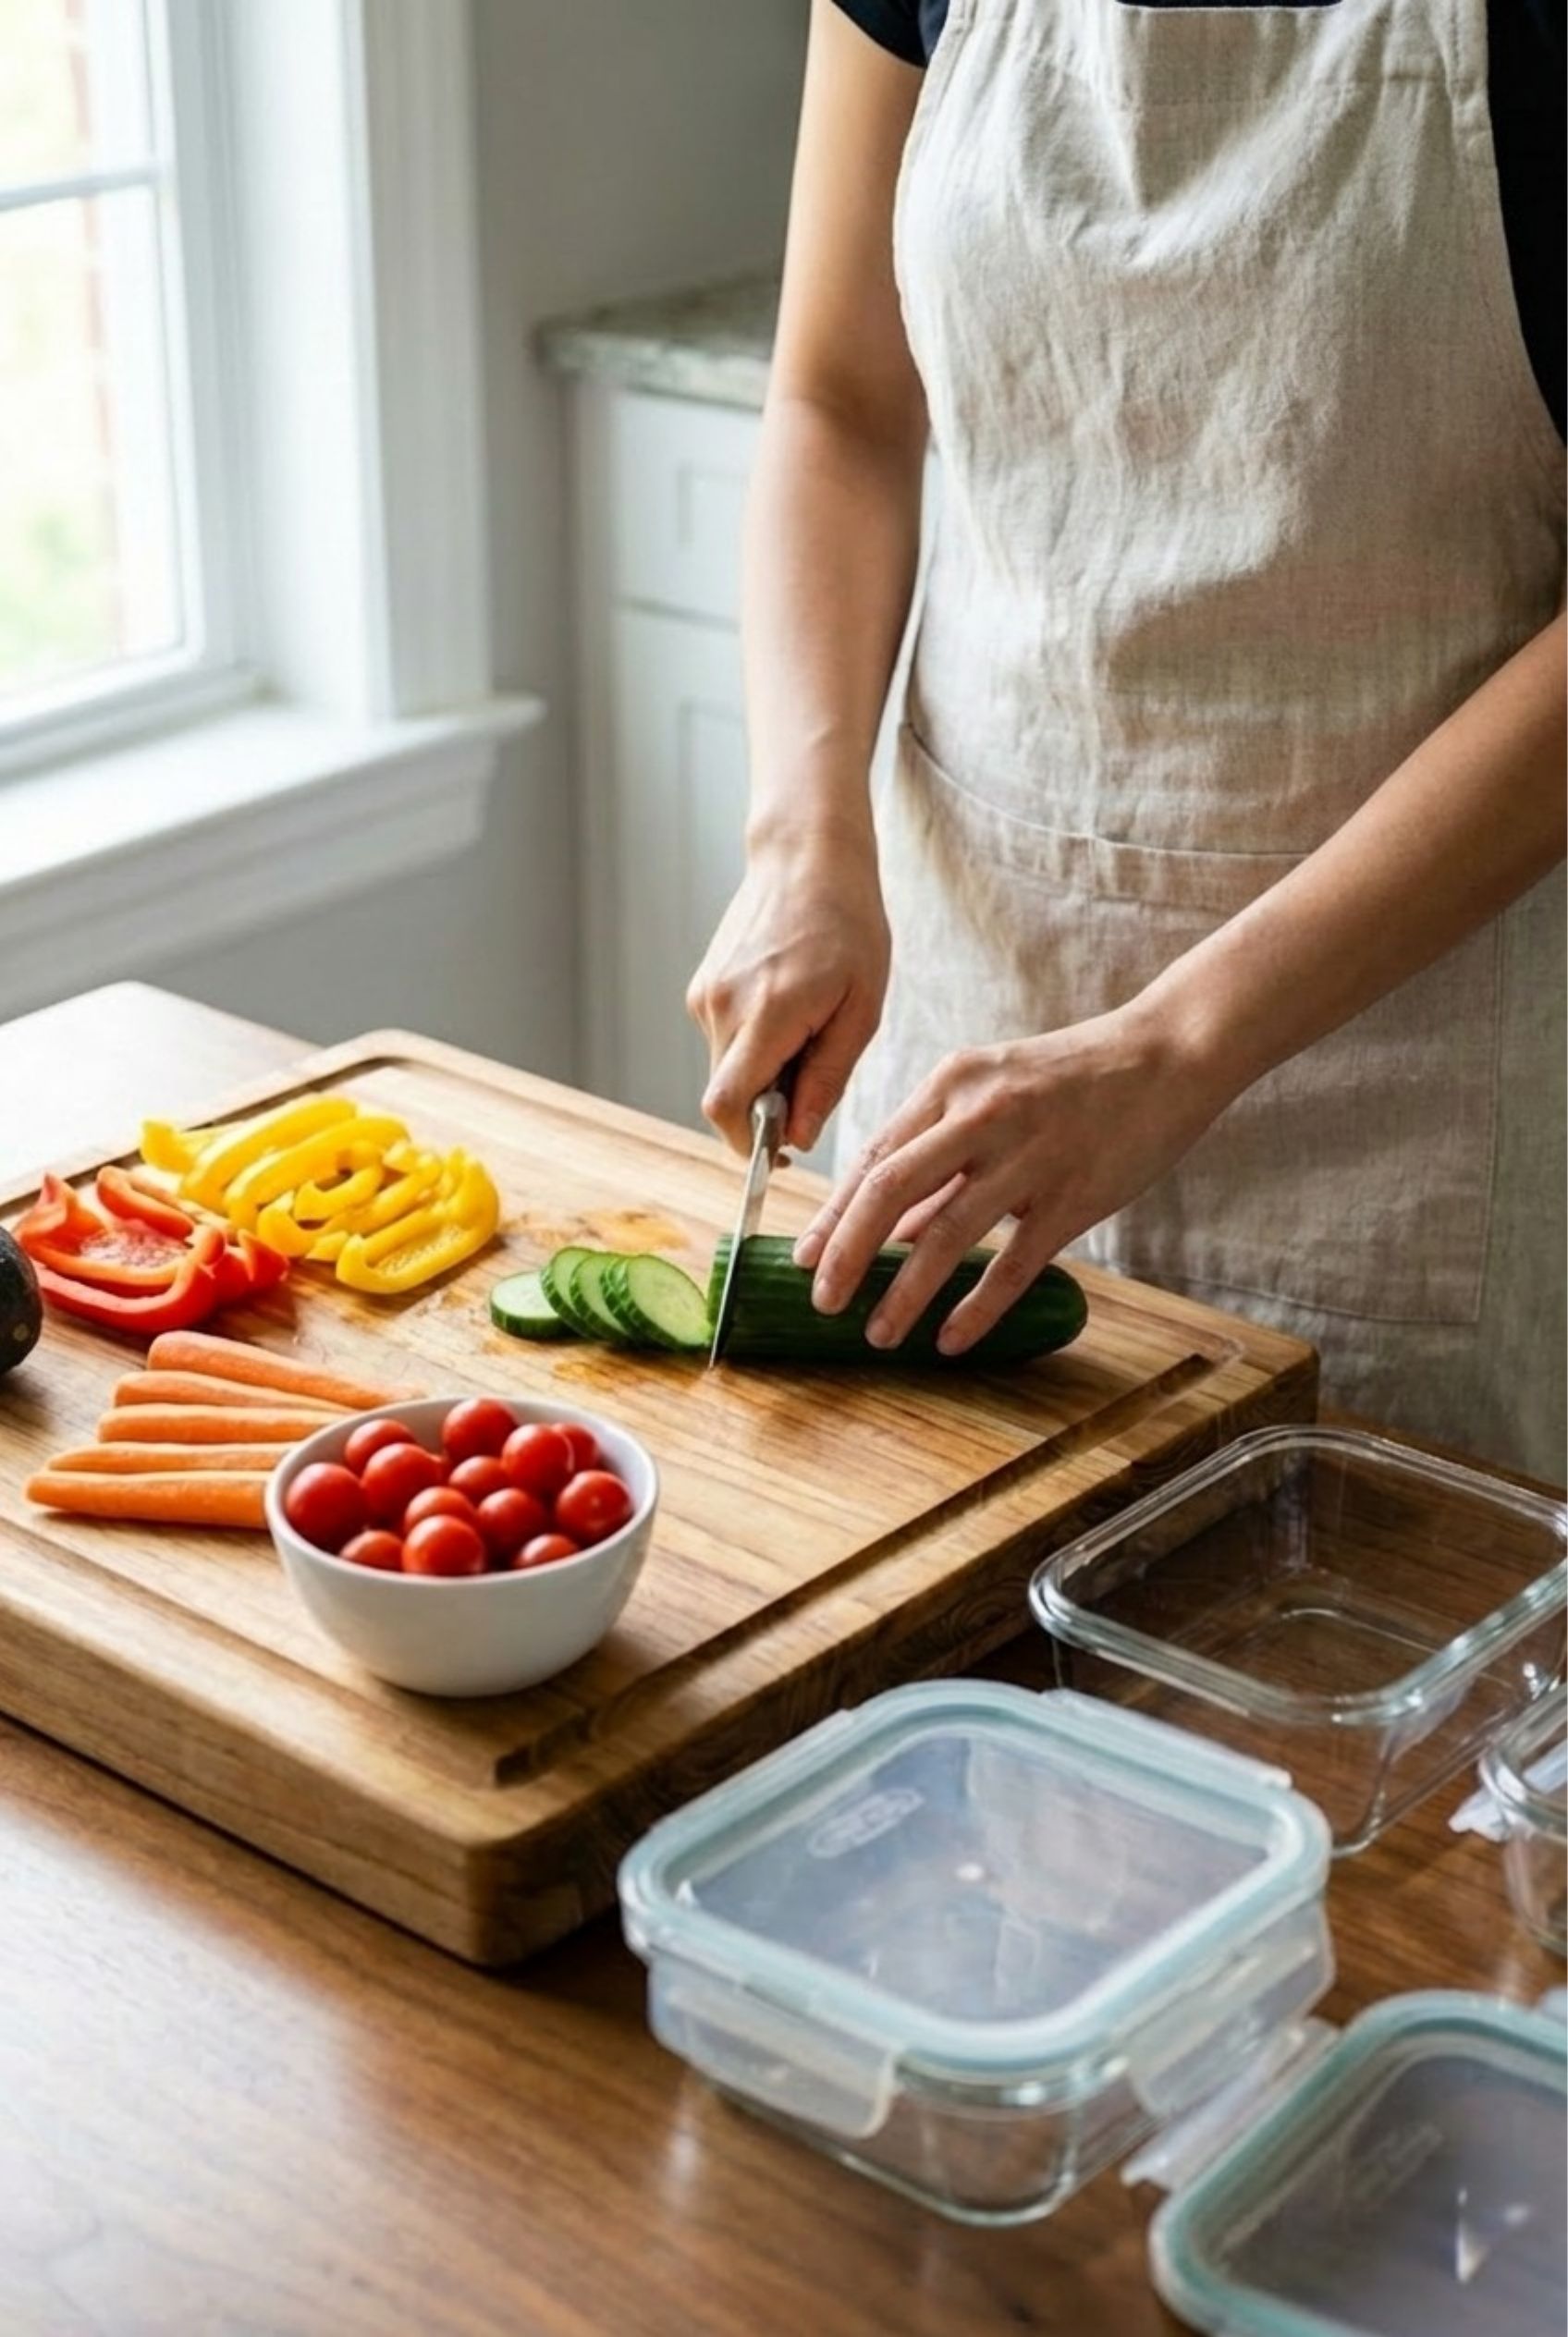
- How to do it: Chop carrots, celery, or radishes into sticks. Place them vertically in a Mason jar and fill it with cold filtered water. Screw the lid on tight.
- Why it helps weight loss: There is nothing quite as satisfying as the sound of snapping into a water-stored carrot. Because they have been submerged in cold water, they stay hyper-hydrated. When you bite down, there is an audible CRUNCH that you just don’t get from a carrot sitting in a plastic bag. The texture is firm, cold, and refreshing it almost feels like a cheat code for snacking because it feels so much more premium than a limp vegetable.
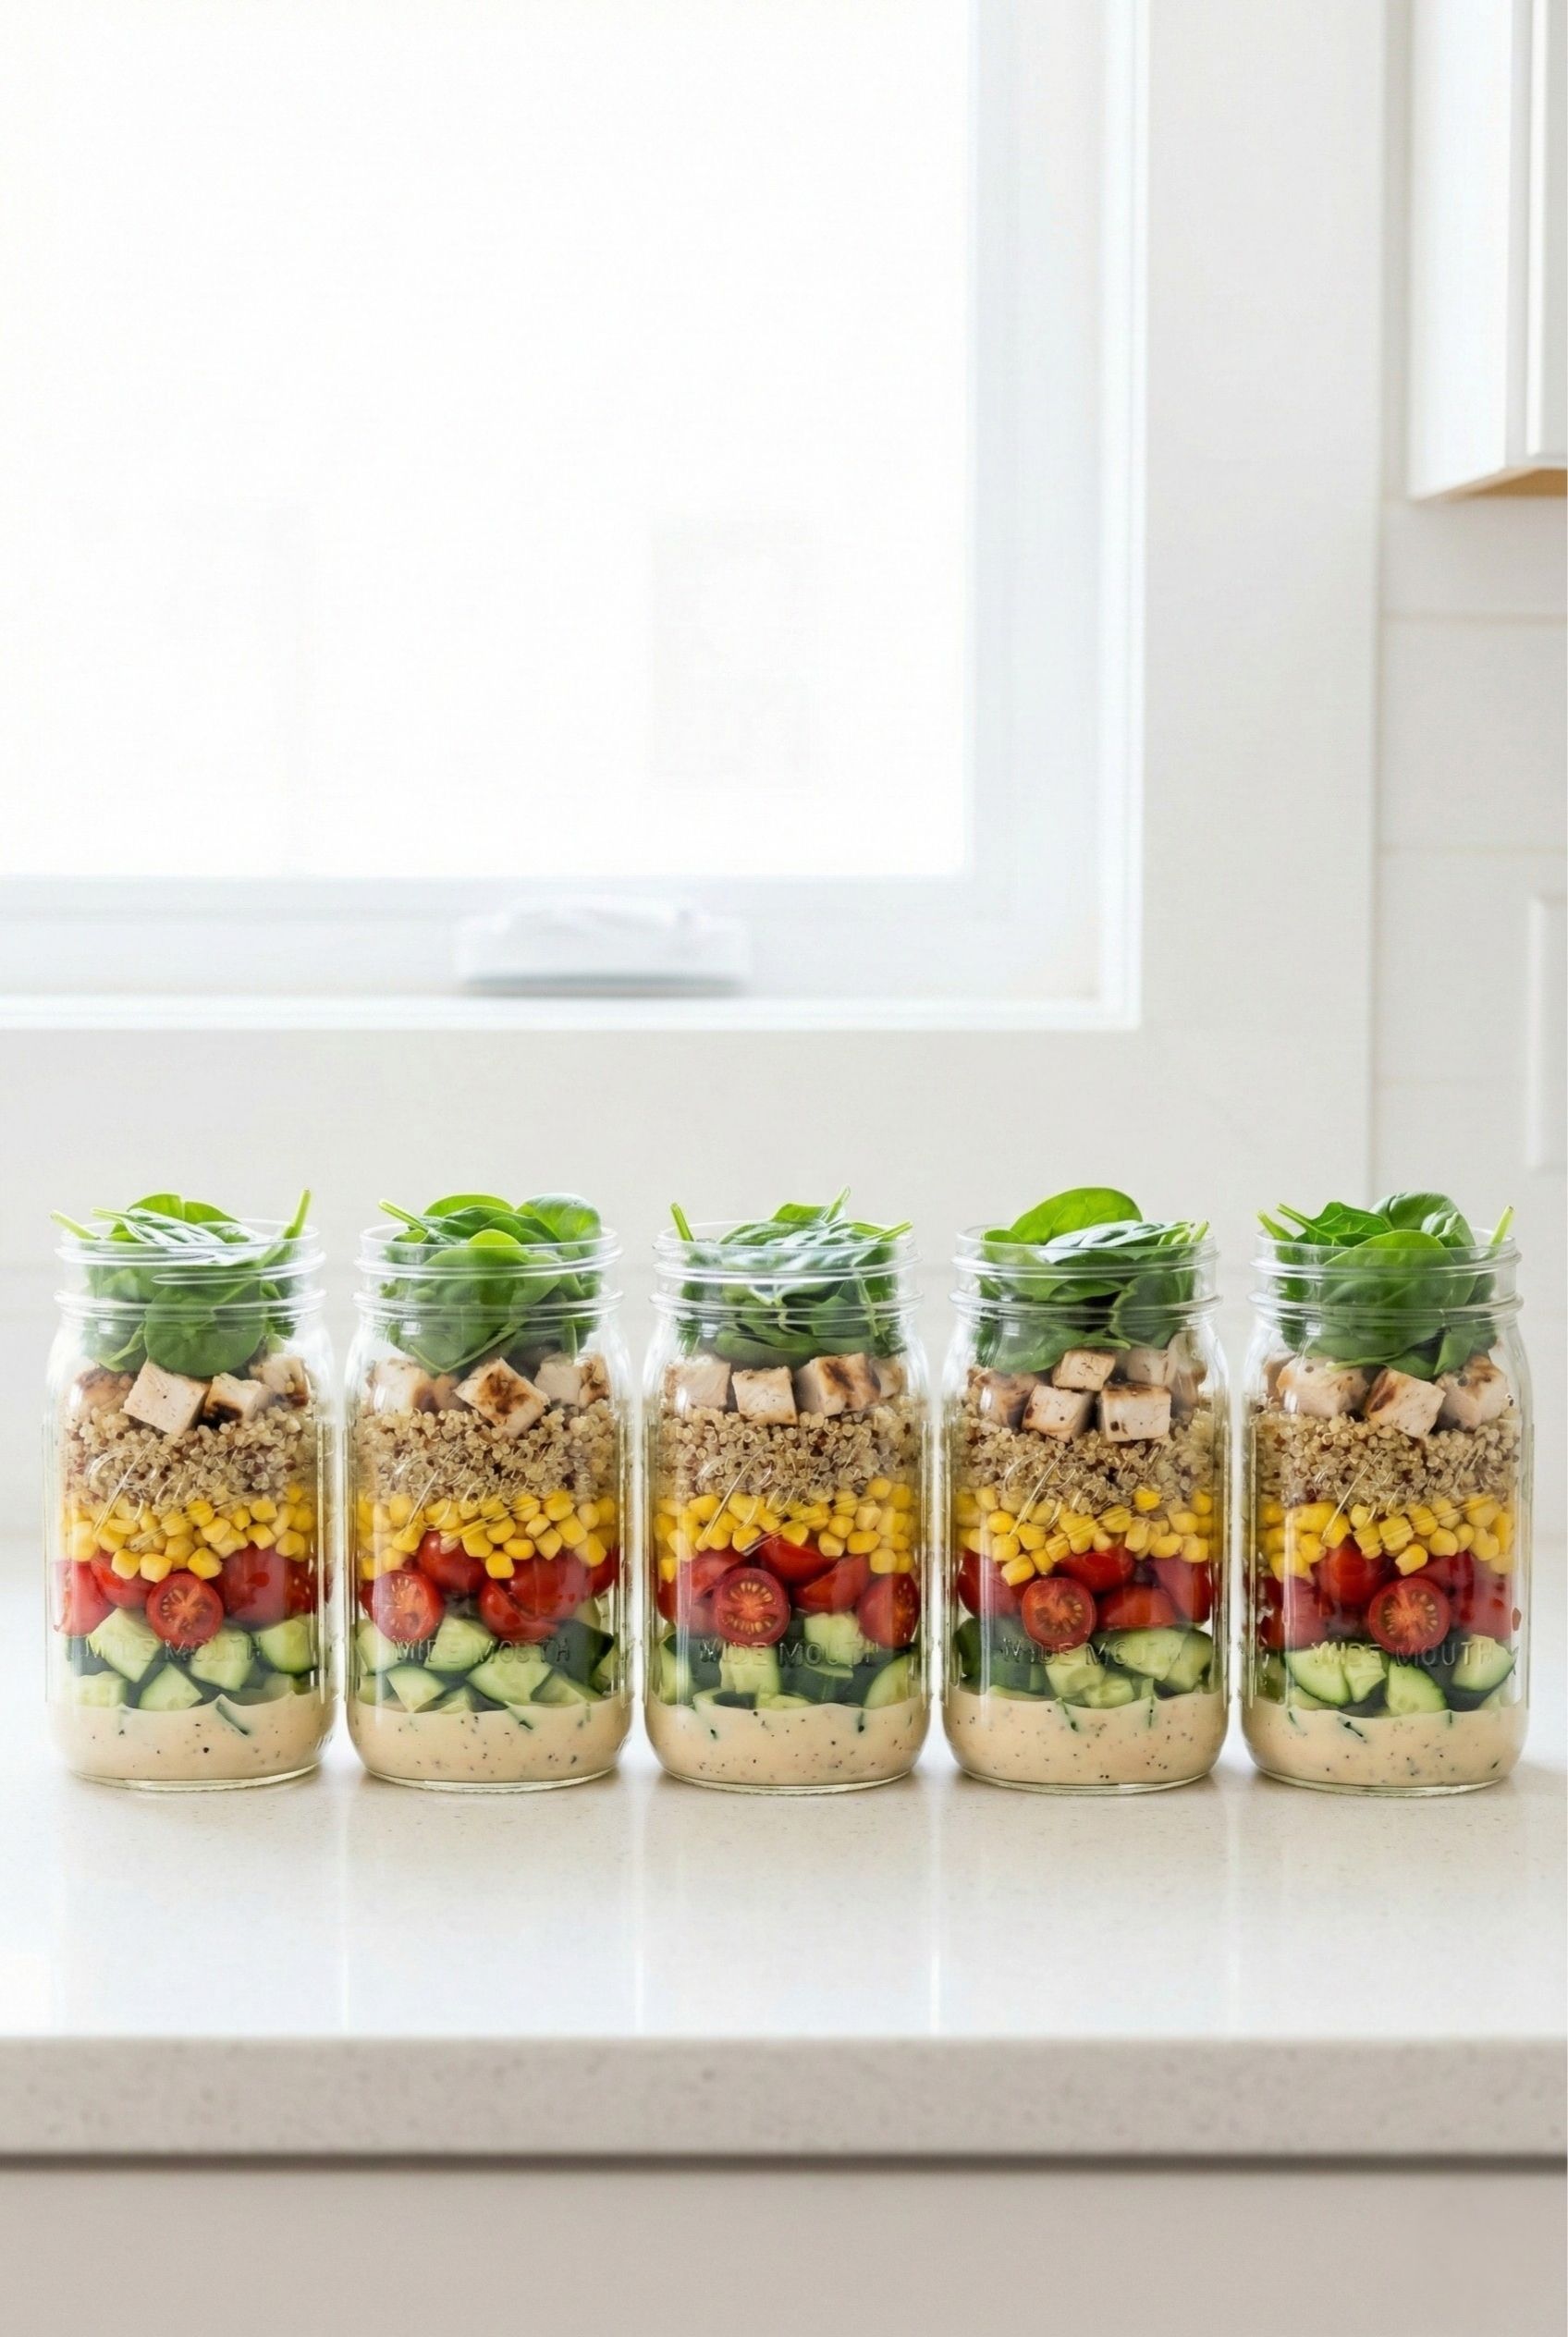
Rainbow Mason Jar Salads
These are the definition of aesthetic meal prep. The key is the layering:
- Dressing on the bottom.
- Hard veggies next (cucumbers, peppers) to marinate.
- Proteins and grains.
- Leafy greens on the very top (so they don’t touch the dressing and get soggy).
- Visual Appeal: When you line up 5 of these in a row on your “Green Zone” shelf, you feel like a professional chef. It makes you want to eat salad.
The Berry Buffet
Wash your berries in a vinegar-water solution (1 part vinegar, 3 parts water) to kill mold spores, dry them thoroughly, and store them in a clear bin lined with a paper towel.
- The Result: A vibrant pop of red and blue that looks like candy. When strawberries look this good, you are less likely to reach for the gummy bears.
Phase 4: Maintenance (The Sunday Reset)
You might be thinking, “Abby, this looks great, but my fridge will look like a disaster again by Wednesday.”
Not if you have a system. I call it the Sunday Reset.
- The Clear Out: Before you go grocery shopping, remove everything. Toss expired items.
- The Wipe Down: Quickly wipe the glass shelves. (A clean shelf reflects light and makes the food look more appetizing).
- The Shop: Buy only what fits in your containers. This sounds restrictive, but it actually prevents food waste.
- The Decant: This is the most important step. Do not put the grocery bags in the fridge. Wash, chop, and transfer to glass containers immediately. If you put the plastic bag of spinach in the drawer, it will rot. If you put it in a container with a paper towel, it will be eaten.
Final Thoughts: It’s About Self-Respect
Creating an aesthetic fridge for weight loss isn’t about vanity. It is an act of self-care. You are telling yourself that you deserve fresh, beautiful, accessible food. You are removing the obstacles between you and your goals.
When you open your fridge and see order instead of chaos, you feel calm. And when you are calm, you make better food choices.
So, toss those takeout containers, invest in some glass, and let’s turn your fridge into your biggest weight-loss ally.
A Note on Health & Safety
While organizing your fridge can support healthy eating habits, always prioritize food safety. Ensure your fridge temperature is set below 40°F (4°C). If storing cut vegetables in water, change the water every 2-3 days to maintain freshness and prevent bacterial growth. Always consult with a healthcare professional before making drastic changes to your diet.