If there is one thing that can derail a weight loss journey, it is the late-night need for something rich, fudgy, and chocolatey. We have all been there. You are doing great with your fasting window, you are hitting your protein goals, and then suddenly, you just want a brownie.
But what if the “brownie” was actually good for you?
This recipe for Frozen Chocolate Banana Berry Fudge (also known as the viral “upside-down” frozen berry bar) is the answer. It is flourless, has zero added sugar, requires no baking, and uses only 4 main ingredients. It’s the perfect bridge between a refreshing fruit sorbet and a dense, rich chocolate fudge.
I saw this concept going viral on social media, but I noticed a lot of people struggling with the aesthetic their fruit would sink, or the bar would turn into a rock-hard ice block. I went into the kitchen to test, perfect, and create the ultimate version for Abby’s Health Series. This version is specifically designed to be high in fiber and volume, making it perfect for anyone on a GLP-1 journey or focused on fat loss.
My “Why” (The Late Night Craving)
I remember staring into my fridge last Tuesday. I’m currently on a mission to get my weight down to 65kg, and I’ve been really disciplined with my eating windows. But I had a stressful day, and the thought of eating another plain apple made me want to scream. I wanted indulgence. And wanted that “snap” of chocolate and that creamy, mouth-coating texture of a truffle.
I didn’t want to break my progress, but I also refused to eat something that tasted like cardboard “diet food.” Then grabbed some over-ripe bananas that were staring at me from the counter and a bag of frozen berries. I realized that if I blended the bananas with enough cocoa, the texture mimicked a ganache. When I froze it? It transformed. And wasn’t just “healthy food” it was genuinely better than the sugary snacks I used to buy. It satisfied the craving instantly, and because it’s so nutrient-dense, one slice was all I needed.
Why This Recipe Works for Weight Loss (The Science)
This isn’t just about low calories; it’s about
- Volume Eating: The base of this recipe is bananas and berries. These are high-water, high-fiber foods. You are getting a massive volume of food for relatively few calories, which triggers the stretch receptors in your stomach to signal “fullness” to your brain faster.
- Resistant Starch: When you freeze bananas (especially green-tipped ones, though we use ripe ones here for sweetness), the starch structure changes. It becomes more “resistant,” meaning your body absorbs fewer calories from it, and it acts as a prebiotic for your gut health.
- The “Chocolate” Dopamine Hit: We use 100% Cocoa Powder and sugar-free dark chocolate. Dark chocolate is rich in magnesium and antioxidants. By using a high-quality cocoa, you satisfy the brain’s desire for “richness” without the insulin spike that comes from white sugar.
User Note: If you are following a strict Keto diet, the bananas make this higher in carbs, but for a general low-calorie or GLP-1 friendly diet, this is perfect.
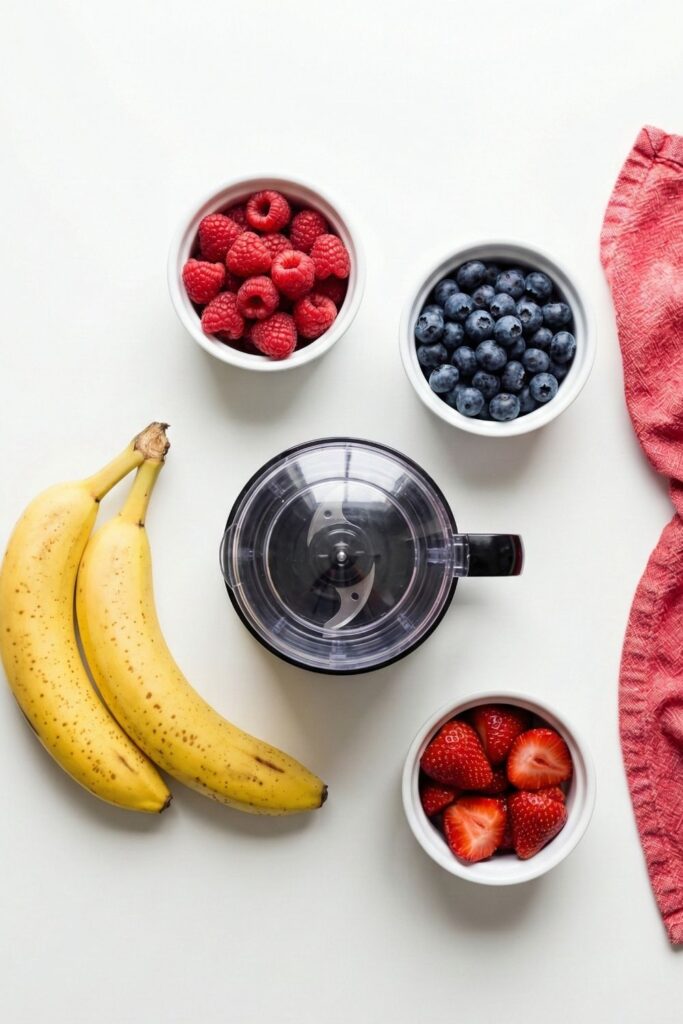
The Equipment You Need (To Get The “Aesthetic”)
To get that viral, professional look I shared in my photos, specific tools help. You don’t need a professional kitchen, but these items make the process seamless.
- A Mini Food Processor: You do not want a massive high-speed blender for this. A mini-chopper works best because it keeps the mixture thick and doesn’t require adding liquid to get the blades moving.
- My Recommendation: Ninja Express Chop or KitchenAid Mini Chopper This creates that thick, pudding-like consistency we need.
- A Rectangular Loaf Pan: This gives you that classic “bar” shape.
- My Recommendation: Standard 9×5 Loaf Pan
- The “Pink” Silicone Spatula: If you want to feel like the video, get yourself a solid silicone spoonula. It scrapes the bowl perfectly clean so you don’t waste any chocolate.
- My Recommendation: Heat-Resistant Silicone Spatula Set.
- Parchment Paper: Essential. If you don’t use this, your fudge will stick to the pan and break when you try to flip it.
- A Stone Serving Tray: For that beautiful presentation when you serve it to guests (or just yourself!).
- My Recommendation: Beige Travertine or Marble Serving Tray
The Ingredients
We keep it simple, clean, and whole-food based.
- 2 Large Ripe Bananas: The browner the spots, the better. This is your sweetener. If your bananas are green, the fudge will taste bland and starchy.
- 4 Tablespoons Melted Sugar-Free Dark Chocolate: This provides the “snap” and helps the fudge set solid in the freezer.
- My Pick: [Hu Kitchen Gems or Lily’s Sugar-Free Chocolate Chips].
- 1 Tablespoon High-Quality Cocoa Powder: This bumps up the chocolate intensity without adding fat.
- My Pick: [Rodelle Dutch Processed Cocoa] (Dutch-processed is less acidic and darker).
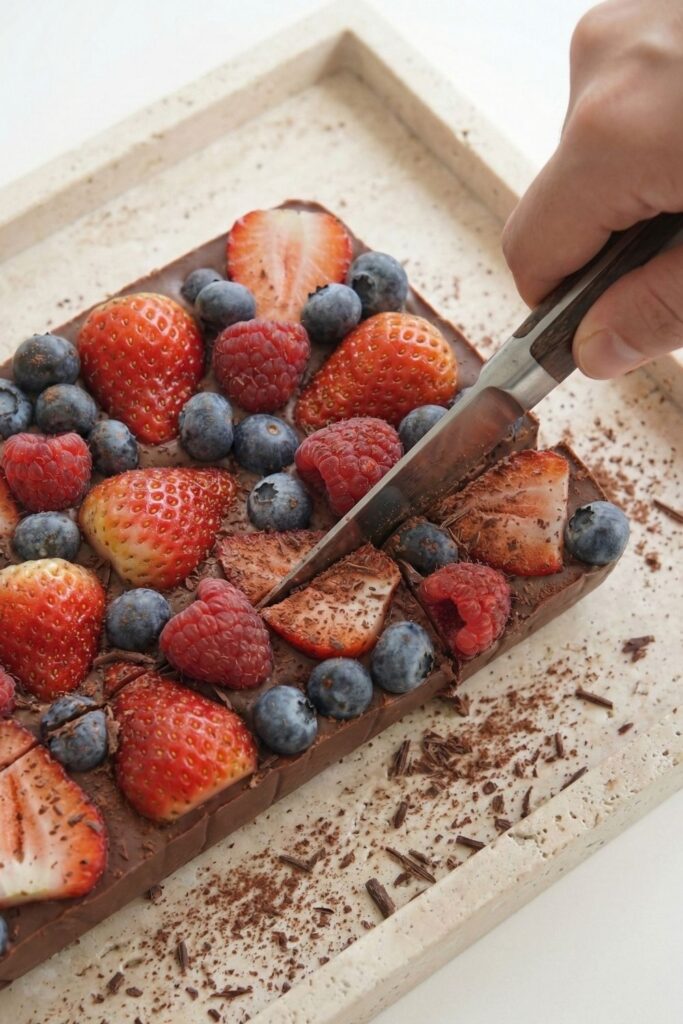
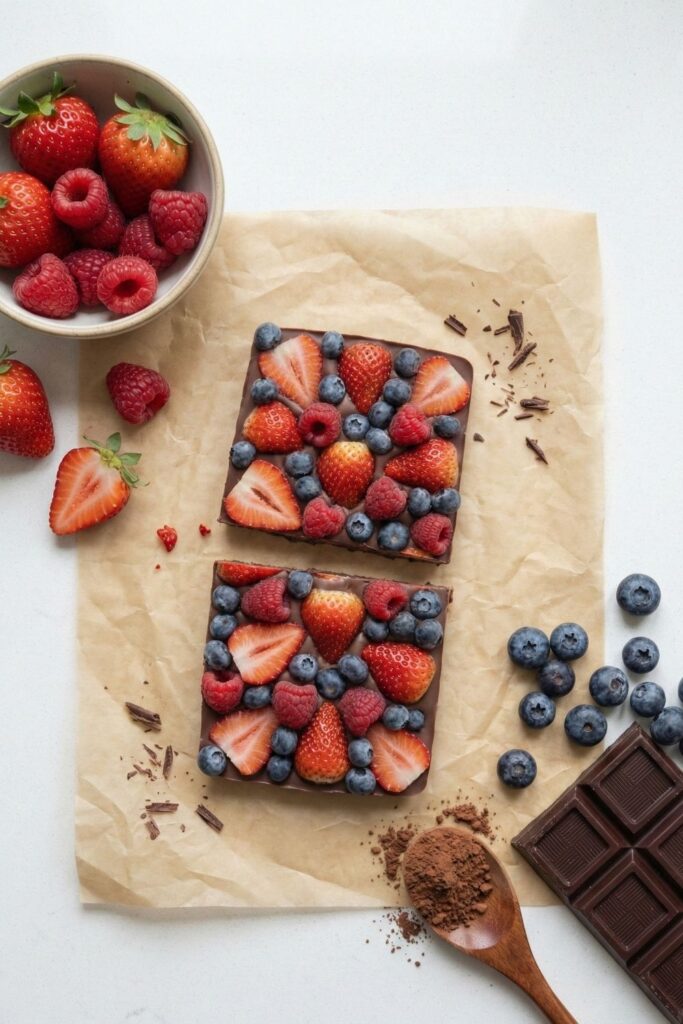
- Fresh Berries (Strawberries, Blueberries, Raspberries): These add acidity to cut through the rich chocolate.
- Tip: Use fresh fruit for the layering, not frozen. Frozen fruit releases too much water when thawing and can make the bar icy.
Optional Protein Boost:
- Want to turn this into a post-workout meal? Add 1 scoop of [ Unflavored Whey Isolate or Chocolate Collagen Peptides] into the blender. You may need to add a splash of almond milk if it gets too thick.
Step-by-Step Instructions (With Pro-Tips)
Follow this exact order to get the “Inverted” look where the fruit is perfectly embedded in the top.
Step 1: The “Upside Down” Prep
Line your loaf pan with parchment paper. Leave some paper hanging over the edges these are your “handles” to lift the bar out later.
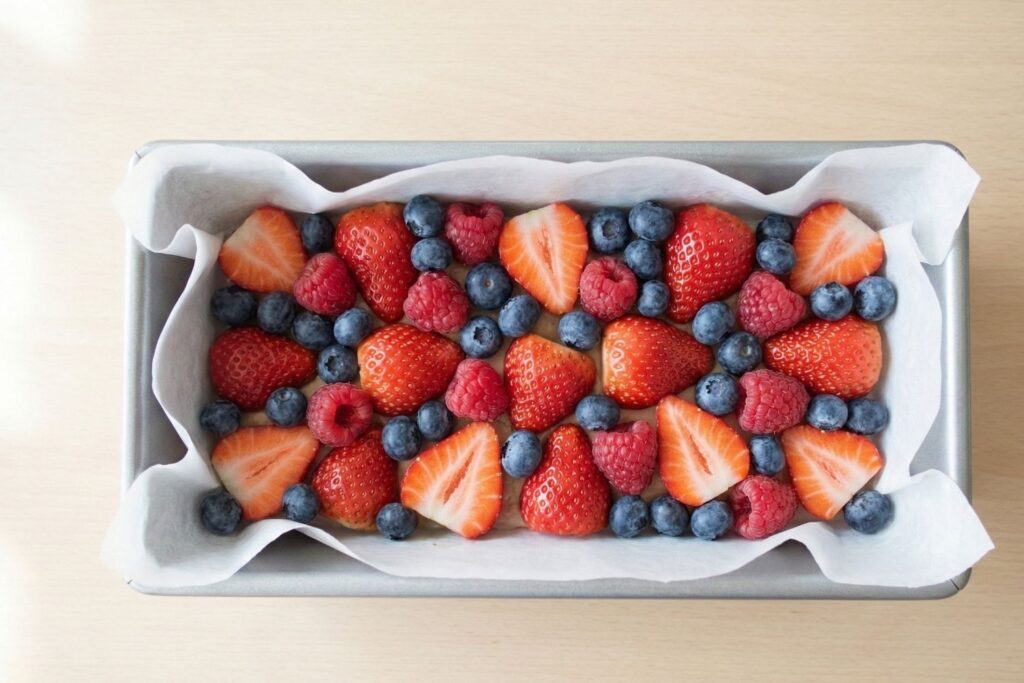
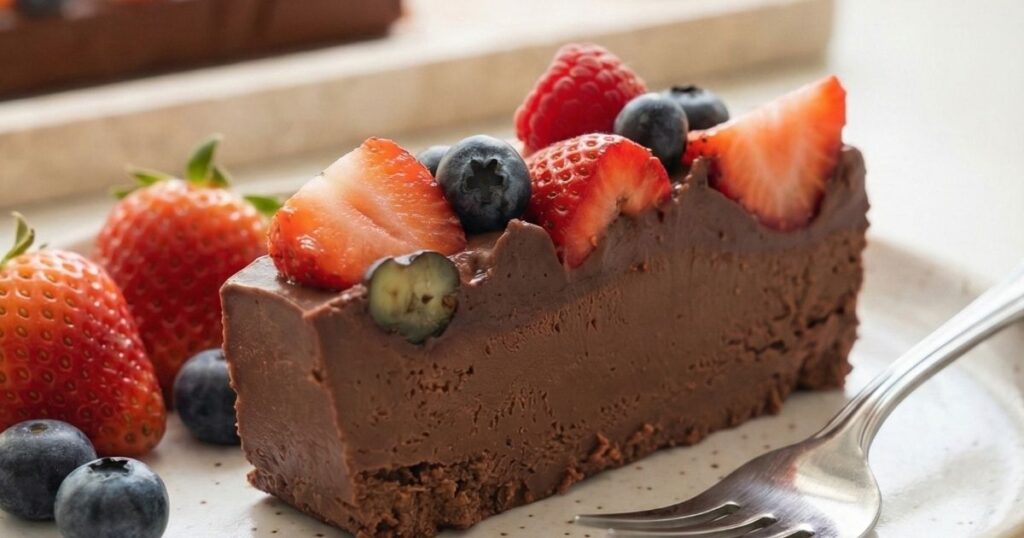
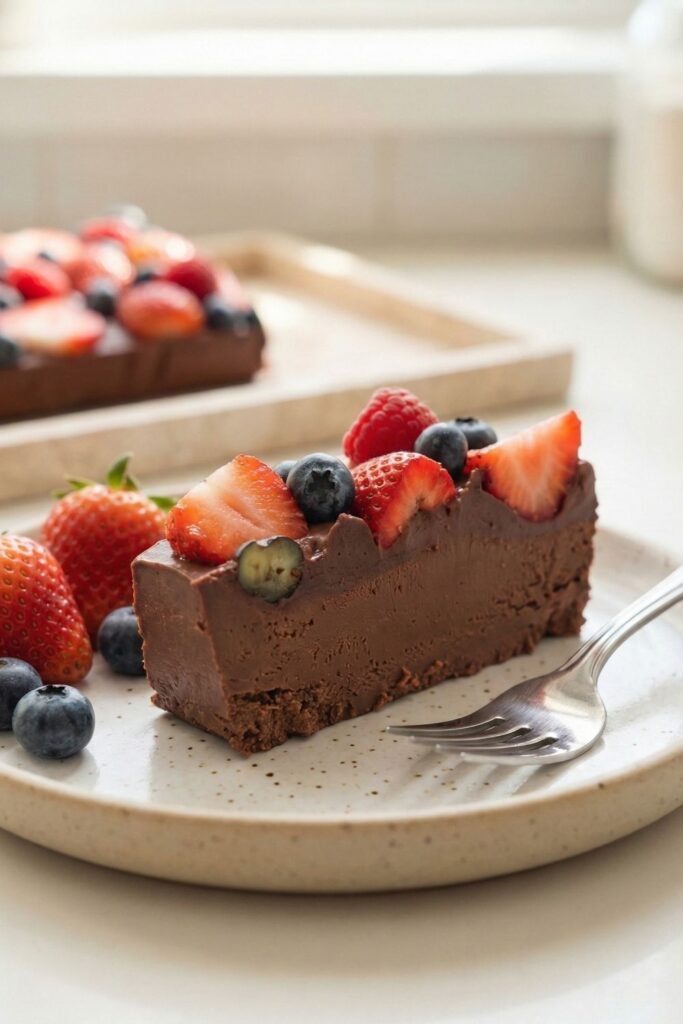
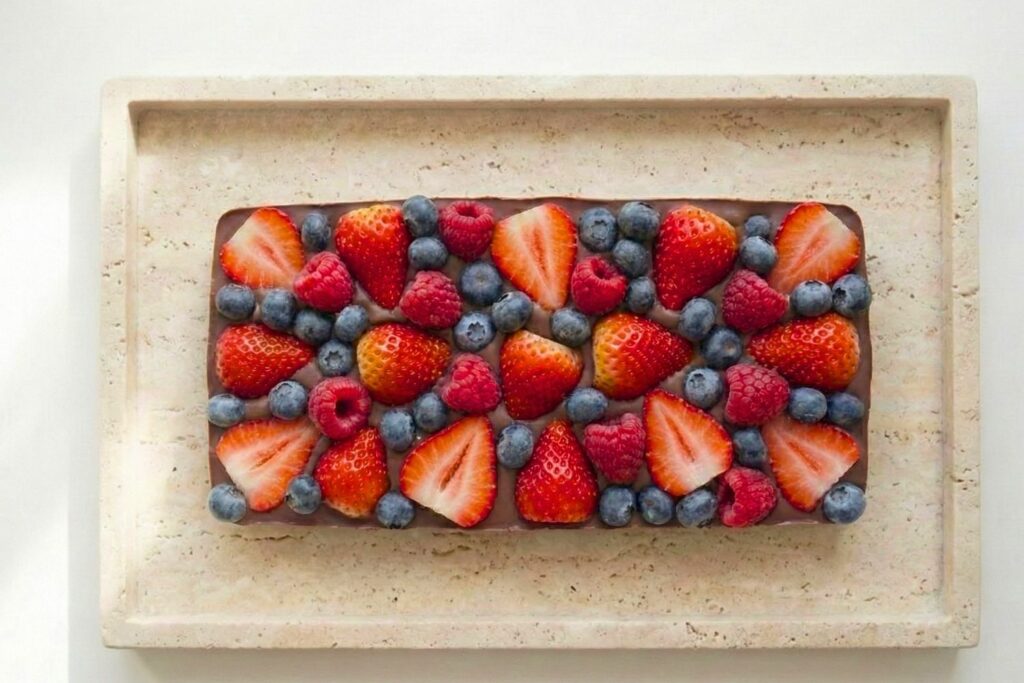
- Crucial Step: Place your strawberries (cut in half), blueberries, and raspberries at the bottom of the pan. Place the cut side of the strawberries flat against the paper. This ensures that when we flip it over, you get that smooth, flat, professional surface.
Step 2: Create the “Batter”
In your mini food processor, combine the bananas, cocoa powder, and melted chocolate.
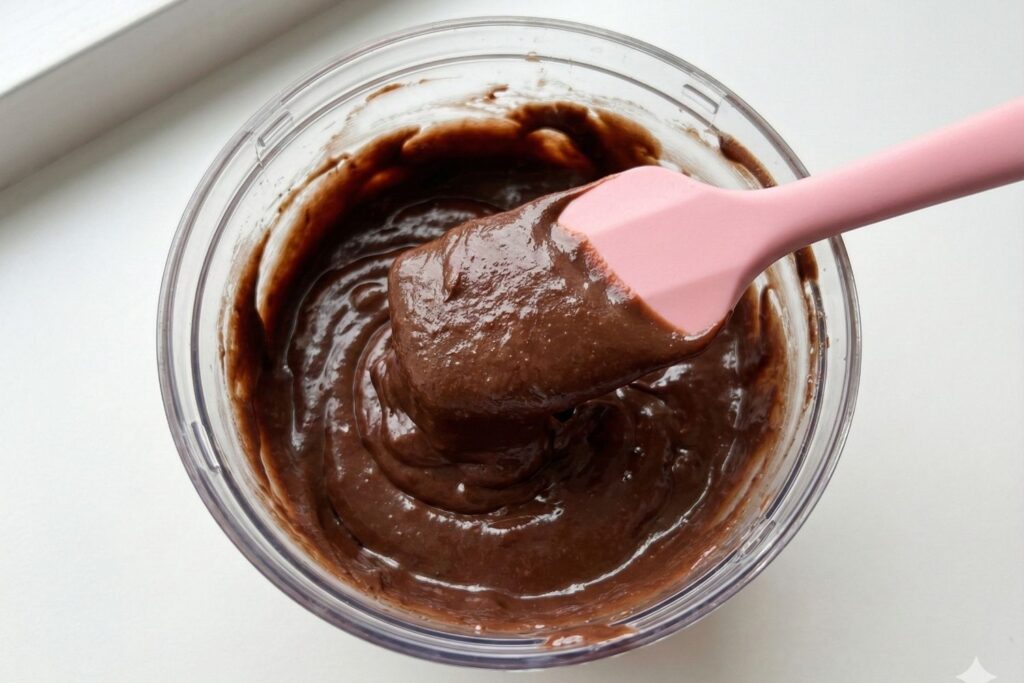
- Texture Check: Pulse it. Do not just let it run on high. You want a thick, glossy puree that looks like cake batter or chocolate mousse. If it is watery, your bananas might have been too large add a teaspoon more cocoa powder to thicken it.
Step 3: The Assembly
Pour the chocolate banana mixture directly over the fruit in the pan. Use your spatula to gently spread it into the corners.
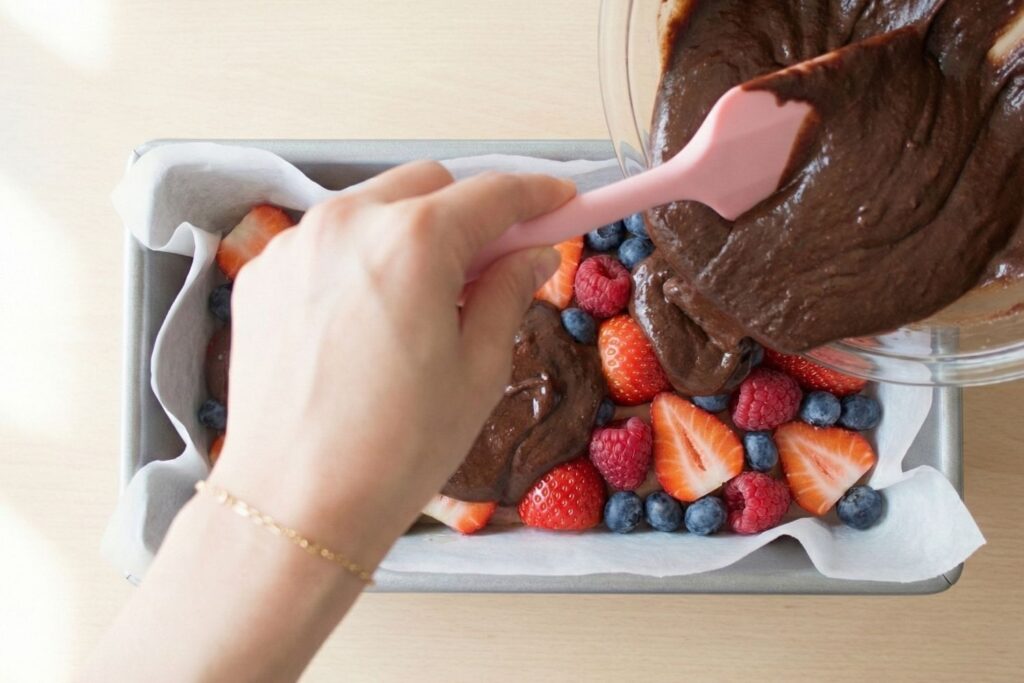
- Pro-Tip: Tap the pan on the counter 3 times. This pops any air bubbles trapped between the berries and the chocolate, ensuring a smooth finish.
Step 4: The Freeze (Patience Required!)
Place the pan on a flat surface in your freezer.
- Time: Freeze for at least 3 to 4 hours. Warning: If you try to take it out after 1 hour, it will be soft in the middle and won’t slice cleanly.
Step 5: The Reveal
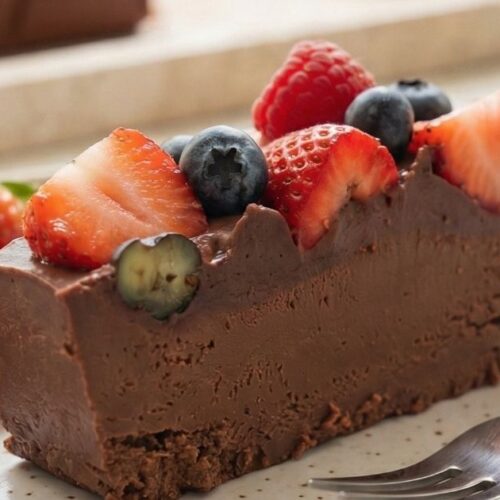
Remove from the freezer. Lift the bar out using the parchment paper handles. Flip it upside down onto your serving board and peel off the paper. This is the magic moment the fruit will look like beautiful jewels embedded in the dark chocolate.
Taste & Texture Test
I know what you are wondering: Does it taste like a banana?
Honestly, the banana flavor takes a backseat. Because we use melted dark chocolate and cocoa powder, the dominant flavor is deep, rich truffle.
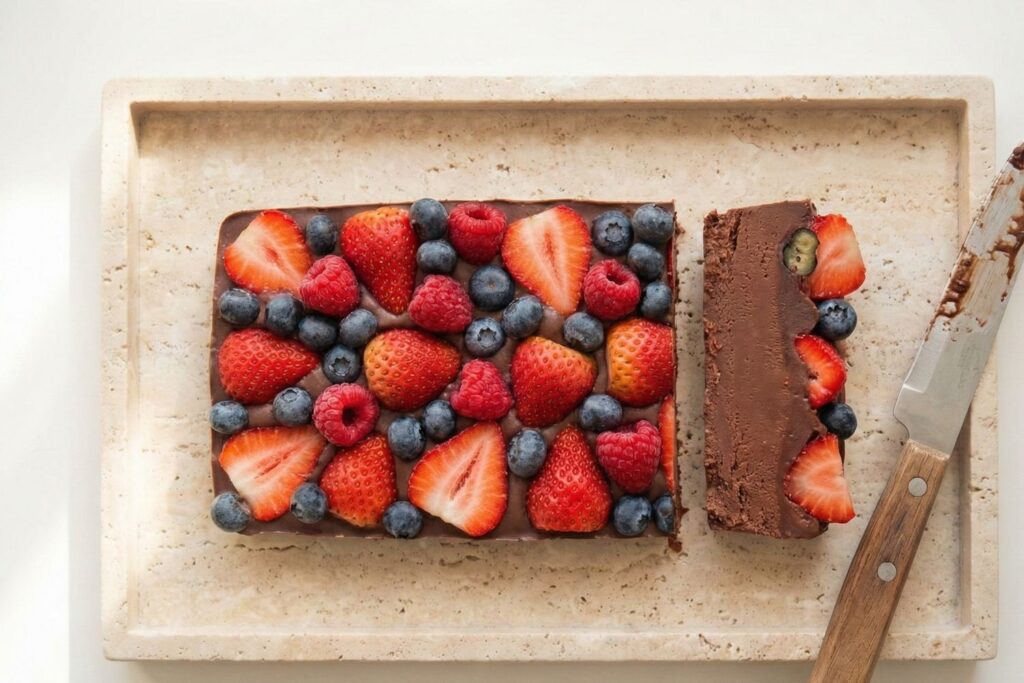
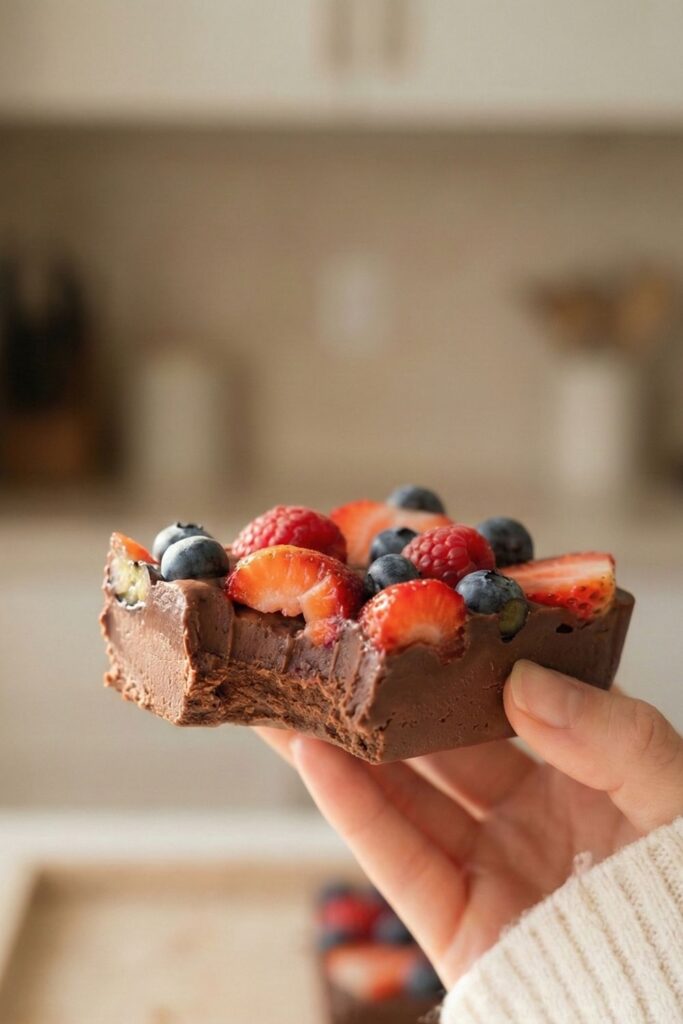
- The Texture: When you first bite into it, there is a distinct “snap” from the frozen fruit and the outer chocolate layer. Then, it melts immediately. It’s not icy like a popsicle; it’s creamy and dense, almost like a frozen cheesecake or a very thick fudge. The strawberries freeze, but because of their sugar content, they don’t turn into rocks they turn into little pockets of sorbet. The contrast between the bitter dark chocolate and the sweet-tart berries is sophisticated and addictive.
Frequently Asked Questions (FAQ)
I don’t recommend it. Frozen fruit tends to “bleed” liquid as it sits in the chocolate mix, which can make the texture icy rather than creamy. Stick to fresh fruit for the mold, but you can use frozen berries for a smoothie on the side!
This can stay in your freezer for up to 2 weeks (if you don’t eat it all first!). I recommend slicing it into individual squares and wrapping them in parchment paper, then storing them in a Ziploc bag. This makes it a perfect “grab-and-go” snack.
Bananas are generally not Keto-friendly due to the natural sugars. However, for a standard low-carb or GLP-1 diet, the fiber content makes this a great choice. If you are strict Keto, you can swap the bananas for avocados and add a keto-friendly sweetener like Monk Fruit.
If you don’t have a strong food processor, mash the bananas with a fork until they are a complete liquid puree before mixing in the cocoa and chocolate. It takes a bit more elbow grease, but it works!
Final Thoughts
This Frozen Chocolate Banana Berry Fudge is proof that you do not need to give up desserts to reach your body goals. It is aesthetic, delicious, and functionally good for your hunger levels.
If you try this recipe, please take a photo and tag me on Instagram or Pinterest! I love seeing your recreations. And don’t forget to pin this recipe to your “Healthy Desserts” board so you can find it next time that late-night craving hits.
Disclaimer: I am a wellness blogger, not a doctor. Always double-check with your healthcare provider regarding specific dietary needs, especially if you are managing insulin levels or taking GLP-1 medications.
Frozen Chocolate Banana Berry Fudge (No-Bake)
Equipment
- Mini Food Processor / Chopper
- Rectangular Loaf Pan (9×5 inch)
- Parchment paper
- Silicone spatula
Ingredients
The Fruit Base:
- 1/2 cup Fresh Strawberries hulled and sliced in half
- 1/4 cup Fresh Blueberries
- 1/4 cup Fresh Raspberries
The Chocolate Fudge Batter:
- 2 large Ripe Bananas Look for brown spots for natural sweetness
- 4 tbsp Sugar-Free Dark Chocolate Chips melted (Recommended: Lily’s or Hu Gems)
- 1 tbsp Cocoa Powder Dutch-processed preferred
- 1 pinch Sea Salt Optional, enhances chocolate flavor
Optional Boosts:
- 1 scoop Unflavored Whey Protein Isolate For high protein
Instructions
- Prep the Mold: Line a small rectangular loaf pan with parchment paper. Ensure there is paper hanging over the edges (these act as handles later).
- Layer the Fruit (The Inversion): Place the halved strawberries (cut-side down), blueberries, and raspberries closely together at the bottom of the pan. This will be the top of your bar.
- Blend the Batter: In a mini food processor, combine the ripe bananas, cocoa powder, and melted sugar-free chocolate. Pulse until the mixture is thick, glossy, and smooth (like a mousse).
- Assemble: Pour the chocolate banana mixture over the arranged fruit. Use a silicone spatula to spread it evenly into the corners and smooth the top. Tap the pan on the counter 3 times to remove air bubbles.
- Freeze: Place the pan on a flat surface in the freezer for at least 3 to 4 hours until solid.
- Serve: Remove from the freezer. Use the parchment handles to lift the bar out. Flip it upside down onto a serving tray and peel off the paper to reveal the fruit. Slice into 8 squares.
Notes
- Texture Tip: Let the bar sit at room temperature for 2–3 minutes before slicing. This prevents the chocolate from cracking and makes cutting easier.
- Storage: Store leftovers in an airtight container in the freezer for up to 2 weeks. Separate slices with parchment paper so they don’t stick together.
- Protein Option: If adding protein powder, the mixture may become too thick. Add 1 tsp of almond milk at a time until it blends smoothly.
- Banana Ripeness: Do not use green bananas! They are too starchy and will not freeze into a creamy texture. Use spotty, brown bananas.