The $18 "Emergency" High-Protein Pantry Prep (Shelf-Stable)
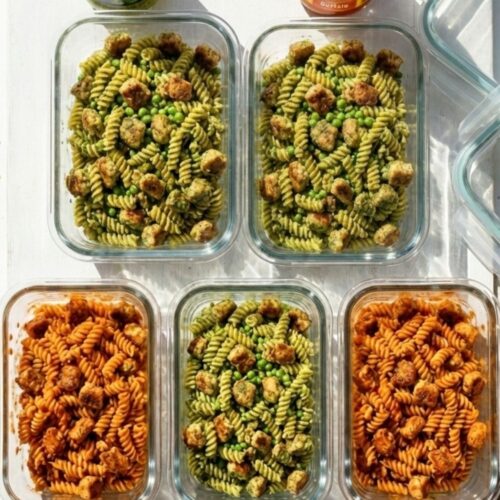
This 5-day "Emergency Pantry Prep" requires zero fresh ingredients and costs less than $4 per serving. By using shelf-stable staples like canned chicken and pasta, you get a high-protein (30g) lunch that requires no grocery shopping. This recipe features a "Two-Way Split" method, giving you 3 Creamy Pesto bowls and 2 Spicy Buffalo bowls from a single batch.
Equipment
- Large Pot (for boiling pasta)
- Colander
- Non-Stick Skillet
- Glass Meal Prep Containers
- Food Scale
Ingredients
The Pantry Staples
- 2 cans 12.5 oz each Swanson Premium White Chunk Chicken (Drained)
- 1 box 16 oz Barilla Rotini Pasta
- 1 can 15 oz Sweet Peas (Drained)
- 1 tsp Garlic Powder
- 1/2 tsp Black Pepper
- Cooking Spray or Olive Oil for sautéing
The "Two-Way" Sauces
- 1 jar 6.5 oz Barilla Rustic Basil Pesto (Use the whole jar)
- 1/3 cup Frank's RedHot Buffalo Wing Sauce or more to taste
Instructions
Phase 1: The Base
- Boil the Pasta: Bring a large pot of salted water to a boil. Add the entire 16 oz box of Rotini pasta. Cook according to package instructions for "Al Dente" (usually 8-9 minutes).
- The Veggie Hack: When there are exactly 2 minutes left on the pasta timer, pour the drained can of Sweet Peas directly into the boiling water with the pasta. This warms them through without making them mushy.
- Drain: Pour the pasta and peas into a colander. Shake off excess water and set aside in the large pot (heat off).
Phase 2: The Protein Transformation
- . Drain & Dry: Open BOTH cans of chicken. Drain the packing water thoroughly. Pro Tip: Press down on the chicken with a paper towel to remove excess moisture.
- Sear the Chicken: Heat a non-stick skillet over medium-high heat with a spray of oil. Add the drained chicken.
- Season: Sprinkle with garlic powder and black pepper. Sauté for 3-5 minutes without stirring too often. You want the edges to turn golden brown and crispy. This removes the "canned" flavor.
Phase 3: The "Two-Way" Split
- Divide the Batch: Get two large mixing bowls. * Bowl A (Pesto): Add about 60% of the pasta/pea mixture and 60% of the seared chicken. * Bowl B (Buffalo): Add the remaining 40% of the pasta and chicken.
- Sauce It: * For Bowl A: Pour in the entire jar of Basil Pesto. Toss until creamy and coated. * For Bowl B: Pour in the Buffalo Sauce. Toss to coat.
Phase 4: Assembly
- Pack: Divide the Pesto Pasta into 3 meal prep containers. Divide the Buffalo Pasta into 2 containers.
- Cool: Let the food cool completely before snapping the lids on to prevent condensation. Store in the fridge for up to 5 days.
Notes
- Storage: These meals stay fresh in the fridge for 5 days. The Pesto version actually improves in flavor on Day 2 and 3 as the oil marinates the pasta.
- Reheating: Microwave for 90 seconds. If the pasta looks dry, sprinkle a teaspoon of water over it before heating to steam it back to life.
- Cold Option: Both flavors work excellent as a cold "Pasta Salad" if you don't have access to a microwave.
- The "Canned" Taste: Do not skip the searing step! Sautéing the chicken is the secret to making the texture resemble rotisserie chicken.
- Gluten-Free Swap: You can swap the Rotini for Chickpea Pasta (like Banza), but this will slightly increase the grocery cost.